Spring Motor Rolling Chassis Version 2


Spring Motor Rolling Chassis Version 2
Published 2017-03-27T18:40:15+00:00
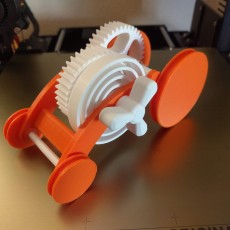
An updated version of my earlier design, this version includes stronger spring and gears, weaker pawl, and o-ring tires for traction. The first photograph is of the actual prototype. The second photograph is a screen grab of the cad version. The final photograph is of JersyBeast's knob (see UPDATES below).
Assembly video is here: https://www.youtube.com/watch?v=q_Jom7imnNw.
Video of prototype run is here: https://www.youtube.com/watch?v=zo1t8SiTtTM.
Video of JersyBeast's knob (see UPDATES below) is here: https://www.youtube.com/watch?v=vIy25mTT5O0.
You will need to purchase two #18 o-rings (1 3/16" O.D., 15/16" I.D., 1/8" diameter) and two #111 o-rings (2 1/2" O.D., 2 1/8" I.D., 3/16" diameter), which are available on line, and at plumbing supply / box stores.
Designed using Fusion 360, sliced using Cura 2.3.1, and printed in PLA on an Ultimaker 2+ Extended and Ultimaker 3 Extended.
UPDATES:
1) Thingiverse member JersyBeast requested an "easier on the fingers" knob design and even provided a suggested for the new design. So I have implemented JersyBeast's suggestion and uploaded the result as "Knob and Axle (1).stl". I have not tested it yet, but I recommend printing it at 100% infill, and be very careful not to over-torque the spring using it as the spring or "Chassis Left.stl" axle could snap. @JersyBeast, hope your fingers get better!
2) Printed, tested and uploaded photograph and video of JersyBeast's knob.


Print two each of "Axle.stl", "Wheel.stl" and "Wheel Rear.stl", one each of the remaining parts.
Print "Chassis Left.stl", "Chassis Right.stl", "Knob and Axle.stl" and "Spring.stl" at 100% infill, print remaining at 50% infill.
Prior to assembly, test fit and trim, file, sand, etc. all parts as necessary for smooth movement of moving surfaces, and tight fit for non moving surfaces. Depending on the colors you chose and your printer settings, more or less trimming, filing and/or sanding may be required.
Study "Assembly.stl".
I assembled my Spring Motor Rolling Chassis Version 2 as follows:
1) Slide "Knob and Axle.stl" into "Chassis Left.stl", then press "Spring.stl" and "Pawl.stl" onto "Knob and Axle.stl".
2) Slide "Gear Pawl.stl" onto "Knob and Axle.stl".
3) Slide "Gear Spur.stl" onto the axle on "Chassis Left.stl".
4) Press "Chassis Right.stl" onto "Chassis Left.stl".
5) Press one "Axle.stl" onto one "Wheel.stl", then slide into position through "Chassis Left.stl" and "Chassis Right.stl", and secure with remaining "Wheel.stl". Make sure the wheels and axle spin freely.
6) Press "Gear Spur Small.stl" onto the remaining "Axle.stl" in the position shown.
7) Insert the small spur gear and axle assembly into the chassis assembly as shown, then press one each of "Wheel Rear.stl" onto each end of the axle. Make sure the wheels rotated freely.
8) Install one each of #18 o-ring onto "Wheel Front.stl", then one each of #111 o_ring onto "Wheel Rear.stl".
9) Apply light machine oil onto all moving contact surfaces.
We built a few of of these to race, they accelerate rapidly thanks to the beefier spring, and run anywhere between 30 to 50 feet depending upon the lubrication and break in.
Hope you like it!
| Date published | 27/03/2017 |
| Technology | FDM |

This is an awesome design. I didn't expect the PLA spring to work as well as it does! I am getting some skipping in the first gear stage. It seems like there is a bit too much play and the gears can disengage. Otherwise, great model! My 1 year old son loves chasing it down the hall.