Micro:Racing


Micro:Racing
Published 2016-02-08T11:44:25+00:00
TUTORIAL
This tutorial will show you how to easily build your own car racing game using 3D printing and the BBC Micro:bit.
You will need :
-
1 BBC micro:bit
-
1 coin cell battery 3V + 1 coin cell holder
-
1 3D printer + filament
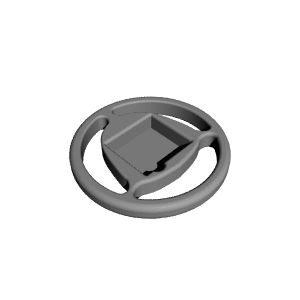
Step 1 : Print the wheel
Simply download the STL file of the wheel on this page.
Next, you will have to slice the parts. That means to generate a code, representative of your 3D part which your printer will be able to understand. This action is called “slicing” because your printer prints layer by layer and the software needs to calculate the path that the printer's nozzle will follow. Make sure to use the appropriate slicer for your 3D printer, ask your teacher if you need help!
Here are the settings for printing your wheel : speed at 70 mm/s, 0.2mm layer height, 10% infill, temperature between 200ºC and 240ºC. This design is support free !
Step 2: Flash your micro:bit
There are two versions of the racing game. You can download the codes by clicking on the link below or on the zip file on this page. The programs are explained in the appendix attached.
Click on “Compile” to download the code on your computer. Then, drag and drop the file into the micro:bit icon on your computer section.
Version 1: https://www.microbit.co.uk/jaynsnytym
After the countdown push A to move left and B to move right in order to avoid the obstacles. Push the reset button at the back of the micro:bit to play again.

Version 2: https://www.microbit.co.uk/zipeuqtzob
It is the same game but instead of using the buttons to move, you have to turn your wheel like a real driver:

LOOK OUT! Because the micro:bit uses the compass, at the beginning of a new game, you will to calibrate the device by drawing a circle by moving the micro:bit.
Enjoy!


| Date published | 08/02/2016 |