Skip to content

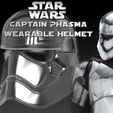
Captain Phasma Wearable Helmet

Advertising
Advertising
?
Creation quality: 5.0/5 (1 vote)
Evaluation of members on the printability, utility, level of detail, etc.

  • 11.2k views
  • 50 likes
  • 1k downloads
  • 1 collection

License
3D design format
ZIP Folder details Close
  • files.zip

Learn more about the formats

Last update 2016-12-14 at 19:51
Publication date 2016-12-13 at 15:15
Design number 8353

3D printer file info

3D model description

Update 17/2/2016
thanks Maso27 for the input, he was right - the section above the ear needs to be more square instead of rounded like the Storm Trooper helmet. You can do this yourself with some putty when finishing if you've already made or started making it - but I will update the files for those who haven't. It's a minor detail but if you are trying to get screen-accurate, it's important :p

Update 16/2/2016
Full Helmet uploaded in one piece. Watermark added.

Well, as little time as Captain had on screen, it was a pretty cool outfit.
It took a while to get even close to being happy with the detailing on it... but even now I think it needs more, but at least what I learned from this I can go back and apply to the storm trooper helmet, most notably the cheek texturing.

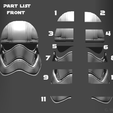
Sizing and assembly Part numbers are in the images.

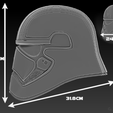
Pieces are cut to fit on a Replicator 2 or above print area.
No parts are over 20cm wide, no deeper than 14cm and no parts are over 14cm tall.

20 Parts, only 18 necessary. Parts 5 and 6 are optional visor inserts for display helmets.

The sizing on this should fit most heads, I scaled it to be just slightly bigger than the Ep7 first order helmet.

Happy printing and as always, may the force be with you.

No derivatives are to avoid others uploading copies and those being sold without disclaimer.

Created in blender in about 2-3 days slowly working on it. I took the original low poly start for my other Ep7 storm trooper helmet, cut it in half, mirrored it, shined all the details out, put the new ones, then stretched it and pulled it until it was as close to the shape as I could get.

The image below is what it looked like before it got detailed.

3D printing settings

Rafts:
Doesn't Matter

Supports:
Yes

Resolution:
0.2 to 0.3

Infill:
5% to 10%

Notes:
I would use 2 shells myself at 0.2 or 0.3mm.
Nearly all the parts will print without support - with exception parts 3 & 4

Parts 3 and 4:
Don't flip them upsidown, I plated them the way they are will use very very little support. If you flip them, it will increase the print time by a couple hours and make a tonne of support - trust me.

Advertising


Issue with this design? Report a problem.

Would you like to support Cults?

You like Cults and you want to help us continue the adventure independently? Please note that we are a small team of 3 people, therefore it is very simple to support us to maintain the activity and create future developments. Here are 4 solutions accessible to all:

  • ADVERTISING: Disable your banner blocker (AdBlock, …) and click on our banner ads.

  • AFFILIATION: Make your purchases online by clicking on our affiliate links here Amazon.

  • DONATE: If you want, you can make a donation via Ko-Fi 💜.

  • WORD OF MOUTH: Invite your friends to come, discover the platform and the magnificent 3D files shared by the community!


Sharing and downloading on Cults3D guarantees that designs remain in makers community hands! And not in the hands of the 3D printing or software giants who own the competing platforms and exploit the designs for their own commercial interests.

Cults3D is an independent, self-financed site that is not accountable to any investor or brand. Almost all of the site's revenues are paid back to the platform's makers. The content published on the site serves only the interests of its authors and not those of 3D printer brands who also wish to control the 3D modeling market.
100% secure payment by credit card, PayPal, Apple Pay, Google Pay, etc.
View all payment options.