
Prints (0)
-
No Prints Yet
Be the first to upload a Print for this Design!
Description
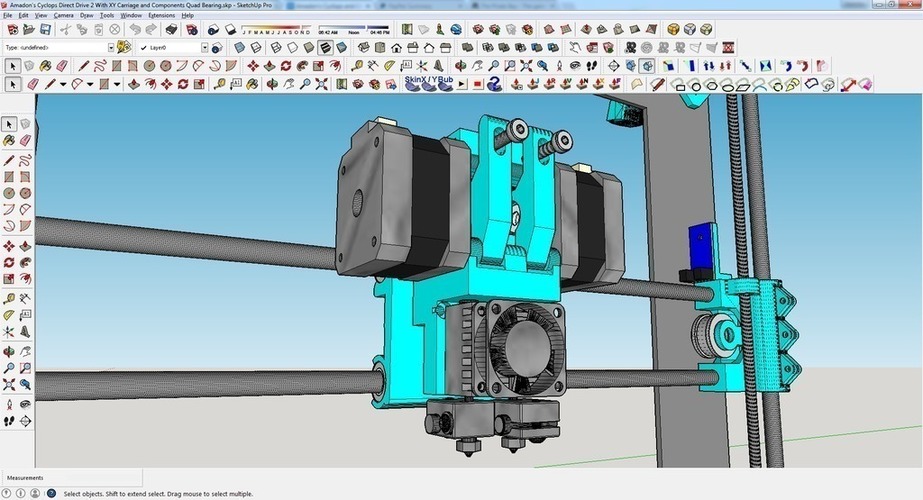
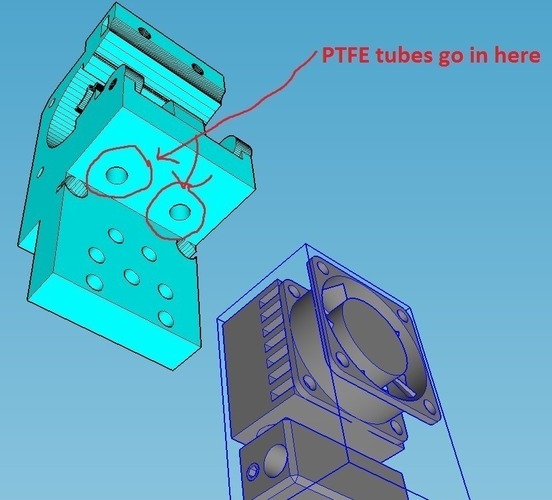
SummaryEDIT: 6/28/16 Added a V4 of the extruder body. The only difference is the holes for the PTFE tubing go all the way through so you can just make your own cutout for the drive gear, instead of worrying about making the tube the exact length. EDIT 6/6/16 Added new version of the idlers These new idlers have support for the bearings on both sides so it can't bend over and lose clamping pressure on the filament. There's a 0.4mm thick support material built in that you must cut out. No support needed from your slicer. Use a washer on BOTH sides of the roller bearing. Low profile nut of course. The flat side of the idlers should face towards the motors. Slightly raised sides towards the center. Put the nut on the motor side. I used to have a complete printer here, but the title made no sense so that is now published separately here: http://www.thingiverse.com/thing:1259225/ This is an updated and more reliable version of my thing seen here: http://www.thingiverse.com/thing:961555 The primary difference between this and V2 is that you don't cut the PTFE tubes off flush with the top of your cold end. They extend up into the extruder body just below where the gear feeds the filament through the hole. This provides less bind points since now your extruder top doesn't have to line perfectly up with the bottom of the body itself. The PTFE tubes in my print of this extruder are 47mm long, but when you first assemble this, cut the two PTFE tubes to about 50mm long and try to put the cold end on. If they are too long trim off about 1mm and try again. Repeat until your PTFE tubes are exactly the right length so they are snug but still let the holes on the back of your cold end match up with the printed extruder body. TIP: Don't make the PTFE TOO snug. If you do, the part that contacts at the bottom of the PTFE tube is resting on a U shaped reduction in diameter. This part gets hot. If your PTFE is too long it'll soften and try to squeeze down into that U shape and get smaller. This will cause the inside of the bottom of the PTFE to be smaller than your filament and it will bind. MAKE SURE THE PTFE IS EXACTLY THE RIGHT LENGTH. I had mine a little too long, by about a mm, and ended up having to heat my hot end hot enough to somewhat liquify the PTFE, and push my filament through by hand until I had extruded the PTFE that was touching my filament and causing it to bind. Big pain in the butt. So make sure your PTFE is not so long that you have to apply a lot of pressure to make the screw holes match up. Either that, or just put it all together with the heat brakes not inserted all the way and then move them up. Then level them. The difference between the two X carriages is minor. The Chimera one has easier access to the upper rear grub screws on in the Chimera cold end and also allows you to slide the lower bearings out of the way to get to the lower grub screws. Just slide the bearings all the way towards the center once you have both nozzles exactly the same height and have tightened the grub screws again. It should hold the bearings in place just fine. Mine does. Parts for extruder assembly: 2 10mm M5 screws: http://www.mcmaster.com/#93070a121/=wnovg7 2 low profile M5 nuts: http://www.mcmaster.com/#90695a037/=wnndyn 2 5x10x4 ball bearings: http://www.amazon.com/Bearing-5x10x4-Shielded-Miniature-Bearings/dp/B002BBGE56 2 Washers between the idler and the 5x10x4 bearings. http://www.mcmaster.com/#93475a230/=109ocpw If you don't use these washers your bearings won't spin. You will have to drill the washers out to 5mm I.D. 2 M4 screws for the idlers: http://www.mcmaster.com/#93070a109/=wnnqj3 2 M4 nuts for the idlers: http://www.mcmaster.com/#90725a010/=wnosvm 2 MK8 drive gears which can be found all over the place online. Cut some M3 threaded rod and make 3 lengths that are 120mm long. These will mount the motors to the whole thing. 2 springs: http://www.mcmaster.com/#94125k658/=yy1s7h You will have to trim the springs shorter and use trial and error to get the length just right for tension. You will probably need a couple washers on the M4 screws to keep the springs from slipping past the screw heads. You can download my configuration.h here: http://pastebin.com/4izq94YL It's configured to use a Chimera, so if you have a Cyclops just change (#define EXTRUDERS) to 1. I gave my printer the custom name "augmentation" so it'd say "augmentation ready" when it was ready to print. You can change this to whatever you like. I believe I listed all the screws and such but if I missed anything let me know! Thanks and enjoy! EDIT: Added access holes for the mounting screws for the Chimera/Cyclops in the X carriage. This way if they come loose you don't have to disassemble anything to tighten them again. https://www.youtube.com/watch?v=T9Ya5-5jXGc
Comments