Skip to content

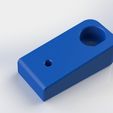
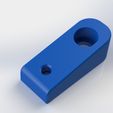
Foot for gouge at 90° (Foot for gouge at 90°)

Advertising
Advertising
?
Creation quality: 0.0/5 (0 votes)
Evaluation of members on the printability, utility, level of detail, etc.

  • 278 views
  • 1 collection

License
3D design format
STL Folder details Close
  • Pie para gubia pequeña.STL
  • Pie para gubia_grande.STL

Learn more about the formats

Publication date 2022-09-11 at 18:01
Design number 841295

3D printer file info

3D model description

English:

Hello everyone! Sometimes when you want to cut something completely flush with a flat surface, with normal gouges you can't, because the handle doesn't allow you to get flush. I bring you a practical solution.

For this gadget you need:

MATERIALS:

  • 2 screws M2x 10mm countersunk head.

  • 2 bronze insert nuts

  • 1 gouge handle 11mm (approx).

  • 1 gouge shank 8mm (approx.)

  • 1 M6x20mm flat head screw

  • 1 screw M5x20mm countersunk head

STEPS:

1-

For both gouges, you have to file one side of the handles a little to fit into the hole.

2-

For the small shank gouge, use the M5x20mm screw to fit the shank to the printed part.

In the case of the large shank gouge, use the M6x20mm screw to fit the shank to the printed part.

3-

Insert the bronze insert nuts into the small holes by heating them little by little until they manage to get in and stay in position. Note that the position is slightly inclined.

4-

Place the desired razor blade according to the size indicated:

For the large gouge: 9mm wide razor blades.

For the small gouge: 5.9mm wide blades.

5-

Tighten the knives with the M2 screws.

English:

Hello everyone! Sometimes when you want to cut something completely flush to a flat surface, you just can't with normal gouges, as the handle won't allow you to go flush. I bring you a practical solution.

For this gadget you need:

MATERIALS:

  • 2 M2x 10mm countersunk head screws.

  • 2 brass insert nuts

  • 1 11mm gouge handle (approx)

  • 1 8mm gouge handle (approx)

  • 1 M6x20mm flat head screw

  • 1 screw M5x20mm countersunk head

STEPS:

1-

For both gouges, you have to file down one side of the handles a bit to fit the hole.

2-

For the small handle gouge, use the M5x20mm screw to fasten the handle to the printed part.

For the large handle gouge, use the M6x20mm screw to fasten the handle to the printed part.

3-

Insert the brass insert nuts into the small holes, heating them little by little until they go in and hold their position. Please note that the position is slightly tilted.

4-

Place the razor blade you want according to the indicated size:

For the large gouge: the 9mm wide blades.

for the small gouge: the 5.9mm wide blades.

5-

Fasten the blades with the M2 screws.

3D printing settings

English:

-Can be printed on any type of filament that is NOT flexible.

-I recommend printing the part at 100% for strength.

-Print it sideways.

-No supports are needed.

English:

-Can be printed on any type of filament that is NOT flexible.

-I recommend printing the parts at 100% for strength.

-Print it sideways.

-No supports needed.

Advertising


Page translated by automatic translation. See the original version.
Issue with this design? Report a problem.

Would you like to support Cults?

You like Cults and you want to help us continue the adventure independently? Please note that we are a small team of 3 people, therefore it is very simple to support us to maintain the activity and create future developments. Here are 4 solutions accessible to all:

  • ADVERTISING: Disable your banner blocker (AdBlock, …) and click on our banner ads.

  • AFFILIATION: Make your purchases online by clicking on our affiliate links here Amazon.

  • DONATE: If you want, you can make a donation via Ko-Fi 💜.

  • WORD OF MOUTH: Invite your friends to come, discover the platform and the magnificent 3D files shared by the community!


Sharing and downloading on Cults3D guarantees that designs remain in makers community hands! And not in the hands of the 3D printing or software giants who own the competing platforms and exploit the designs for their own commercial interests.

Cults3D is an independent, self-financed site that is not accountable to any investor or brand. Almost all of the site's revenues are paid back to the platform's makers. The content published on the site serves only the interests of its authors and not those of 3D printer brands who also wish to control the 3D modeling market.

100% secure payment by credit card, PayPal, Apple Pay, Google Pay, etc.
View all payment options.