There will be no more updates to this page. Go to the new GitHub page for the latest updates.
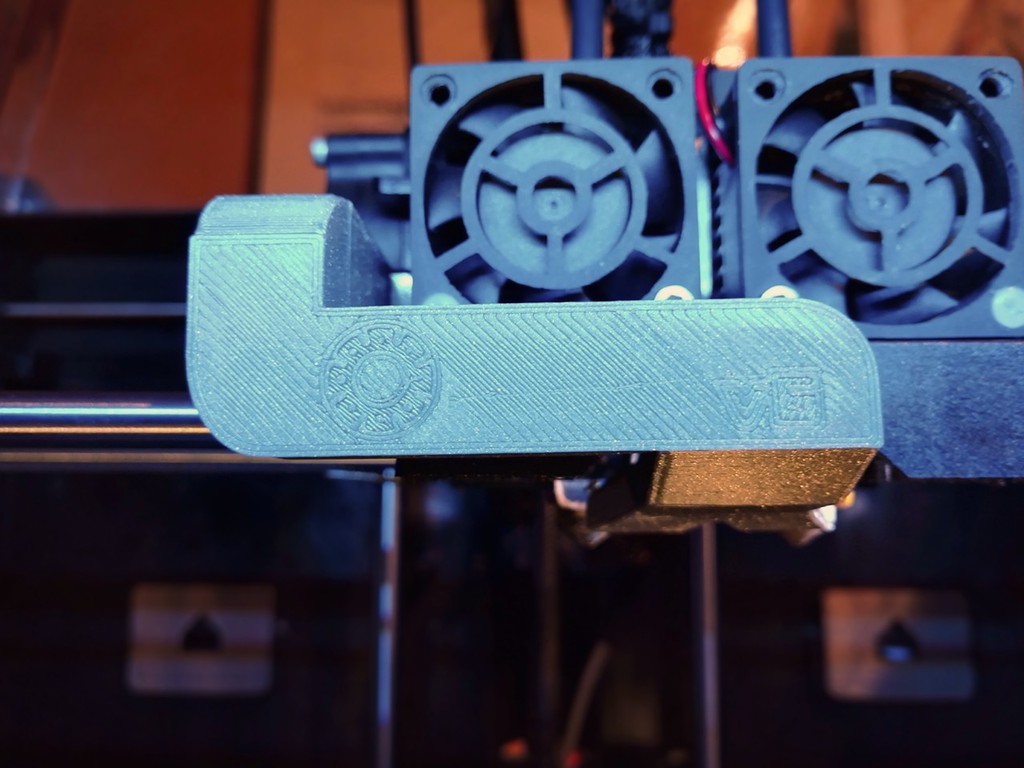
This is a drop-in replacement fan duct that fits the FlashForge Creator Pro and similar models that have the ‘turbo fan’ at the left of the nozzles. It has been confirmed to fit the 2015 FFCP (upwards opening door), the 2016 (sideways door), and the Dreamer. It probably also fits clones like CTC and PowerSpec.
The stock duct has an obvious problem: it only cools the left nozzle. This means it pretty much obliges you to always print filaments like PLA with the left nozzle because they require active cooling for a good result. This new duct offers cooling for both nozzles at the same time, which allows to use any filament with any of the nozzles and also do dual extrusions with proper cooling as well.
After reports that the v4 and v5 versions of this duct did not perform as well as the stock duct (for single extrusion with the left nozzle obviously), I made some more improvements and did some extensive tests that confirmed the new v6 outperforms the stock duct on a particular challenging model. It is possible that the stock duct will still provide better results in specific situations, but those should be rare.
If you're only going to print with a single extruder, check out the single-extruder variation of this duct (https://www.thingiverse.com/thing:2436915), it provides even better cooling.
Be sure to check for updates: as stated above, there won't be updates anymore on this Thingiverse page, because this website has turned into an unusable piece of junk. All the new updates will be on GitHub.
Printing
Do not print this in PLA: it is likely to deform from the heat of the nozzles and possibly the heated bed as well. The duct must be printed in a filament that can withstand some heat like ABS. PETG is not recommended either: it will deform as I found out by experience. Polycarbonate would be ideal, but is of course more difficult to print. You might get away with PLA or PETG if you apply heat insulation as described below, but still I wouldn't recommend this.
There are two models: one to be used if you have stock hot-ends that are aligned to standard height, and one with ‘x1’ suffix to be used if your nozzles are 1 mm lower than standard height. If you aligned them with this leveler (https://www.thingiverse.com/thing:1582720), they are at standard height. If you installed Micro Swiss all-metal hot-ends and followed their instructions exactly, they will be roughly 1 mm below standard height. If you are unsure, see the bottom of this page for instructions.
Make sure to disable supports, otherwise the duct may be blocked by material added on the inside. You could use soluble supports, but the model is designed to be printed easily without supports, and a raft or brim should also be unnecessary. Just ensure your bed is well-levelled and you have no problems printing bridges. The model has internal structures to minimise the risk of problems caused by your slicer and printer, but only if you print it with the intake pointing upwards.
Do not rush this print. To get a strong result, print slowly and only provide the minimum amount of cooling necessary. If you can control fan speed (which is not the case on an unmodified FFCP), you can enable it all the time on an ABS print at about 10% to 25%. Otherwise, only enable the fan while overhangs are being printed. You should get an OK result without fan altogether.
Set infill to 100%: the model consists almost entirely of thin walls anyway. 100% is needed to ensure strength of the few small solid parts. You won't be saving much filament or weight by trying to enforce a lower infill, it would only make the duct weaker.
Printing in a translucent material has the advantage that it will pass through some of the light from the LED strip, but it is advisable to add an extra LED (https://www.thingiverse.com/thing:1790072) to get a better view on what is being printed.
Installing
Be sure to read the Post-Printing section first.
Verify the position of your nozzles as explained in the ‘How to check nozzle height’ section below, to ensure the duct will not be blowing against the heaters or below the nozzles.
Mounting is very easy. You will have a tiny bit of margin to wiggle the duct up and down, ensure it is not rubbing against the rail by pushing it down while tightening the screw. The little tab should be resting on top of the cradle. I recommend to glue a thin piece of rubber (or flexible filament) onto the carriage under the tab, such that the duct won't rattle due to vibrations.
Even though it is considerably larger than the stock fan duct, my ABS print of the v5 duct weighs exactly the same as the stock duct so there should be no impact on print performance.
If you want to retrofit the blower fan and this duct on an older printer that does not have the mounting bracket, you can print my clone of it (https://www.thingiverse.com/thing:2086927).
Using
Just as with the stock duct, a limitation is that it only blows in one direction, meaning that parts in the ‘shadow’ of the nozzle (i.e. at the back) will get the least cooling. If possible, orient the model such that overhangs or whatever parts should look best, are at the front. Again, if you will only be printing with one extruder, the single-extrusion variation (https://www.thingiverse.com/thing:2436915) of this duct reduces the shadow problem.
If you're going to do a long print where the fan is not needed, you should remove the duct altogether. This is especially the case with filaments like polycarbonate that need to be printed at very high temperatures. When no air is flowing through the duct, the long exposure to the heat of the extruders is very likely to cause the exhausts to deform, even if printed in ABS and even if you applied extra insulation.
You can enable the fan on ABS prints to improve quality, but this will greatly increase the risk of warping and cracking. Enabling the fan continuously with ABS is only feasible in the following cases:
* for small objects printed with thin layers. Be sure to increase your print temperature if you do, and seal the enclosure to keep the air inside cozy and warm. A raft can also help to prevent warping.
* for large objects when using the smart cooling features of your slicer software to only enable the fan during short periods while printing overhangs.
* if you can drastically reduce the speed of the fan. Don't bother trying to vary the speed in your slicer program, the fan circuit in the FFCP is on/off only. The simplest way to obtain variable fan speed is by installing a hardware PWM controller (https://www.thingiverse.com/thing:2095862). There are also some custom Sailfish firmware builds that have a software PWM implementation, but it is limited. A more complicated but also fully automatic solution is this one (https://www.thingiverse.com/thing:2852499), where fan speed is delegated to a separate controller steered by commands in the print code itself.
Similar remarks hold for PETG: it is very sensitive to cooling but you will obtain nicer prints when applying just a tiny bit of cooling, which is only possible by controlling fan speed.
If you really like this and want to reward me for the work I've put into this, remember there is a tip designer* button.
:format(webp)/https://fbi.cults3d.com/uploaders/19896799/illustration-file/fbc07ced-351f-48a3-aa9e-91aba5b676e4/Duct1.jpg)


/https://preview3d-images.cults3d.com/ssvlud3f1cj10vrqlijwa5vwkcfa)
/https://preview3d-images.cults3d.com/uuz4ibw3d1moov63lveg8ad7borz)


