Skip to content

MyDigitalSlot IT1 Car, 1/32 Complete Analog / Digital Slot Car

Advertising
Advertising
?
Creation quality: 0.0/5 (0 votes)
Evaluation of members on the printability, utility, level of detail, etc.

  • 2.2k views
  • 1 download
  • 1 collection

License
3D design format
ZIP Folder details Close
  • MDS_Car_IT1_STLs.zip

Learn more about the formats

Publication date 2022-10-10 at 17:40
Design number 879326

3D printer file info

3D model description

This 1/32 Slot car can be used in analog mode in any 1/32 car track or in digital mode with MDS System, which is compatible with old commercial and MDS 3D printed track parts.

CHOOSE A MOTOR

Side-Winder Transmission:
The ideal motors for this chassis would be the E200 style ones, specific for Slot cars, so they work well between 12V and 15V. Between the motors of this kind, you will find some has the shaft in one side or the other, some of them in both! The geometry of the chassis is symetric, allowing to mount the crown on both sides of the chassis. We must plug the wires in the right direction so the car goes forward.

There is also a version of the chassis for "Short Can" style motors, which are similar to E200 but have cable connectors in the opposite side than the motor shaft.

In-Line Transmission:
If you don't mind about using the car in digital mode, you can also mount a "Long Can" or an "Old F1" Motor. There is not enough space for the actual version of MDS "chip" in these versions of the chassis, but maybe an smaller one will fit in the future.
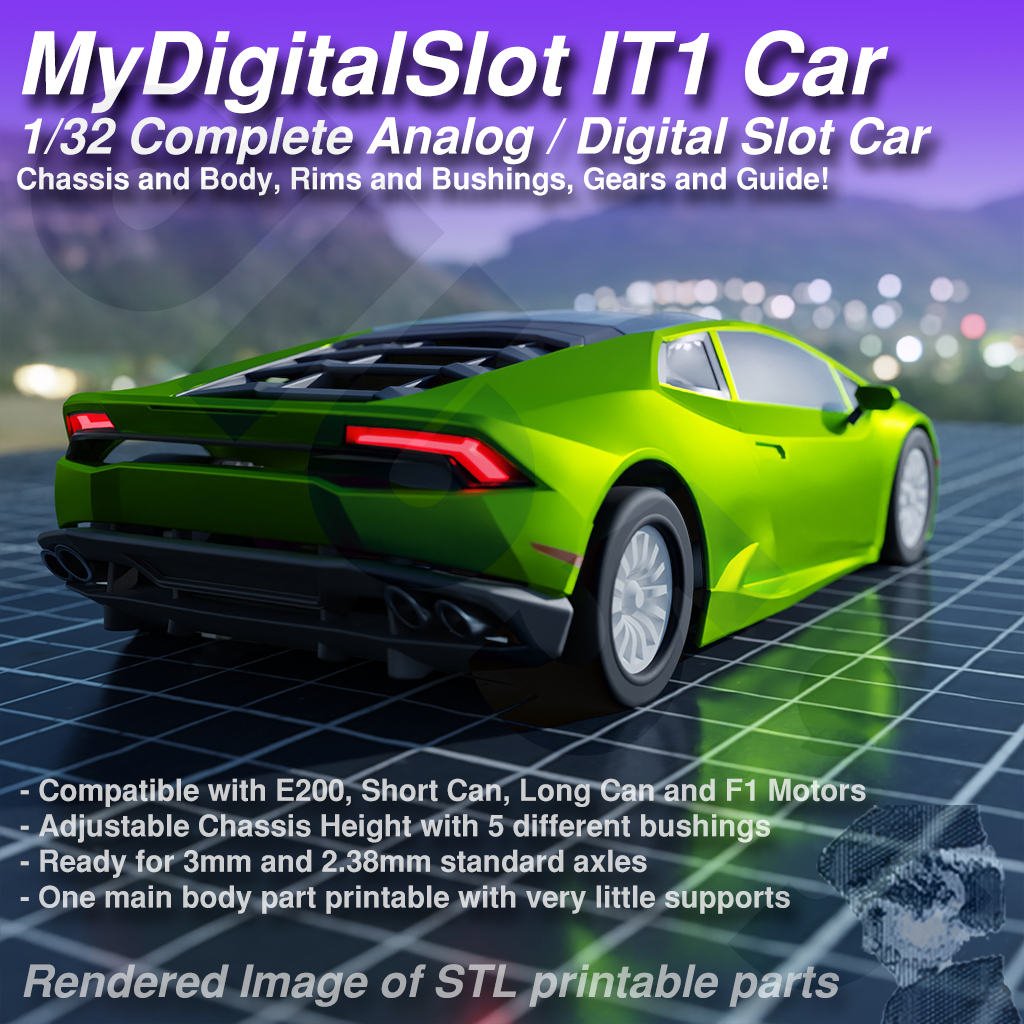
INCLUDED PARTS

  • RIMS:
    You can print simple rims in various sizes to adapt to the tires you have or can find. You can find these rims in versions for 3mm axles or for 2.3mm commercial axles. Try to find 20-21mm outer diameter tires for rear wheels and 19-20mm for the front ones. 10-11mm wide tires will be fine for the rear while 9-10mm wide ones for the front.

  • BUSHINGS:
    Different bushings will allow you to mount the front and rear axles in a lower or higher position, without having to re-print a whole chassis. This way you can control quite better the position of the wheels and the contact with floor in the front axle. You will find them also for 3mm and 2.3mm axles. Ideally, you will have 3mm piano wire and will be able to cut portions of 46-50mm length for the axles.

  • GUIDE:
    The size of hole for the guide in the chassis is 4.2mm, which should allow to insert commercial guides. Anyway, a 3D printable guide is included to be used with "Dupont" F-M cables and commercial copper braid. If the dupont cable is too much rigid you can use 2.54mm male shocket to insert in the gide and solder the cables to these connectors. The dupont males should go through the guide holes (and through the copper braid) and be connected to the motor in the other side.

  • CHASSIS:
    Four different chassis for four different motors. E200 and Short Can styles will allow you to mount MDS Chip, while the Long Can and F1 Old motor styles won't.

  • BODY:
    The files for the body have been created using a free model with the right license for comercial use, similar to this one as a base. I can't actually find the exact model.
    Looking for simplicity and low weight, a main body has been created which can be printed in one piece with little supports. For that, you will have to print the body in a very particular position, rotating the model aprox. 100-110º over the Y axis. This makes the wheel holes zones to be printable without supports, but with a great overhang angle. You will have to print and glue a few accessory parts, like lights, exhausts or rearviews. If you can print these ones in TPU they will ressist quite more.

You will need one M3x8 Socket-Head screw for the front, previously inserting the chassis rear part into the rear bumper slot for it.

ANALOG OR DIGITAL?¿?

Analog:
As you probably know, in analog slot the car system is very simple. You only need to supply current to the motor from the track for the car to work, connecting the cables from the guide directly to the motor. The smaller or bigger current will make the motor go slower or faster.

Analog + Digital:
In a near future, I pretend to create the Digital Track Controller for Analog Cars. It won't allow to drive through any of the rails, but will add some interesting features from the MDS system like Lap Count, Boxes, Stop & Go, Start Lights, fuel control, racing system, etc.

MyDigitalSlot Car Chip V1:
This is not the first version of my chip, but is the first one you can make quite easy. Anyway, you will need to not be afraid of basic DIY electronics, have some soldering skills and be patient. If you use it you will have:
- Low Latency Wireless Communication
- Can drive in both directions over same rail
- Bi-Directional IR comm. between car and track
- Small buffer for "not electrifyed" zones
- Simple to understand and easy to build

The V1 wants to be simple and understandable, so you can build it with pre-perforated PCB (2.54mm spacing) and very common components. In this version there is no connection for lights, servos or gyros, but you could add them in some other way if you would like.

If you are interested in controlling led lights, a servo, etc, please take a look to my first historical research chassis.

NOT INCLUDED:

The building instructions for the MDS Car Chip V1 or the code to make it work with the rest of the elements of MDS System are not included, they are not actually part of any product.

To get them you will have to become a "MDS Ambassador", and for that you will have to:
- Buy, print, build, paint and show an analog MDS Car
- Buy, print, build and show a MDS Controller
- Write a story about you and slot and where you want to get with MDS
- Publish a video using the MDS car in your track or an MDS track
- Publish in social networks about MDS with your video and link to "MDS Collection" of my store

The same way, becoming a MDS Ambassador you will access:
- MDS Car and Controller code
- Big personal discount for other MDS products
- MDS Discord Channel
- Ambassador discount for promotions
- Updates, upgrades and error corrections for products

3D printing settings

The Chassis:
- It has been designed to be printed using 0.4mm perimeter thickness and 0.2mm layer height. It should take around 1h to print the main part
- You will need to add some supports for back zone.
- Be sure you have a good inter-layer adhesion to avoid breaking it while introducing bushings, the motor or the guide
- I print them in PLA or PETg, but probably you can try other rigid materials
- Remove supports with care and clean up any screw holes after printing with 3mm tool. Do the same for the guide hole with 4mm tool
- To insert / remove bushings or motor, you can bend up a little the chassis to favor the in/out movement

The Guide:
- You will need to add supports until the "plate" height, use slow printing speeds, small layer heights and print it 100% filled.

The Bushings:
- I print them in 0.4mm perimeter thickness and 0.1mm layer height. Try to keep starts near the round sides instead of the long side walls. The holes are 3.2mm and 2.55mm diameter, so your 3mm or 2.3mm axles should pass and spin inside without problems. Use a proper tool to increase the hole size if you need it.

The Main Body:
- This is the most relevant and dificult part. The position I suggest to print the body is very important, it has beed designed and modified to help printability in this position. This way, you will need supports only for a few initial mm, while the most of the body will print over itself.
- In this case, for a 4h print, I use 0.16mm layer height, but I can half it to 0.08mm if I want more resolution but not always better result.
- As it is mostly a 0.8mm shell, you will need 0.4mm perimeter thickness to print it the most effective way, minimizing the retractions to 0 per layer in many cases. This is the main idea, the one which should lead into more clean and accurate result, the less retractions and travels, the better finish.
- Try to minimize your stringing, blobing, oozzing etc to 0 if you want to remove your supports easily with low temps, but not too much to avoid loosing the strong bond between layers
- In cura, you can reduce speed for overhangs... I did this in my last prints with good results.
- If you have transparent material, PLA or PETg, don't mess around with fan speed or printing speed during the print, I mean automaticaly, to have the most homogeneous finish.
Use low speeds, specially for outer walls, (I used something like 20mm/s) and do the same with acceleration to avoid ringing... If you can, like in Cura, use lower accel value for outer wall, like 200mm/s2 in my case, while I print other elements like tops/bottoms at 400mm/s2 or supports at 600mm/s2

The Body Accessories:
- These parts are specially small sized. In most cases, you will have to use a smaller nozzle or just "trick" your printer making it print thinner perimeters, like 0.35, 0.32 or 0.25mm instead of 0.4mm
- They are so small that even with very high resolution they won't take too much time, so try your best slicing params for these ones.
- Add supports if you can't find a way to print without them.

The Rims:
- The basic rims should be printed over the external face without supports using 0.4mm perimeter thickness and your desired layer height. Print them solid if you want to add very little weight or with 2 perimeters and 15% infill if you want to get lighter.

Crown and Pinion:
- Use very thin perimeter thickness to ensure you really fill the teeth of the gears. Use small layer height to improve finish and slow speeds to have accurate teeth and shapes.
- If you need it, use very little negative horizontal expansion, like -0.02mm, to be able to fit the crown into the rim. The holes in this case are 2mm for the pinions and 2.5 or 3.1mm for the crown. Use a proper tool to increase the hole size if needed

Advertising


Issue with this design? Report a problem.

Would you like to support Cults?

You like Cults and you want to help us continue the adventure independently? Please note that we are a small team of 3 people, therefore it is very simple to support us to maintain the activity and create future developments. Here are 4 solutions accessible to all:

  • ADVERTISING: Disable your banner blocker (AdBlock, …) and click on our banner ads.

  • AFFILIATION: Make your purchases online by clicking on our affiliate links here Amazon.

  • DONATE: If you want, you can make a donation via Ko-Fi 💜.

  • WORD OF MOUTH: Invite your friends to come, discover the platform and the magnificent 3D files shared by the community!


Sharing and downloading on Cults3D guarantees that designs remain in makers community hands! And not in the hands of the 3D printing or software giants who own the competing platforms and exploit the designs for their own commercial interests.

Cults3D is an independent, self-financed site that is not accountable to any investor or brand. Almost all of the site's revenues are paid back to the platform's makers. The content published on the site serves only the interests of its authors and not those of 3D printer brands who also wish to control the 3D modeling market.

100% secure payment by credit card, PayPal, Apple Pay, Google Pay, etc.
View all payment options.