TEA U94 dual ptt replica
Русская версия
Licensing: CC-BY-NC
English
###Description
It is a not accurate replica of dual ptt for airsoft use. I made it for use with Baoeng UV-82 radios.
It's nowere near original in all aspects - it's not waterproff, has different connector (from another chnese PTT), the cable are weak, but it does the job.
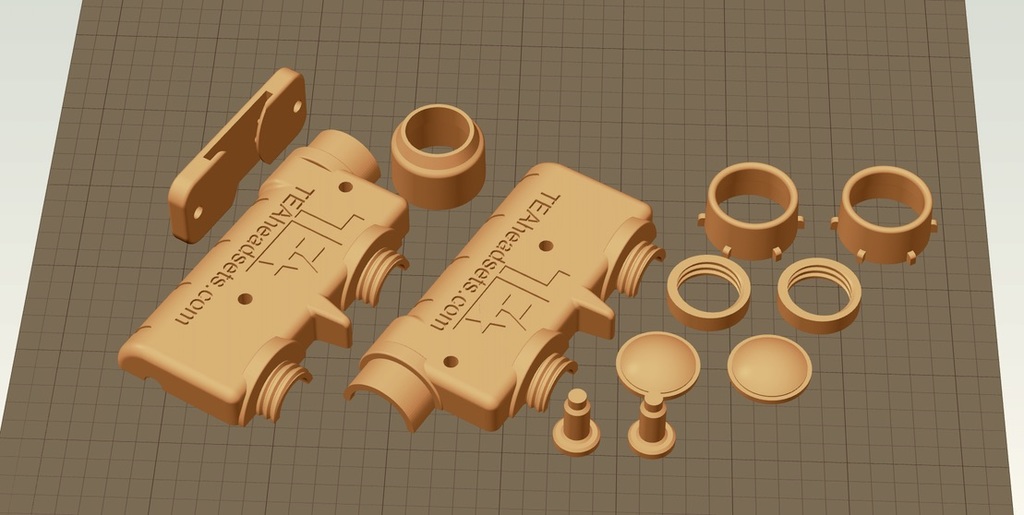
###Printable parts
I prefer to use ABS where applicable, so case is made of black ABS or composite glass- or carbon-fileed ABS, except mount, connector gasket and buttons.
ABS parts:
- Bottom.stl + Top.stl - main enclsure;
- Thread.stl + Button.stl - buttons thread and outer case, print x2;
- Push.stl - Intermediate "pusher", print x2.
PETG part:
- Molle Mount.stl - as it says, mount to 20 mm molle straps.
Flex/TPU parts:
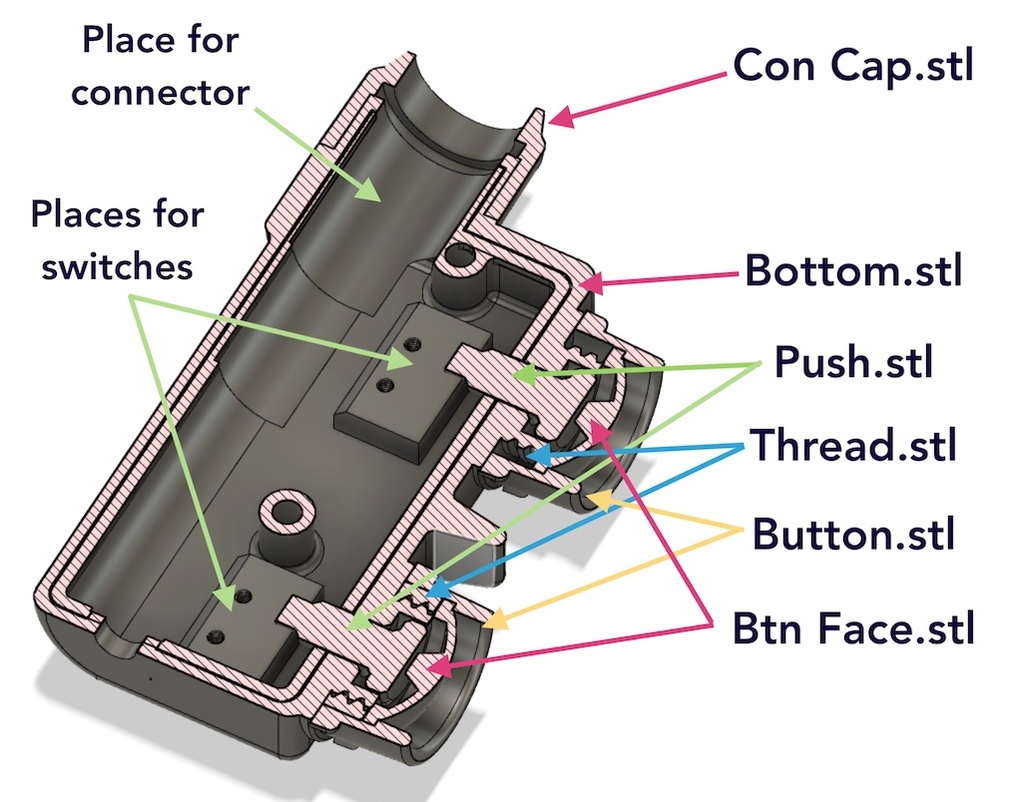
- Con Cap.stl - connector gasket;
- Btn Face.stl - buttons faces, print 2x.
Additional parts
To make a functional PTT you also need:
- Cable from a Baofeng UV-82 headset (usually ships with a radio);
- 2pcs KW10 micro switches (often used in PC mouses);
- 4pcs M2x8 screws (optional);
- 2pcs M3x25 screws;
- 2pcs M3 nuts;
- Some thin wire, 25 cm long;
- Military plug socket connector (cannibalize some chinese PTT).
###Printing instructions
- Material - ABS/PETG/Flex
- Nozzle - 0.3 mm
- Layer - 0.15 mm
- Infill - 40%
- Top/bottom - 5-6 layers
- Walls - 4-5 layers
Use raft and supports, see proposed printing layout on picture printing.jpg.
###Assembly
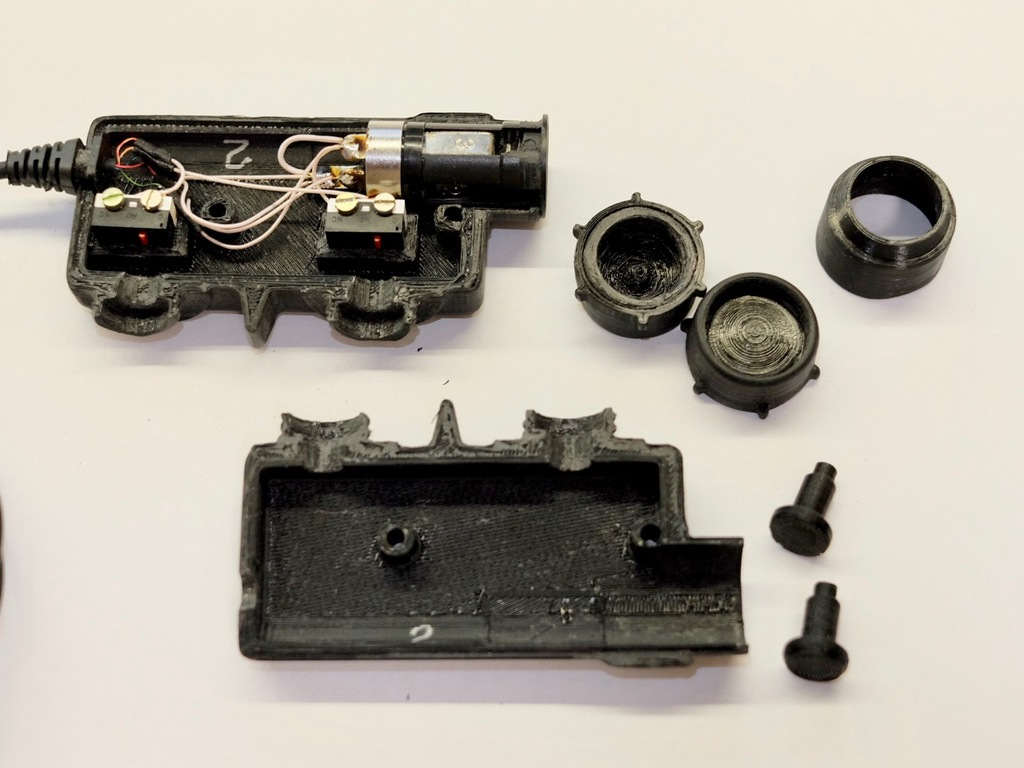
Check inside.jpg, assembly.jpg and section.jpg pictures.
- Clean the part thoroughly from supports. Ensure they join without play and you do not have to force them to do so. Be polite, but use filer and sandpaper without hesitation, except on Flex/TPU parts.
- Assemble Top+bottom, screw Thread parts on, but not entirely, 1/2 turn suffice.
- Use 120 and 80 grit sanding sponges to wet-sand the externals. 120 is really enough, if you go the way up your PTT will lose resin-like look&feel. I think wet sanding is mandatory, dry sanding is really much harder.
- Use the same sanding sponges on Button parts.
- Let it dry.
- Screw Thread parts ALMOST all the way down, then use CA glue to blue Btn Face parts inside the Button parts and then assembled buttons onto Thread parts. Apply CA only on the deeper half of the Button insides, otherwise you are risking to glue it ALL together.
- Unscrew assembled button caps.
- Remove metal levers from KW10 micro switches (if they are present), then using M2 screws screw them inside the Bottom part. Then assemble with Top, insert Pusher parts into holes and screw the buttons on. Try to push. If all is OK, then go to the step 11.
- If your buttons has too short stroke, not moving when pressed or not "clicking" back when you depress buttons, then your Pusher part must be shortened. Just shave half a millimeter off the thin end and check again.
- If your button moves too freely and you feel no click... that is really strange, because Pusher part has excess length. Try to idenify where is the problem using only Bottom and Pusher parts. Insert pusher into its groove and see why it's not pushing the switch.
- Put some (just a little) glue on the bottom perimeter of the KW10 to fix them. Waste not.
- Disassemble Baofeng headset and unsolder the radio wire. With a multimeter, identify wires, then extend wires with 35-40 mm thin wires.
- Glue the wire into wire slot in the Bottom part.
- Cannibalise or trade or buy or some other way posess connector. Cut off 3/4 of the long terminal. Using file remove the thread part until connector fits in with Top and Bottom parts connected.
- Solder according to picture schematic.png. Check with headset and radio.
- Glue connector to Bottom part.
- Assemble: Top + Bottom, then Pushers, then screw assembled buttons, put on the gasket over the connector mouth;
- Using CA glue carefully glue M3 nuts inside Molle Mount part. You can otherwise heat and press the nuts into place.
To attach the PTT to molle interface first put the Molle Mount under the strap, guide the strap inside the mount recess, then screw the PTT to the mount using 2 x M3 screws. Easy, fast, reliable.
##Russian
###Описание
Реплика кнопки PTT, размеры не выдержаны (оригинал в руках не держал). Делалась для радиостанции Baoeng UV-82.
Учтите - это нифига не оригинал - ни водостойкости, ни качественного разъема, ни дубового кабеля здесь не прдусмотрено. Но работает.
Лицензия - CC-BY-NC, то есть печатайте себе, печатайте друзьям, печатайте кому хотите, но не за деньги (вы можете взять деньги для для покрытия расходов на печать, но не за изделие в целом).
###Печатные части
Я вообще предпочитаю печатать из АБС где можно, поэтому корпус печатается из ABS или стекло-/карбоно-наполненных композитов, исплючения - монтажная скоба, уплотнитель разъема и жмакательные поверхности кнопок.
Части, печатаемые из ABS:
- Bottom.stl + Top.stl - тело PTT;
- Thread.stl + Button.stl - резьба и наружная часть "кнопок", печатаем по 2;
- Push.stl - толкатель, печатаем 2.
Части, печатаемые из PETG:
- Molle Mount.stl - монтажная скоба на молле.
Части, печатаемые из Flex/TPU:
- Con Cap.stl - юбка разъема;
- Btn Face.stl - мембраны - жмакательные поверхности кнопок, печатаем по 2.
Дополнительные детали
Чтобы PTT работала как PTT, а не просто радовала взор понадобятся:
- Кабель от гарнитуры Baofeng UV-82 (той, которая обычно с рацией в комплекте);
- 2 шт микропереключателя (микрика) KW10 (часто встречаются в компьютерных мышках);
- 4 винтаM2x8 (можно без них, на клею, но с ними проще);
- 2 винта M3x25;
- 2 гайки M3;
- Тоний провод, 25 сантиметров хватит;
- Разъем от китайской PTT, "мама" (или аналогичный оригинал, если вы Абрамович).
###Печать
- Сопло - 0.3 мм
- Слой - 0.15 мм
- Заполнение - 40%
- Верх/низ - 5-6 слоев
- Стенки 4-5 слоев
Используйте рафт и поддержки, предпочтительная ориентация деталей - см. рисунок printing.jpg.
###Сборка
Внимательно изучите картинки inside.jpg, assembly.jpg и section.jpg перед сборкой.
- Тщательно очистить детали, подогнать так, чтобы собирались без излишнего приложения силы (плотно, но не чересчур). Не грубите, но без колебаний применяйте напильник и шкурку. Ну, кроме гибких частей, полировать их морока.
- Собираем Top+bottom, накручиваем Thread примерно на 1/2 оборота.
- Полировочной губкой на 120 и 80 grit на мокрую полируем корпус снаружи. 120 более чем достаточно, если взять мельче, то корпус не будет похож на резинку. Мокрая полировка просто обязательна, т.к. сухая дольше и результат хуже. Я проверял.
- Делаем то же самое с парой Button.
- Ждем, когда просохнет.
- Накручиваем резьбовые части Thread ПОЧТИ до упора, затем цианакрилатным клеем (суперклей) АККУРАТНО вклеиваем мембраны в части Button. Аккуратно наносим клей внутрь этой Button, примерно на половину высоты, ОТ МЕМБРАНЫ наружу. Если переборщите с клеем или нанесете слишком низко, рискуете склеить все детали в один кусок. Нанеся клей надеваем крышку кнопки с мембраной на резьбовую часть.
- Откручиваем кнопки.
- У микриков снимаем металлические рычажки-лапки, нажимающие на кнопку (если они есть) и вкручиваем их винтами М2 внутрь нижней детали (Bottom). Соединяем верх/низ, вкладываем в отверстия кнопок толкатели, накручиваем кнопки. Жмем. Если при нажатии и отпускании ощущается щелчок на обоих кнопках, переходим к шагу 11.
- Если жмёте, а оно не жмется и не кликает, либо нажали - кликнуло - отпустили - тишина и больше не кликает, то откручиваете кнопку, чуть стачиваете толкатель с узкого конца и повторяете до нормального срабатывания.
- Если жмёте, и чувствуете как кнопка нажимается свободно и не кликает, то это прям странно, т.к. длина толкателей сделана с запасом. Откручиваете кнопки, снимаете верх, вкладываете толкатель в его паз и пытаетесь понять, что же пошло не так. Исправляете.
- Аккуратненько наносите клей по периметру микриков. Главное не переборщить и не склеить саму нажималку кнопки. Короче, "не навреди".
- Разбираем гарнитуру Baofeng и аккуратно отпаиваем провод. Далее идентифицируем тестером куда идёт какой провод и удлиняем провода отрезками тонкого провода длиной по 35-40 мм.
- Вклеиваем провод в отверстие для провода, клеим только к нижней части гарнитуры
- Добываем разъем от китайской гарнитуры (как именно - это очень болезненные воспоминания, я не готов ими делиться). Укорачиваем на 3/4 длинющий контакт. Надфилем стачиваем резьбу и около неё, пока разъем не станет входит в своё тотверстие при плотно прижатых друг к другу частях Top и Bottom.
- Паяем части согласно рисунку schematic.png. Проверяем с радиостанцией, что всё работает.
- Вклеиваем разъем в нижнюю часть.
- Собираем: Top + Bottom, вкладываем толкатели Pushers, накручиваем кнопки, нагягиваем на выступ разъема юбку-уплотнитель;
- Аккуратно вклеиваем гайки в посадочные места монтажной скобы. Или можно нагреть их и усадить (паяльником).
Для установки на молле - пропускаем скобу под стропу, вырезом к себе, заводим стропу в вырез и прикручиваем PTT к скобе парой винтов М3. Быстро, просто, надёжно.
:format(webp)/https://fbi.cults3d.com/uploaders/25779955/illustration-file/f36bbda8-90d9-4627-a2e6-b1fcbfe5d47a/completed.jpg)


/https://preview3d-images.cults3d.com/894q0fyky1tn3ifrwgnjwhl2ye80)
/https://preview3d-images.cults3d.com/o8r5qu5bddfvd4jxu07z64ut8btd)
/https://preview3d-images.cults3d.com/q6se47vm2y5jes1n0xoutdqsyiie)
/https://preview3d-images.cults3d.com/3baft530biugn6mai3f30ulu92ss)
/https://preview3d-images.cults3d.com/chu8i2zcxyzbksr48pce23o45cw8)
/https://preview3d-images.cults3d.com/4vnchnyw33r1rbrp0i1emrafdiya)
/https://preview3d-images.cults3d.com/v7vo05ium0kptvzhv4aypmazt35n)
/https://preview3d-images.cults3d.com/rdwzxxf6y5jwl4i2od8a4r5ttfov)


