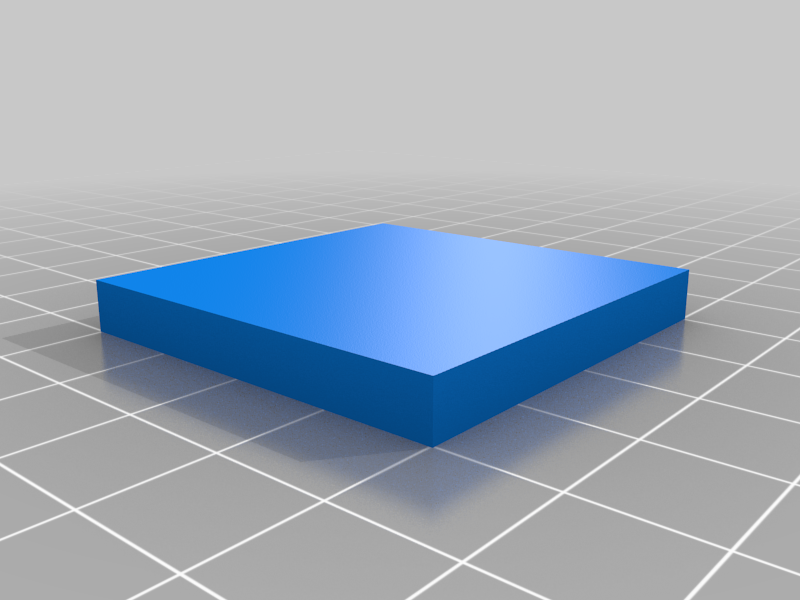
Obviously the printing of this part which is a simple solid parallelogram is of no interest other than that of the calibration of the feed flow of the filament. Because the proper management of this flow has a very direct impact on the precision of the printed parts so that they correspond perfectly to the dimensions of the model.
This is of great importance for parts that need to be perfectly adjusted.
The principle for this calibration is to print a shape of a desired size, then by comparison to the printed size to adjust the flow of the filament. The simplest form to make this adjustment is a wall made of a single width of printed filament. Effectively, depending on the nozzle, this width will vary, which could make it necessary to have as many template as the width of nozzles used.
So unlike other models present on Thingiverse which multiply the number of templates I preferred to opt for another more general solution which consists in using a solid parallelogram to print only the outer wall in the form of a single line printing.
This possibility is offered by your slicer (example Cura) by setting its surface printing mode.
It requires the use of branded filament, and with a low tolerance for diameter variation (+-0.05 mm), otherwise you risk going in circles, and will never end up with a stabilized value of this test at the desired level of accuracy.
Here's how to do it :
1 - Calibrate the wall width using the TestFlow file included in this download :
2 - If you use Cura, set the profile in spiralized and unsmoothed surface mode and with a border.
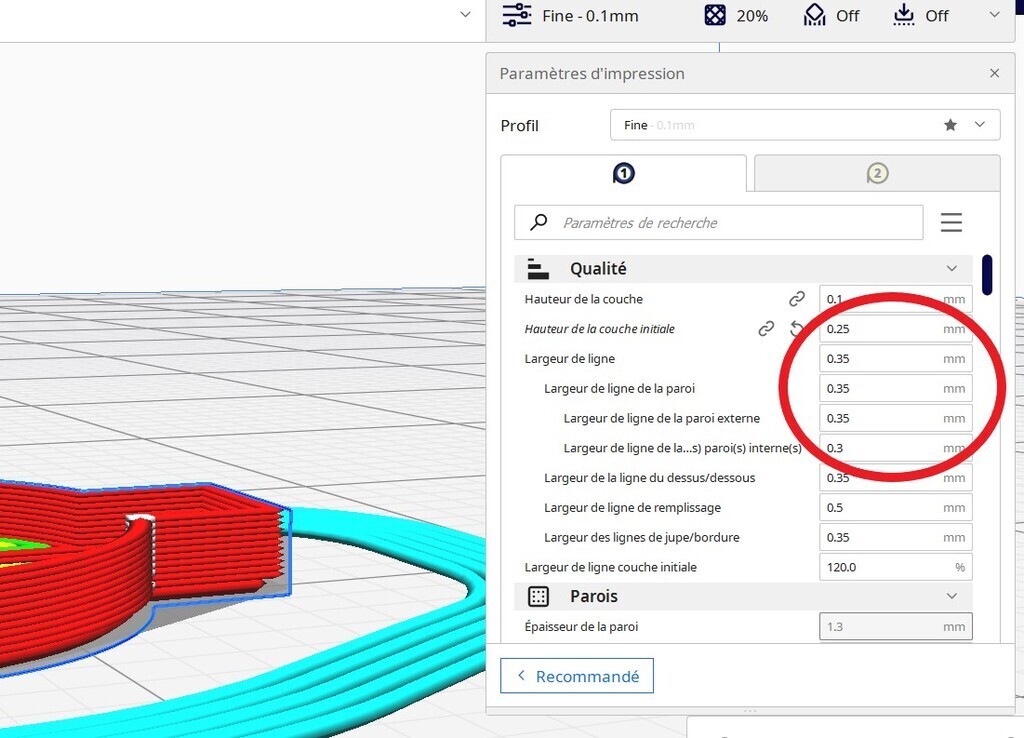
3 - Use the layer height that is the one you want in your future print.
Set the line width to a value around 87.5% of your nominal nozzle width.
So for a 0.40 nozzle indicate 0.35 in line width.
In the material section, set the print stream to 100% as the starting point for the calibration.
4 - Check in preview mode that only the wall prints in one line width.
Make sure you have provided enough brim for proper attachment to the board.
Print the part.
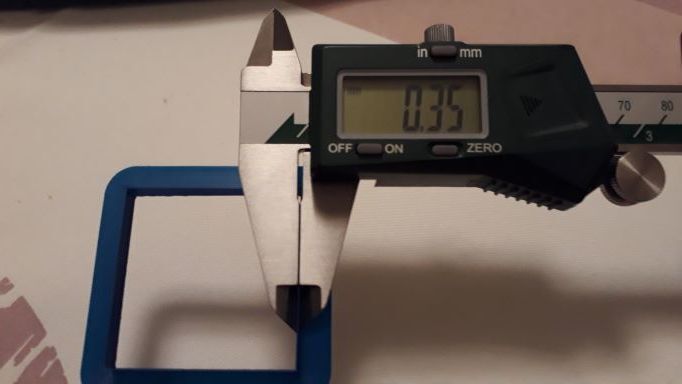
5 - Measure the thickness of the wall obtained with a caliper, taking an average of the measurements of the 4 sides
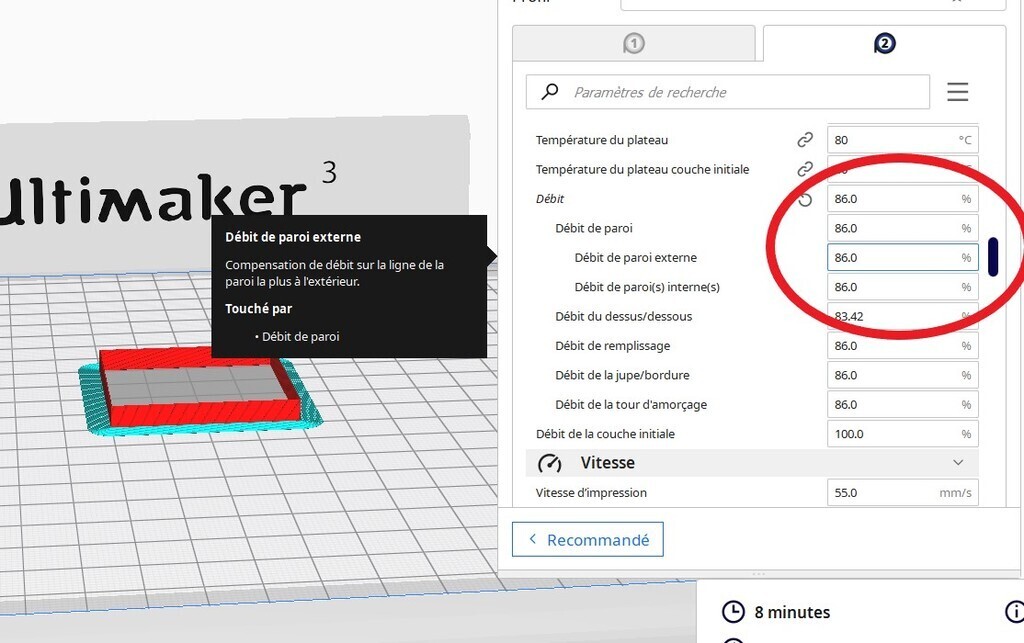
By a rule of three calculation fit the print rate in the profile :
Example: average width read 0.41, line width indicated in Cura 0.35
Calculation of the correction by rule of three = 0.35 / 0.41 = 0.86 or 86%
Application of the correction to the current flow: 100 x 86% i.e. a new flow of 86 which replaces 100
(the print line is wider than the desired value, so it makes sense to print less filament)
6 - Reprint the part and repeat this process until you get a wall width adjusted to 1/100 or 0.35 (see screenshots)
-o-o-o-o-o-
Evidemment l'impression de cette pièce qui est un simple parallélogramme plein est sans intérêt autre que celui de la calibration du flux d'alimentation du filament. Car la bonne gestion de ce flux impacte très directement la précision des pièces imprimées afin qu'elles correspondent parfaitement aux dimensions du modèle.
Ce qui est de grande importance pour des pièces qui nécessitent d'être parfaitement ajustées.
Le principe pour cette calibration est d'imprimer une forme d'une dimension souhaitée, puis par comparaison à la dimension imprimée de procéder au réglage du flux du filament. La forme la plus simple pour opérer ce réglage est une paroi faite d'une seule largeur d'impression de filament. Evidemment selon la buse cette largeur va varier, ce qui pourrait obliger à disposer d'autant de gabarits que de largeur de buses utilisées.
Donc contrairement à d'autres modèles présents sur Thingiverse qui multiplient le nombre de modèles j'ai préféré opter pour une autre solution plus générale qui consiste à utiliser un parallélogramme plein pour n'en imprimer que la paroi externe sous forme d'un seule ligne d'impression.
Cette possibilité est offerte par votre slicer (exemple Cura) en paramétrant son mode d'impression de surface.
Elle nécessite l'usage de filament de marque, et avec une faible tolérance de variation de diamètre (+-0.05 mm), sinon vous risquez de tourner en rond, et n'aboutirez jamais à une valeur stabilisée de ce test au niveau de précision souhaité.
Voilà comment procéder :
1 - Calibrez la largeur de paroi en utilisant le fichier TestFlow inclu dans ce téléchargement :
2 - Si vous utilisez Cura paramétrez le profil en mode surface spiralisé et non lissé et avec une bordure.
3 - Utiliser la hauteur de couche qui est celle souhaitée dans votre future impression.
Paramétrez la largeur de ligne à une valeur de l'ordre de 87.5 % de votre largeur nominale de buse.
Donc pour une buse de 0.40 indiquez 0.35 en largeur de ligne.
Dans la section matériau, paramétrez le flux d'impression à 100% en point de départ de la calibration.
4 - Vérifiez en mode prévisualisation que seule la paroi s'imprime en une seule largeur de ligne.
Assurez vous que vous avez prévu une bordure suffisante pour une bonne fixation au plateau.
Imprimez la pièce.
5 - Mesurez l'épaisseur de la paroi obtenu avec un pied à coulisse, en faisant une moyenne des mesures des 4 côtés
Par un calcul de règle de trois adaptez le débit d'impression dans le profil :
Exemple : largeur moyenne lue 0.41, largeur de ligne indiquée dans Cura 0.35
Calcul de la correction par règle de trois = 0.35 / 0.41 = 0.86 soit 86%
Application de la correction sur le flux en cours : 100 x 86% soit un nouveau flux de 86 qui remplace 100
(la ligne d'impression étant plus large que la valeur souhaitée, il est donc logique d'imprimer moins de filament)
6 - Réimprimez la pièce et répétez ce processus jusqu'à obtenir une largeur de paroi ajustée au 1/100 soit 0.35 (voir captures d'écran)
:format(webp)/https://fbi.cults3d.com/uploaders/15761688/illustration-file/1c11f033-9588-4e7a-9a15-b0d4eb3af342/20220603_225932_Resized.jpg)
/https://preview3d-images.cults3d.com/f0cvme7qnu3b7pcybip0r44jfy06)


