Skip to content

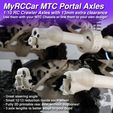
MyRCCar MTC Portal Axles, 1/10 RC Crawler Axles with 13mm extra clearance

Advertising
Advertising
?
Creation quality: 5.0/5 (1 vote)
Evaluation of members on the printability, utility, level of detail, etc.

  • 8.1k views
  • 34 likes
  • 6 downloads
  • 3 collections

License
3D design format
ZIP Folder details Close
  • MRCC_MTC_PortalAxles_STLs.zip
    • MTC_Portals_Gear1_12T.stl
    • MTC_Portals_Gear1_12T_102015hole.stl
    • MTC_Portals_Gear1_12T_Vandalhole.stl
    • MTC_Portals_Gear2_13T.stl
    • MTC_Portals_HubCover.stl
    • MTC_Portals_ServoArm22mmSTRONG.stl
    • Axle Bodies/MRCC_MTC_RigAxles_Axle_Bottom_Long.stl
    • Axle Bodies/MRCC_MTC_RigAxles_Axle_Bottom_Medium.stl
    • Axle Bodies/MRCC_MTC_RigAxles_Axle_Bottom_Short.stl
    • Axle Bodies/MRCC_MTC_RigAxles_Axle_Top_Long.stl
    • Axle Bodies/MRCC_MTC_RigAxles_Axle_Top_Medium.stl
    • Axle Bodies/MRCC_MTC_RigAxles_Axle_Top_Short.stl
    • Axle Bodies/MRCC_MTC_RigAxles_SteeringPlatform_L_Adjustable_REVISITED.stl
    • Axle Bodies/MRCC_MTC_RigAxles_SteeringPlatform_L_Adjustable_REVISITED_pivot.stl
    • Axle Bodies/MRCC_MTC_RigAxles_SteeringPlatform_M_Adjustable.stl
    • Axle Bodies/MRCC_MTC_RigAxles_SteeringPlatform_S_Adjustable.stl
    • Front Axle/MTC_Portals_102015to106015adaptor_22mm.stl
    • Front Axle/MTC_Portals_Front_C-HubLeft.stl
    • Front Axle/MTC_Portals_Front_C-HubRight.stl
    • Front Axle/MTC_Portals_Front_HubMain_Left.stl
    • Front Axle/MTC_Portals_Front_HubMain_Right.stl
    • Hex Collection/MTC_Portals_Hex10mm.stl
    • Hex Collection/MTC_Portals_Hex5mm.stl
    • Hex Collection/MTC_Portals_Hex6mm.stl
    • Hex Collection/MTC_Portals_Hex7mm.stl
    • Hex Collection/MTC_Portals_Hex8mm.stl
    • Hex Collection/MTC_Portals_Hex9mm.stl
    • Rear Axle/MTC_Portals_Gear1_FakeDogBone_InnerAxle.stl
    • Rear Axle/MTC_Portals_Gear1_FakeDogBone_OuterAxle.stl
    • Rear Axle/MTC_Portals_Rear_HubMain_Left.stl
    • Rear Axle/MTC_Portals_Rear_HubMain_Right.stl
    • MTC_Portals_Diff_Spacer10mm.stl
    • MTC_Portals_Gear1_5mmBushing.stl

Learn more about the formats

Publication date 2022-06-20 at 12:29
Design number 760582

3D printer file info

3D model description

I saw this kind of axles time ago, but they seemed something impossible for me then, especially when you have other parts of the transmission to improve to have a reliable build.

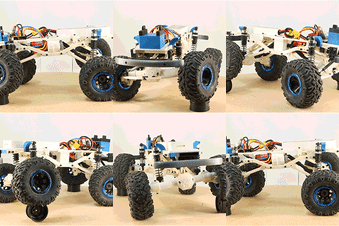
But people asked for it, and I took my extra time these last days to bring up a working version of Portal Axles for the Rigid Axles Version of the MTC Chassis.

I'm also including the main body of the axles in 3 different lengths, which should let you use 102015 or 106015 HSP CVDs, or a combination of them to achieve the desired axle length.

I have tried to minimize the needed sourced parts as always, and employ the most common and sourceable possible parts. In the rear axle you can use the same CVDs than in the front one or use a 3D printable solution for what would be the Rear Dogbones.

Needed Parts to build both complete axles:

  • 2 or 4 102015 or 106015 HSP CVDs
  • 2 or 4 2x9mm pins
  • 2 HSP 02024 Differentials
  • 2 HSP 02030 Diff. Pinions
  • 2 HSP 18027 Universal Transmission
  • 12 5x10x4 bearings (4 are for diff pinions)
  • 12 10x15x4 bearings (4 are for diffs)

  • 6 M5x10 Grub Screws for gears inside HubMains

  • 4 M4x16 Socket Head Screws for the wheels

  • 6 M3x30 Socket Head for links and shocks and steering

  • 16 M3x16 Counter-Sunk screws to close Hubs

  • 8 M3x12 Counter-Sunk screws to close axles

  • 4 M3x10 Socket Head or Button Head for C-Hubs->FrontHubMains

  • 8 M3x8 Socket Head or Button Head for Hubs->Axles

  • 1 M3x16 and another M3x20 for the steering platform->steering hubs

Thanks to an included "Adaptor", you can use 102015 CVDs instead of 106015 ones in the medium and long axles, but you won't be able to use 106015 CVDs in the medium or short axles... So I would recommend you to buy 102015 for short and med, and 106015 if you know you want the long axles. Remember you can use 3D printed transmission in the rear axle if you want to go cheaper.

Inside each wheel Hub a slight 12/13 reduction will occur. To attach the 12T gear to the CVDs you will have two possibilities:

  • You can metal smith with a rotary tool or something similar, chamfering the 5mm section zone of the CVDs removing 0.5mm and creating a plain surface. In this case, you can use the Gear1 Standard Part.
  • Or you can insert a 2x9mm pin in the Gear1withHole and make it pass through the CVD hole. It should fit inside the Gear1 without reaching out. Seal it with a point of glue.

I have only tested the first one by now, but when I break gear1 or deform it, I will go with the second one.

If you already have MTC Total Combo or MTC Rigid Axles Chassis this publication is specially for you.

If you don't have MTC Chassis, maybe you can use this in your own build. With the mentioned sourced parts, the axles should be ready to be installed in other projects. The space for the "Links Heads" is 10mm.

With the medium length axles and big crawler wheels, the total width is around 290mm, 280mm with 96mm wheels. You can add or remove 24mm to those numbers if using the long or short axles.

IMPORTANT:
This design has been only partially tested by me; anyway this is the third iteration over the idea to reach what I consider an experimental but working/usable design. If you are one of the first giving a try to this, you will for sure have all my attention to correct or improve what we consider can make this better.

3D printing settings

Most if not all of these parts are strictly dimensioned, so It would be better if you print them solid. For that, I'm using 0.4mm line widths and 0.2mm layer heights with hundreds of top/bottoms, so it gets solid.

Specially for the gears, you will need a very high inter-layer adhesion, so probably warm up 5 or 10ºC your PLA for the best adhesion and adapt the inner walls width to perfectly fill all the inside of the part.

These gears need to fit into 10x15x4 bearings, so check you are printing them the right size, if you don't, maybe play a little with horizontal expansion to correct the deviation.

About the perimeter starts (seams) I would recommend making them near the center of the gears. For the rest of the parts I use Shortest->SmartHide for the seam.

Let me recommend you the last CURA software, version 5 now. The variable line width, specially applied to the inner walls can better fill the space than in previous versions, it really surprised me, avoiding a lot of retractions just widening the inner walls in some points, really smart!

You can see in one of the photos all the parts together over the bed. I completely NOT recommend printing various parts at a time, as you can have worse results and more fail possibilities. Specially for the gears, print them one by one and put the seam point near the center, so no start points occur over the tip of teeth.

Remember, if you choose the medium length axles, you will have to apply symetry to one of the axle body parts to have them with the diffs aligned to the same side.

Supports:
- C-Hubs or rear hubs need a little support for the first horizontal surface. Remember to block the supports over that point, as the overhangs should be perfectly managed by your machine.
- Front Steering Hubs will need some support for the center surface, but not for the arm or other parts.
- Gear2 will need support for the first 0.6mm, so just two 0.2mm layers of supports and one layer of "air"

Accuracy, quite important:
To have the less play possible but also a good fit between parts you will need to print some parts very good, specially the gears and Hubs. Things can fit very easy into under-extruded parts, but they will be weak, as the perimeters won't be as good fusion as they could. If you over-extrude, parts will fit too much hard and probably you won't fit some bearings in their places. I had to use 215ºC and 110% flow with my last filament to reach that point of very strong and solid but accurate parts. The same way, don't use high speeds and accels for outer walls to achieve a more accurate result.

Advertising


Issue with this design? Report a problem.

Would you like to support Cults?

You like Cults and you want to help us continue the adventure independently? Please note that we are a small team of 3 people, therefore it is very simple to support us to maintain the activity and create future developments. Here are 4 solutions accessible to all:

  • ADVERTISING: Disable your banner blocker (AdBlock, …) and click on our banner ads.

  • AFFILIATION: Make your purchases online by clicking on our affiliate links here Amazon.

  • DONATE: If you want, you can make a donation via Ko-Fi 💜.

  • WORD OF MOUTH: Invite your friends to come, discover the platform and the magnificent 3D files shared by the community!


Sharing and downloading on Cults3D guarantees that designs remain in makers community hands! And not in the hands of the 3D printing or software giants who own the competing platforms and exploit the designs for their own commercial interests.

Cults3D is an independent, self-financed site that is not accountable to any investor or brand. Almost all of the site's revenues are paid back to the platform's makers. The content published on the site serves only the interests of its authors and not those of 3D printer brands who also wish to control the 3D modeling market.

100% secure payment by credit card, PayPal, Apple Pay, Google Pay, etc.
View all payment options.