Skip to content

The Swiss Army Rattler - 65mm

Advertising
Advertising
?
Creation quality: 0.0/5 (0 votes)
Evaluation of members on the printability, utility, level of detail, etc.

  • 1.2k views
  • 1 collection

License
3D design format
STL Folder details Close
  • Swiss Army Rattler 65 Clean.stl
  • Swiss Army Rattler 65 Gills and scales.stl
  • Swiss Army Rattler 65 Gills.stl
  • Swiss Army Rattler 65 scales.stl

Learn more about the formats

Publication date 2022-08-18 at 12:11
Design number 816463

DIYLureSupply

3D printer file info

3D model description

a While back I realised my tackle box had very few lipless crankbaits in it. So I went out a purchased a few. Sadly most of them disappointed me: They all require at least a medium retrieve to achieve a half-decent action. Retrieve too slow and they just do nothing. Secondly, most lipless cranks sink like a ball of lead. So you need fairly deep water to sun them. This is not always a bad thing, but it was a limitation.

So I set out to design my own. My design goals were as follows:

  1. It should have strong WIGGLY action even at a very low speed.
  2. the design should allow for flexibility. If you want it to float, suspend or sink the design should accommodate them all while still being stable at speed. This is achieved by changing the volume of weight.
  3. It should print as a single-piece lure with no assembly.

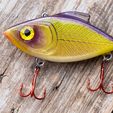
After many design iterations, I managed to achieve all of the above goals successfully. As this lure is now much more versatile than a standard lipless crank, I have dubbed it the Swiss Army Rattler: It will do it all! It will even wiggle in the fall if you make a normal fast sinking version! Due to the strong action, this lure gets very loud. I guarantee this lure will outperform any other lipless crank of the same size with regard to action and usability, I am that confident in it. It will catch a lot of fish!

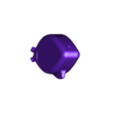
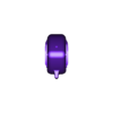
This is is original and 65 mm version of the above design. Please note there are 4 versions of the lure included depending on the look you want. One is just a plain blank canvas. One has raised gill plates, a third has just a scale pattern and the last has both a scale pattern and raised gill plates. All versions have a recess for 8mm eyes.

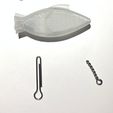
Prints as a single piece with internal rattles and weights. The front hook eye and tie-on eye are single through-wire, so it is very robust. It will easily suspend 15kg of weight for any amount of time. The design allows for changing the sound of the rattle depending on the weights used. Easily make high pitched rattle with 4.5mm BBs or a low-pitched "2 tap" version using 8 and 8mm steel bearings. The only important part when it comes to retaining stability in swimming actions is that the front chamber should always be heavier than the rear chamber. If it is not the lure might become unstable at high speed. I have tested even 50/50 weight distributions and it works fine at slow and medium speeds, but might become unstable at high speeds, depending on the hooks used. Feel free to experiment, though!

Weighting suggestions:

Floating
3-4 x 4.5mm BBs in the front chamber
1-2 x 4.5mm BBs in the rear chamber

Slow sinking
4-6 x 4.5mm BBs in the front chamber
2-4 x 4.5mm BBs in the rear chamber

Fast Sinking
6-8 x 4.5mm BBs in the front chamber
4-5 x 4.5mm BBs in the rear chamber

A detailed step-by-step guide on how to build this lure will be available very soon.

Please be aware that these files are for non-commercial use only. Print one or print a million, it's up to you. You are welcome to hand them out to friends and fellow anglers. Your friend wants one but doesn't have a printer? Print it for them and have them reimburse you for the cost of the material. No problem.

Please respect the fact that a lot of time and effort went into making these designs and associated media. You may not under any circumstances resell the design (file) or the resultant lure made from the print at profit.

Please respect the fact that a lot of time and effort went into making these designs. You may not under any circumstances resell the design (file) or the resultant lure made from the print at profit.

3D printing settings

The following are my suggested Cura settings. These work and work very well. After having printed 50+ lures, I know these settings are ideal. You are welcome to deviate, but you do so at your own peril.

Print the model in the orientation you find it in (upright). Do not scale. Wall thicknesses have been designed with specific line width settings and buoyancy in mind to give you the strongest possible allure while maintaining proper performance. Countless hours and numbers of prototypes have gone into refining the design. Deviate and change at your own risk. All models have integrated feet to add stability while printing. they were designed with a 0.2mm air gap between the floor and model, so will easily snap off after printing using a set of pliers.

0.4mm Nozzle
Layer height- 0.16mm
Initial Layer Height- 0.2mm
Line width 0.45mm
Wall Line count- 4
Fill gaps between walls Yes
Z Seam alignment User specified
Z Seam position back
Seam Corner Preference Smart Hiding
Bottom/Top thickness 1.6mm
Infill Density 10%
Infill Pattern Gyroid
Print Speed 75mm/s
Combing mode Not on skin (Important to not knock parts over)
Avoid Printed Parts when Traveling (Not on skin (Important to not knock parts over)
Travel avoidance Distance 0.625mm
Cooling is critical if printing PLA. I suggest using PLA+ at 100% colling. If you get bad surface detail/drooping/ or the support feet adhere too much to the body it is because you have inadequate cooling.
Build plate adhesion Brim
Brim line count 10

Required weights:
a Number of 4.5mm BBs as per the description above.

Weights and rattles are inserted during the printing process to decrease assembly time. I strongly suggest you review the model images for where there the weights and rattles should go and check your model during slicing to get an approximate idea of when they should be inserted. Suggested percentages are 24% for the front chamber and 60- 75% for the rear chamber. I prefer to slow down the printing process via the printer’s control panel to its lowest speed to insert the weights and rattles, then speed it up after insertion. You can pause the print to make it easier, but I always seem to have a perceptible misalignment after pausing which increases sanding time afterwards. Pausing negates any risk of knocking the print over. Just slowing down carries the risk of having the print head collide with your hand or a set of needle nose pliers.

Advertising


Issue with this design? Report a problem.

Would you like to support Cults?

You like Cults and you want to help us continue the adventure independently? Please note that we are a small team of 3 people, therefore it is very simple to support us to maintain the activity and create future developments. Here are 4 solutions accessible to all:

  • ADVERTISING: Disable your banner blocker (AdBlock, …) and click on our banner ads.

  • AFFILIATION: Make your purchases online by clicking on our affiliate links here Amazon.

  • DONATE: If you want, you can make a donation via Ko-Fi πŸ’œ.

  • WORD OF MOUTH: Invite your friends to come, discover the platform and the magnificent 3D files shared by the community!


Sharing and downloading on Cults3D guarantees that designs remain in makers community hands! And not in the hands of the 3D printing or software giants who own the competing platforms and exploit the designs for their own commercial interests.

Cults3D is an independent, self-financed site that is not accountable to any investor or brand. Almost all of the site's revenues are paid back to the platform's makers. The content published on the site serves only the interests of its authors and not those of 3D printer brands who also wish to control the 3D modeling market.

100% secure payment by credit card, PayPal, Apple Pay, Google Pay, etc.
View all payment options.