Skip to content

Tulip Heart Suncatcher Garden Decor with Stained Glass Effect

Advertising
Advertising
?
Creation quality: 5.0/5 (1 vote)
Evaluation of members on the printability, utility, level of detail, etc.

  • 1.8k views
  • 9 likes
  • 40 downloads

License
3D design format
STL and ZIP Folder details Close
  • Tulip Heart - Bottom.stl
  • Tulip Heart - Color 1 (Top and Bottom).stl
  • Tulip Heart - Color 2.stl
  • Tulip Heart - Color 3 (Center).stl
  • Tulip Heart - Flower.stl
  • Tulip Heart - Leaves.stl
  • Tulip Heart - Top (Silhouette).stl
  • Tulip Heart Suncatcher - WHOLE.stl
  • Tulip Heart Suncatcher by GP3D.zip

Learn more about the formats

Publication date 2023-01-27 at 19:43
Design number 1032659

3D printer file info

3D model description

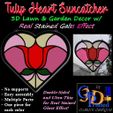
The Tulip Heart Suncatcher makes a beautiful decoration for any window, lawn and garden. It was specially designed with ultra-thin panels between double-sided outlines to mimic the luminescent nature of stained glass. the panels are divided into multiple files so that you can easily change up the colors and make it your own.

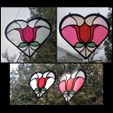
Around the tulip and leaves, there are three sections. The top and bottom pieces are combined, the next two inside those, and the larger piece in the middle. Being so close to Valentine's Day, we chose to print one heart sun catcher in Vanilla Cream/Crystal Clear/Pink, and another with all Crystal Clear panels around the flower. Both came out amazing, and catch the sun brilliantly where they hang from our porch.

#VALENTINEXCULTS

As an added bonus, the "Top" piece can be printed alone to make a beautiful, negative space silhouette of the heart and flower.

ASSEMBLY INSTRUCTIONS
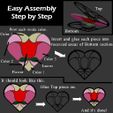
There are a total of 7 pieces in the ZIP file:

  • Tulip Heart - Top (Silhouette)
  • Tulip Heart - Bottom
  • Tulip Heart - Flower
  • Tulip Heart - Leaves
  • Tulip Heart - Color 1 (Top and Bottom)
  • Tulip Heart - Color 2
  • Tulip Heart - Color 3 (Center)

Each of the pieces have been carefully rendered to fit perfectly into the recessed areas of the "Bottom" section. They are ultra-thin and should only print 2-layers thick (at 0.16 Layer Height). This is important to ensure a translucent print, and that light is able to illuminate softly through the other side.

Use just a touch of glue to secure each of these in place. Next, add glue to the underside of the Top section. Only use tiny dots, but a lot of them for a good hold. Then line up the Top section over the bottom/middle and gently press them together. Use clips or clothes pins to hold the pieces together and allow ample time to dry. I like to use fishing line and a small keyring to hang them.

Enjoy!

If you like the sunflower, be sure to check out other pieces in the Stained Glass Series:

DIMENSIONS
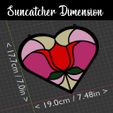
Fully assembled, the stained glass heart yard decoration measures:

X = 19.0cm / 7.48in
Y = 17.7cm / 6.96in
Z = 3.5cm / 1.38in

If you like the Tulip Heart Suncatcher, please check out other items in our ever-growing portfolio of STL models (including many more items in the Stained Glass Series!)

IMPORTANT: We have made this file available for commercial resale! If you buy it, you can print and sell it until the cows come home! You may NOT restribute the actual file in any way shape or form. Only the model, in its original state, may be printed and sold.

Note that, unlike this one, most of our models do not come with a commercial license. However, you can obtain a license to download and legally sell ALL GetPrinted3D models here:
- https://www.patreon.com/GetPrinted3D

3D printing settings

TOP/BOTTOM PIECES
These sections will print well under basic settings.
Layer Quality: 0.16
Infill: 20%
Speed: 60mm/s
Supports: No
Plate Adhesion: None

MIDDLE PIECES (Flower, Leaves, Color 1-2-3)
These pieces must print very thin to remain slightly translucent. They are only 0.32mm thick. Use the following settings to ensure they print in just two layers.

Layer Quality: 0.16
Initial Layer: 0.16
Infill: Doesn't matter, it will print at 100% anyway.
Speed: 40mm/s
Supports: No
Plate Adhesion: None

Tip: If you're having trouble printing these smoothly, try using Cura's 'Enable Ironing' setting. It takes a little longer to print, but the nozzle will go back over the top layer to smooth it out, just like you would iron clothing to remove wrinkles.

SILHOUETTE
If you want to print the Heart and Flower as a silhouette, only print the "Tulip Heart - Top (Silhouette)" file. It's just 1.5mm thick, so I recommend scaling the Z to 200% (3mm). From there, these basic settings will do.

Layer Quality: 0.2
Infill: 15%
Top/Bottom Layers: 3
Top "Surface" Layers: 2
Speed: 60mm/s
Supports: No
Plate Adhesion: None

Advertising


Issue with this design? Report a problem.

Would you like to support Cults?

You like Cults and you want to help us continue the adventure independently? Please note that we are a small team of 3 people, therefore it is very simple to support us to maintain the activity and create future developments. Here are 4 solutions accessible to all:

  • ADVERTISING: Disable your banner blocker (AdBlock, …) and click on our banner ads.

  • AFFILIATION: Make your purchases online by clicking on our affiliate links here Amazon.

  • DONATE: If you want, you can make a donation via Ko-Fi πŸ’œ.

  • WORD OF MOUTH: Invite your friends to come, discover the platform and the magnificent 3D files shared by the community!


Sharing and downloading on Cults3D guarantees that designs remain in makers community hands! And not in the hands of the 3D printing or software giants who own the competing platforms and exploit the designs for their own commercial interests.

Cults3D is an independent, self-financed site that is not accountable to any investor or brand. Almost all of the site's revenues are paid back to the platform's makers. The content published on the site serves only the interests of its authors and not those of 3D printer brands who also wish to control the 3D modeling market.

100% secure payment by credit card, PayPal, Apple Pay, Google Pay, etc.
View all payment options.