Celebrate Saint Patrick's Day in sleek DIY fashion with St Pat's Hats! They come in three sizes. There's a Large for Adults, Small for children, and Mini for whatever you want to put them on - like that lucky Leprechaun if you can catch him!
The Small and Large sizes are wearable, while the Mini makes a great tophat decoration for everything from (willing) pets to holiday baskets and party favors. If you print the "Mini Brim with Holes", you can attach a stretch-chord to it and put it on just about anything, including your own head.
IMPORTANT
This is really important, so Read This Before Downloading!
The Small (Kids) and Large (Adult) sizes require a larger 3D printer bed to print! The Mini Hat will print on any printer with a bed size of 130x130 or more, but the human-size hats have large brims that are bigger than the standard print bed size. Here are the sizes you will need to print all the files.
- Mini Hat can be printed on any standard-size Print Bed of 130x130 and up.
- Small (Kids) Hat requires a larger Print Bed of 280x280 or more.
- Large (Adult) Hat requires an even larger Print Bed of 320x320 or more.
SAINT PATRICK HAT PRINT & ASSEMBLY INSTRUCTIONS
There are three folders in the St Pat's Hat Zip File. Each folder contains the STL files for each hat size (Mini, Small and Large). Be sure to print the correct files for the size hate you want to print. (Note that the file "WHOLE (Sample)" is provided for previewing on Cults3D and is not meant to be printed.)
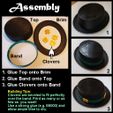
These are very easy to put together. For visual instruction, refer to the images above. I've added some extra details and tips in the step-by-step instructions below.
- Glue the Top section of the hat into the recessed inner lining of the Brim. It should line up inside the recessed area. Set something heavy on top of it while it dries.
- Drop the Band down over the Brim. If it doesn't slide all the way down, try turning it over. Although the size is the same top to bottom, I found that the Bands fit better when flipped upside down. Once you've got a good fit, take it off, add some glue, and drop it back into place.
- You can add as many 4 Leaf Clovers to the hat as you want. I like to use 4, equally spread apart front to back and side to side. The inside of each clover is cut to perfectly fit over the edge of the band. Add a bit of glue just under the bevel and on the stem, then press it into place.
Enjoy!
DIMENSIONS
Fully assembled, each St Patrick Day Hat measures:
Mini Hat
X = 10.4cm / 4.1in
Y = 12.3cm / 4.8in
Z = 4.43cm / 1.74in
Small (Kids) Hat
X = 23.2cm / 9.1in
Y = 27.4cm / 10.8in
Z = 8.62cm / 3.4in
Large (Adult) Hat
X = 26.6cm / 10.5in
Y = 31.3cm / 12.3in
Z = 8.95cm / 3.5in
If you like Saint Pat's Hats, please check out our ever-growing portfolio of STL models.
IMPORTANT: Unless otherwise noted, ALL GetPrinted3D designs are Copyright protected. When you purchase a file, you do NOT have the right to sell the file or printed model. Files may not be redistributed under any circumstances. The models are for personal and private use, and may not be sold commercially without the explicit written consent of GetPrinted3D.
You can obtain a Commercial License to legally sell our designs here:
- https://www.patreon.com/GetPrinted3D

/https://fbi.cults3d.com/uploaders/26463760/illustration-file/f7875395-425d-4e47-8251-408a955b3b84/St-Patricks-Day-Hat-IMG.jpg)
