

Introduction: Soap Wall Tile - Prototyping


This is my tutorial to show you how I made the prototype to my soap-tile concept.
To make this tutorial you will need;
a pillow
the 123d catch app
Meshmixer
123d make
Illustrator
lasercutter
cardboard
glue
wax
heatgun
metalbowl
mdf pieces (mine are 4x4 in)
Step 1: Doing the Catch

I had an initial shape in mind for my soap tiles, and I chose to catch a pillow. I took 32 pictures with the 123d Catch app from different angles, checked that the catch was complete, and uploaded it from my phone to the community. I then went on the community webpage with my computer, and downloaded my file.
Step 2: Cleaning Up Your Catch

Import your file into Meshmixer and clean up your file. delete the surfaces you dont need, and fill out the holes your model might have.
Step 3: Make Your Catch Smooooth

I wanted my model to be as smooth as possible, so I used the smoothbrush/1 to make any small imperfections go away.
Step 4: Import Your File to 123d Make

Import your file to 123d Make and start deciding what your output will be.
Step 5: Decision Time

Go through the instructions on the left side of your screen. Decide on sixe, thickness of material and what I am doing when the photo was taken, deciding on slice direction.
Step 6: Assembly Preview

123d Make also presents you with an assembly guide and preview to clarify how the pieces will fit together
Step 7: Plans

123d Make created the plans that needs to be lasercut. So save the file and move into Illustrator. As you can see, 123d make doesn't place the pieces in a very good way so I always spend a couple minutes rearranging them in Illustrator so that I save as much material as possible.
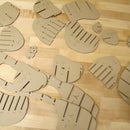
Step 8: Lasercut Your Pieces

Charge up your laser-ing powers and get those pieces cut!
Step 9: Glue

Glue all your pieces together. I needed a couple of shapes. So I printed two pillow shapes so that I could make four shapes with a flat base, instead of round shapes. In this case I used these mock-up prototypes as a shape exploration. Ill make the next prototype separately.
Step 10: Melting and Applying Wax

Start by heating, and therefore, melting, wax. I put the wax in a metal bowl and used a heat gun to melt it. I then placed the mdf square into the hot wax.
Step 11: Finito!

Let the wax cool. I put mine in the refrigerator to speed up the process. When its cool, take it out by using the heatgun one more time to heat up the wax surface so that it can be removed from the bowl. I sanded down the edges so that the wax has a square base shape.


