Skip to content

"Umulius Rectangulum", 3D Printed

Advertising
Advertising
?
Creation quality: 5.0/5 (1 vote)
Evaluation of members on the printability, utility, level of detail, etc.

  • 1.4k views
  • 1 like
  • 33 downloads

License
3D design format
STL and ZIP Folder details Close
  • Assembly.skp.zip
  • Assembly.stl
  • Rectangle_Half.stl
  • Rectangle_Half_Small.stl

Learn more about the formats

Publication date 2018-06-07 at 15:46
Design number 26483

3D printer file info

3D model description

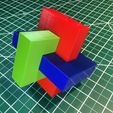
"Umulius Rectangulum", 3D Printed is my 3D printed interpretation of the origami (paper version) "Umulius Rectangulum" by Thoki Yenn. As was the original, this version requires only one part, 3D printed six times in paired colors, in order to recreate this elegantly simple yet clever Thoki Yenn origami design on your 3D printer.

I've included two sizes of the one part required to assemble "Umulius Rectangulum", 3D Printed in the download, standard and small. A poor quality video of the small assembly process is here: https://www.youtube.com/watch?v=nlL1DDh4PnU. Depending on your printer, settings, etc., the small version can be printed in an hour or so, the large version requires much longer print time.

However, if you are a tried and true origami enthusiast, a video of how to recreate the paper version is here: https://www.youtube.com/watch?v=JdOpxqMxQ3A&feature=youtu.be.

Designed using Sketchup Make 2015. Printed in PLA on an Ultimaker 2 Extended using Cura settings as described in Print Settings.

3D printing settings

Printer Brand:

Ultimaker

Printer:

Ultimaker 2

Rafts:

No

Supports:

No

Resolution:

.1mm

Infill:

20%

Post-Printing
Print 6 of either "Rectangle Half Small.stl" (for a smaller version) or "Rectangle Half.stl" (for the original version) in the colors of your choice. I printed two in red, two in green and two in blue for the prototypes as seen in the photo.

Test fit and trim, file, sand, etc. all parts as necessary for a tight fit. Depending on the colors you chose, your printer and your printer settings, more or less trimming, filing and/or sanding may be required. If the components are too loose, add a small dot of thick cyanoacrylate to the side(s) of the male component, allow to dry completely (I use accelerator to speed the process), then try the fit again. Repeat until tight.

Assemble as per "Assembly.skp" or "Assembly.stl".

Advertising


Issue with this design? Report a problem.

Would you like to support Cults?

You like Cults and you want to help us continue the adventure independently? Please note that we are a small team of 3 people, therefore it is very simple to support us to maintain the activity and create future developments. Here are 4 solutions accessible to all:

  • ADVERTISING: Disable your banner blocker (AdBlock, …) and click on our banner ads.

  • AFFILIATION: Make your purchases online by clicking on our affiliate links here Amazon.

  • DONATE: If you want, you can make a donation via Ko-Fi πŸ’œ.

  • WORD OF MOUTH: Invite your friends to come, discover the platform and the magnificent 3D files shared by the community!


Sharing and downloading on Cults3D guarantees that designs remain in makers community hands! And not in the hands of the 3D printing or software giants who own the competing platforms and exploit the designs for their own commercial interests.

Cults3D is an independent, self-financed site that is not accountable to any investor or brand. Almost all of the site's revenues are paid back to the platform's makers. The content published on the site serves only the interests of its authors and not those of 3D printer brands who also wish to control the 3D modeling market.

100% secure payment by credit card, PayPal, Apple Pay, Google Pay, etc.
View all payment options.