Skip to content

Frustration Participation (Hand Cranked Version of Frustration)

Advertising
Advertising
?
Creation quality: 5.0/5 (1 vote)
Evaluation of members on the printability, utility, level of detail, etc.

  • 1.9k views
  • 3 likes
  • 43 downloads

License
3D design format
STL Folder details Close
  • Arm_Lower_Left.stl
  • Arm_Lower_Right.stl
  • Arm_Uppers.stl
  • Axle_Slide_Short.stl
  • Axle_Wheel.stl
  • Axle__Slide_Long.stl
  • Base_Hand_Crank.stl
  • Crank_Hand_Crank.stl
  • Cranks.stl
  • Gear_Hand_Crank.stl
  • Gear_Slide.stl
  • Gear_Wheel.stl
  • Head.stl
  • Knob_Hand_Crank.stl
  • Leg_Lower_Left.stl
  • Leg_Lower_Right.stl
  • Leg_Uppers.stl
  • Pins_Joint.stl
  • Slides.stl
  • Top.stl
  • Torso.stl
  • Wheel.stl
  • Wheel_Hub.stl

Learn more about the formats

Publication date 2018-06-14 at 15:19
Design number 26962

3D printer file info

3D model description

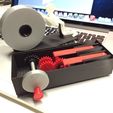
If you desire participation in this little guy's frustration, well build this thing and get cranky with him.

Video of prototype is here: https://www.youtube.com/watch?v=2OmLFXPMEdI.

This is a hand cranked version of the motorized "Frustration" (http://www.thingiverse.com/thing:318760). The bases (motorized and this one) are interchangeable, so if you build the top assembly, then it can be used with either base as shown in the video.

Printed in PLA on a Makerbot Replicator 2 using Makerware 2.3.3.42 "Standard" settings.

3D printing settings

Study "Assembly.skp".

I've included all the files necessary to build a complete hand cranked "Frustration". If you've already downloaded the files for the motorized "Frustration", then you need to only download "Base Hand Crank.stl", "Gear Hand Crank.stl", "Crank Hand Crank.stl" and "Knob Hand Crank.stl".

Follow the assembly instructions for "Frustration" ignoring the motor instructions.

Test fit all parts before assembly.

Finish assembly of the hand crank base by pressing "Knob Hand Crank.stl" into "Crank Hand Crank.stl". Slide this assembly into the assembled base mechanism crank holes and if it does not rotate smoothly, clean / smooth out the crank holes with a 15/64" drill bit, modeling knife, and or file. Once installed, press "Gear Hand Crank.stl" onto the assembly. Test the completed base assembly, and when satisfied that all is smooth, and there is no binding, place a small dot of cyanoacrylate on "Gear Hand Crank.stl" to hold it on "Crank Hand Crank.stl". The video shows how smoothly the assembly should operate.

Snap the top assembly into the base assembly.

Get cranky with the little guy.

Advertising


Issue with this design? Report a problem.

Would you like to support Cults?

You like Cults and you want to help us continue the adventure independently? Please note that we are a small team of 3 people, therefore it is very simple to support us to maintain the activity and create future developments. Here are 4 solutions accessible to all:

  • ADVERTISING: Disable your banner blocker (AdBlock, …) and click on our banner ads.

  • AFFILIATION: Make your purchases online by clicking on our affiliate links here Amazon.

  • DONATE: If you want, you can make a donation via Ko-Fi 💜.

  • WORD OF MOUTH: Invite your friends to come, discover the platform and the magnificent 3D files shared by the community!


Sharing and downloading on Cults3D guarantees that designs remain in makers community hands! And not in the hands of the 3D printing or software giants who own the competing platforms and exploit the designs for their own commercial interests.

Cults3D is an independent, self-financed site that is not accountable to any investor or brand. Almost all of the site's revenues are paid back to the platform's makers. The content published on the site serves only the interests of its authors and not those of 3D printer brands who also wish to control the 3D modeling market.

100% secure payment by credit card, PayPal, Apple Pay, Google Pay, etc.
View all payment options.