Skip to content

Dovetail Joinery Box

Advertising
Advertising
?
Creation quality: 5.0/5 (1 vote)
Evaluation of members on the printability, utility, level of detail, etc.

  • 3.6k views
  • 8 likes
  • 189 downloads

License
3D design format
STL and ZIP Folder details Close
  • Archive.zip
  • Back.stl
  • Base.stl
  • Front.stl
  • Pin_Hinge.stl
  • Side.stl
  • Top.stl

Learn more about the formats

Publication date 2018-06-19 at 13:51
Design number 27415

3D printer file info

3D model description

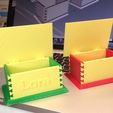
When my kids were young, I gave them what I thought were cool presents, yet they played with the box. Well, when my wife saw my last project, the "Do Nothing Box", she liked the box, only wanted it a little smaller. So, I made the Dovetail Joinery Box.

As a long time woodworker, I couldn't just build any box, so I added dovetail joinery to the sides. Much easier than the wooden version to create, this box was designed using Sketchup 8 (the free version), and printed in PLA using Makerware and a Replicator 2.

I've made two of these with different color combinations. I would like to see the color combinations you chose!

As a final note, I've uploaded all ".skp" files used to build this project. Feel free to modify any component, as did I with my wife's name on "Front.stl". We both would enjoy seeing your results.

3D printing settings

Begin by studying the "Assembly.stl" Sketchup 8 file.

Next, print parts. All parts were printed using Makerware "Standard" settings:

1) Print 1 each of "Base.stl", "Back.stl", "Font.stl" and "Top.stl".

2) Print 2 each of "Side.stl" and "Pin Hinge.stl".

Finally, assemble parts (make sure you study "Assembly.skp" for proper position and orientation):

1) Place "Front.stl" on a flat surface, then press one "Side.stl" on one end of "Front.stl", and press the second "Side.stl" on the other end. I found a rubber mallet made it easier to press the sides onto the front.

2) Press "Back.stl" on the two sides. Again, a rubber mallet helps here.

3) Press the assembly just made into "Base.stl". Some sanding, filing and/or trimming may be necessary to fully seat the assembly in the base. If you are planning to put something heavy in the box, a small dot of cyanoacrylate in each corner of the recess in "Base.stl" may be necessary.

4) Position "Top.stl" on the assembly between the hinge assemblies on "Back.stl", then insert the two "Pin Hinge.stl" pins. After insertion of the pins, if the top does not pivot smoothly, remove the pins and top, then, using a hand held electric drill, run a 3/16" drill bit in REVERSE through the hinge pin holes on "Top.stl" (running the drill in reverse avoids "bit grabbing" which could potentially break the hinge off of "Top.stl").

5) Enjoy. I would like to see the color combinations you choose.

Advertising


Issue with this design? Report a problem.

Would you like to support Cults?

You like Cults and you want to help us continue the adventure independently? Please note that we are a small team of 3 people, therefore it is very simple to support us to maintain the activity and create future developments. Here are 4 solutions accessible to all:

  • ADVERTISING: Disable your banner blocker (AdBlock, …) and click on our banner ads.

  • AFFILIATION: Make your purchases online by clicking on our affiliate links here Amazon.

  • DONATE: If you want, you can make a donation via Ko-Fi πŸ’œ.

  • WORD OF MOUTH: Invite your friends to come, discover the platform and the magnificent 3D files shared by the community!


Sharing and downloading on Cults3D guarantees that designs remain in makers community hands! And not in the hands of the 3D printing or software giants who own the competing platforms and exploit the designs for their own commercial interests.

Cults3D is an independent, self-financed site that is not accountable to any investor or brand. Almost all of the site's revenues are paid back to the platform's makers. The content published on the site serves only the interests of its authors and not those of 3D printer brands who also wish to control the 3D modeling market.

100% secure payment by credit card, PayPal, Apple Pay, Google Pay, etc.
View all payment options.