Tools and materials used for design and construction:
1) Replicator 2.
2) PLA (I used green, red, white and yellow).
3) ReplicatorG.
4) Sketchup8 (free version).
5) Soldering iron.
6) Solder.
7) Tin snips.
8) Screw drivers (jewelers size).
9) Needle nose pliers.
10) Modeling knife.
11) Wire (red and black, stranded, 22 gauge or smaller).
12) Wire cutters.
13) Wire strippers.
14) Heat shrink.
15) Silicon glue.
16) Cyanoacrylate glue.
17) Toothpicks (for applying small amounts of glue).
18) Permanent marker ("Sharpie" or equivalent).
Parts purchased for construction:
1) Motor (1.5 to 3.0 volt dc Radio Shack part number 273-223 or equivalent).
2) Power supply (1.5 volt dc 500ma isolated, or D cell battery and holder).
3) 2 Magnets (3mm diameter, 1.5mm thick, Amazon.com “Tiny Craft Hobby Neodymium Rare Earth Super Magnets 1/8 x 1/16 in. (3x1.5mm) (x50)†or equivalent).
4) Reed switch (my favorite is Mouser.com part number 876-ORD2210V-2025, but a "will suffice but very fragile" Amazon.com "Amico 10 Pcs MKA-10110 10-15AT Magnetic Sensor N/O SPST Contact Reed Switches" or equivalent).
5) Tin sheet (ferromagnetic, .008mm thick, Amazon.com “Tin Sheet 4 x 10, .008†or equivalent).
Construction:
1) Unless noted otherwise, the following ReplicatorG settings were used:
a) Infill: 15%
b) Layer height: .25
c) Number of shells: 1
d) Feed rate: 80
e) Travel feed rate: 150
f) Print temperature: 230
2) Print reservoir. After printing, carefully remove the membrane from the pump housing (see Fountain Assembly for location) using a sharp modeling knife.
3) Print motor mount.
4) Print motor splash cover.
5) Print impeller.
6) Solder 6†red and black wires to the motor + and – terminals respectively.
7) Slide motor into motor mount. This is a tight fit.
8) Slide impeller onto motor shaft. This is a tight fit. The impeller blades should be 1mm clear of motor mount and spin freely. If the impeller does not spin freely, remove impeller, use a drill (15/64â€) or hone to slightly enlarge the impeller hole, reinstall impeller and check fit again. This step is crucial for motor and impeller life and efficiency.
9) Slide motor splash cover over top of motor, routing the red and black motor wires through the large exit hole (see Fountain Assembly for location and orientation). Make sure when the motor splash cover is slid over the motor mount that the position of the impeller does not change.
10) Press motor mount into reservoir pump housing. This is a tight fit. Make sure it is pressed entirely into the base. I highly recommend applying a small bead of silicon glue to the inner ledge of the reservoir pump housing (see Fountain Assembly for location) using a toothpick. This will provide a better seal between the motor mount and the reservoir pump housing. Do not apply too much silicon glue as the impeller may come in contact with it.
11) Print riser.
12) Carefully press riser onto motor mount outlet (vertical square tube rising from the top of the motor mount, see Fountain Assembly for location and orientation of riser). This is a tight fit. Again here a small amount of silicon glue can be applied to the motor mount outlet prior to pressing on the riser for a better seal.
13) Test the pump. Fill reservoir with water until the water level just touches the top of the motor mount (do not overfill). Apply 1.5 volts dc to the motor. Water should flow out of the riser and the motor should run smooth and quiet. If not quiet, make sure the impeller is clear of both the motor mount and reservoir pump base, and make sure silicon glue did not ooze out and impact the impeller. Remove power and drain the reservoir.
14) Print cup.
15) Print cork.
16) Print magnet frame. Press one magnet into each of the two round holes in the magnet frame. A small amount of cyanoacrylate can be used to secure the magnets in the frame. If cyanoacrylate is used, make sure none seeps into the center of the magnet frame.
17) Carefully bend the wire on either end of the reed switch until it is parallel with the glass body of the reed switch. Solder wires to reed switch. If you use the Amazon.com read switch, heat shrink to insulate one of the solder joints (see the Amazon.com reed switch assembly picture).
18) Starting on the bottom, slide reed switch up into reed switch slot (see Fountain Assembly for location) until top of reed switch is 2mm below the top of the reed switch slot. Once positioned, slide the wires into the wire clip in the wire trough on bottom of cup. Make sure the reed switch glass body makes good contact with the outside of the reed switch slot.
19) Cut the rectangular latch strip from tin sheet material, 4mm wide and 12mm long (the latch strip should be just wide enough to slide into latch strip slot on top of cup, see Fountain Assembly for location and orientation). Slide latch strip into latch strip slot leaving about 4mm exposed.
20) Insert cup into reservoir cup holder (see Fountain Assembly for location). Carefully run wires under reservoir pump housing such that they exit the reservoir pump housing below the motor wires.
21) Solder black motor wire to either of the reed switch wires, insulating the solder connection with heat shrink.
22) "Tune" reed switch, magnet frame and latch strip. Connect motor red wire to power supply positive. Connect remaining reed switch wire to power supply negative. Slide magnet frame onto cup center tower such that one of the magnets is on the reed switch side of the center tower, and the other is on the latch strip side of the center tower (see Fountain Assembly for location and orientation). Lower the magnet frame to the magnet frame stops on the center tower. Turn on power. Adjust reed switch position such that the motor starts running when the magnet frame is on the magnet frame stops, and the motor stops running when the magnet frame is raised 2mm or greater off of the magnet frame stops. Note if the motor never starts running, carefully remove the magnet frame, remove and rotate the magnet on the reed switch side of the magnet frame 180 degrees end to end (thus changing the magnetic poles), then reinsert the magnet into the magnet frame. Mark the magnet frame with a black marker to remember this magnet as being the reed switch magnet. Adjust the latch strip such that when the magnet frame is 2mm or greater above the magnet frame stops, it “jumps†to the latch strip. Tuning the reed switch, magnet frame and latch strip is crucial to the operation of the fountain, and may take some time to properly adjust. Remove power.
23) Fill reservoir with water until the water level just touches the top of the motor mount (do not overfill). Place the magnet frame into cork (see Fountain Assembly for location and orientation). Slide the cork and magnet frame onto the center tower of cup, making sure the reed switch magnet is on the proper side of the tower (did you remember to mark it?). Apply power. Water should flow from riser filling the cup. As the cup fills, the cork eventually rises to the point where it lifts the magnet frame off the magnet frame stops, causing the magnet frame to “jump†up the center tower to the latch strip. When this happens, water should stop flowing from the riser. Due to the hole in the bottom of the cup, water drains from the cup returning to the reservoir, and the cork slowly sinks. Eventually, the cork will pull the magnet frame away from the latch strip, and lower it back to the magnet frame stops. Once on the magnet frame stops, the process repeats. Make any necessary adjustments to the reed switch and latch strip so that this operation is continuous. Once satisfied with the latch strip adjustment, carefully bend any remaining exposed latch strip material over the center of the center tower, and secure with a small amount of cyanoacrylate. "Magnet Latch.mov" is a video included in the download that illustrates the correct operation of the cork, magnet frame and latch strip.
24) When all is operating properly, remove power.
25) Print pot. Slide pot onto cup, aligning the slot at the bottom of pot over the reed switch wires.
26) Print petals.
27) Print stem.
28) Print center.
29) Print cover.
30) Press stem legs into cork (see Fountain Assembly for location and orientation).
31) Slide cover over stem and lower it into pot (see Fountain Assembly for location and orientation).
32) Press center into petals (see Fountain Assembly for location and orientation).
33) Slide stem into slots on back of petals (see Fountain Assembly for location and orientation).
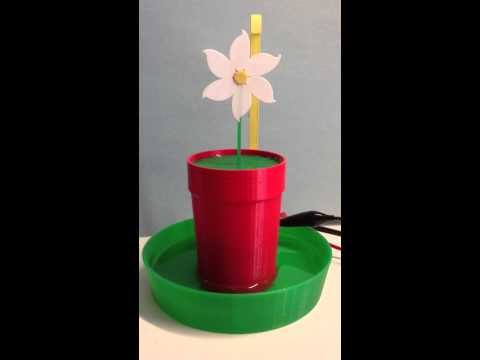
34) Apply power. Your “flower†should rise when water is flowing, and lower when water stops flowing.
35) Design your own flowers and stems, but keep them as light as possible. A PLA cork of this size can only lift so much.
36) I can't imagine having to build something such as this without a Replicator 2 (or a 3D printer in general). It was an enjoyable, albeit at times challenging, experience. Hope you enjoy yours.
Caveats:
1) Do not overfill the reservoir. Doing so does not allow the cork to sink low enough to displace the magnet frame from the magnet latch.
2) While we run ours at 1.5 volts dc, you can run at 3.0 volts dc. However, it is noisier, and may splash water.
3) The cork was printed with 15% infill. This has been more than adequate for the 3 prototypes we built. However, if you increase the weight of your "flower", you may need to decrease the infill of the cork. In reverse, if you decrease the weight of your "flower", you may need to increase the infill of your cork.
4) If your pump won't prime after filling the reservoir, with the reservoir filled and power off, gently lift the motor mount assembly (motor, splash cover and all) barely free of the reservoir pump housing then snap it back in place. This will break the seal just enough to allow the pump housing to prime. Another method, again with the reservoir filled and power off, is to remove the riser, pour water down the motor mount outlet, then replace the riser.
:format(webp)/https://fbi.cults3d.com/uploaders/13550170/illustration-file/43869a5e-0cd5-4f96-83de-342a0bf205c2/Flower_Watering_Fountain_preview_featured.jpg)