Skip to content

Cooling test - Overhang test

Advertising
Advertising
?
Creation quality: 5.0/5 (1 vote)
Evaluation of members on the printability, utility, level of detail, etc.

  • 3.4k views
  • 5 likes
  • 51 downloads

License
3D design format
STL Folder details Close
  • 60-80_no_text.stl
  • 60-80_with_text.stl

Learn more about the formats

Publication date 2018-07-16 at 16:08
Design number 28634

3D printer file info

3D model description

What
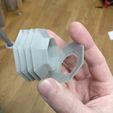
A test to see how well your part cooler performs, mainly on overhangs.
Prints in less than one hour.
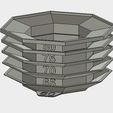
The print can be taken apart at each level when it is done.
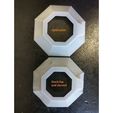
Two versions, with and without text on overhang surface.

Why
Analyse how well you cooler prints overhangs and if it cools evenly over 360Β°.
I made this to help me design and evaluate my Opticooler cooling solution for Wanhao Di3.

Print recommendations
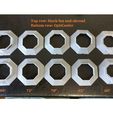
To compare with my pics (PLA) use 100% cooling at 0,2mm layer height and 30mm/sec overall (make sure other settings does not adjust).
Print with enough walls and top/bottom layers that everything prints solid.
Experiment with different layer heights, speeds and temps.

Understand and improve the results
-Look for upwards curling on edges. Compare the curling on all corners to see how well your cooler handles full 360Β°.
-Look for how well the overhang surfaces looks at different angles, experiment with slower speeds and lower layer heights to improve. But don't go lower than necessary, in my experience a too low layer height causes more upwards curling on difficult overhangs.
-Look for filament strands hanging loose. Better cooling can only help so much. At 80Β° overhangs, 0.2mm layer height means that the next layer will print outside of the previous layer, in mid air. You will need to go somewhere below 0.1mm to be able to print that at all.
Watch the layer preview to find a layer height that works for the overhangs you are printing, but don't choose lower than necessary layer heights.
(I'm still learning the relationship for this, If you don't agree, please tell me).
-If you run into a case where your cooling is just not enough no matter what, just slow down and if possible lower temp. Some delicate prints will be easier to print if you print more of them at the same time, allowing more time for each parts layer to cool.

Share the knowledge
I'd be happy to hear what you learn and if you feel my conclusions above are not true.

Advertising


Issue with this design? Report a problem.

Would you like to support Cults?

You like Cults and you want to help us continue the adventure independently? Please note that we are a small team of 3 people, therefore it is very simple to support us to maintain the activity and create future developments. Here are 4 solutions accessible to all:

  • ADVERTISING: Disable your banner blocker (AdBlock, …) and click on our banner ads.

  • AFFILIATION: Make your purchases online by clicking on our affiliate links here Amazon.

  • DONATE: If you want, you can make a donation via Ko-Fi πŸ’œ.

  • WORD OF MOUTH: Invite your friends to come, discover the platform and the magnificent 3D files shared by the community!


Sharing and downloading on Cults3D guarantees that designs remain in makers community hands! And not in the hands of the 3D printing or software giants who own the competing platforms and exploit the designs for their own commercial interests.

Cults3D is an independent, self-financed site that is not accountable to any investor or brand. Almost all of the site's revenues are paid back to the platform's makers. The content published on the site serves only the interests of its authors and not those of 3D printer brands who also wish to control the 3D modeling market.

100% secure payment by credit card, PayPal, Apple Pay, Google Pay, etc.
View all payment options.