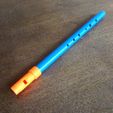
Great DIY project for you or the kids!
Have a blast creating your very own playable instrument.
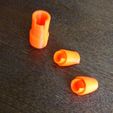
Simply print the Whistle Window and Fipple and connect it to the whistle body. (Instructions provided below).
You have two fipples to choose from: Straight or Round.
• Use the Straight fipple to play a bright open sound.
• Use the Round fipple for a softer and mellower sound.
Materials for the Whistle body.
• 1/2 inch CPVC or PEX pipe (16mm) Diameter. Cost: $1.65USD for two feet of pipe.
Please note, in the USA "1/2 inch" is just a nominal size. Actual outside diameter is 0.625 inch or 15.875 mm. Don't worry! The whistle mouthpiece is designed to fit up to 16mm.
In the USA you can use either SharkBite PEX 1/2 inch or Charlotte CPVC 1/2 inch pipe. I prefer PEX because it's easy to work with (no pvc dust to worry about) and sounds just great since it's the printed mouthpiece that makes the sound!
Tools
• Exacto knife, deburring tool, or power drill to cut out the sound holes into the pipe. .
• If using a power drill, you need drill bits in the following sizes: 3/16 (5mm), 15/64 (6mm), 9/32 (7mm), and 5/16 (8mm).
• Tape measure or ruler in millimeters.
• Pipe cutter or handsaw to cut pipe.
No drill or exacto knife? No problem! Use sharp scissors to shape each hole by turning the tip in place until the desired diameter is achieved. Work slowly and measure the diameter often.
How-to Instructions.
- Measure and cut Pipe at 250mm length.
- Measure the following distances from the end of the pipe and mark the place where each hole will be made.
• 40mm from the end of the pipe for the First hole.
• 67mm from the end of the pipe for the Second hole.
• 84mm from the end of the pipe for the Third hole.
• 106mm from the end of the pipe for the Fourth hole.
• 127mm from the end of the pipe for the Fifth hole.
• 149mm from the end of the pipe for the Sixth hole.
You can use the tip of the exacto knife to punch down and mark the center of the hole.
Next, use the power drill for each hole or use the tip of the exacto knife or deburring tool to carve out a hole at the center mark as follows:
• Using a 7mm drill bit or exacto knife cut the First hole at the center point mark. This hole should have a diameter of 7mm.
• Using an 8mm drill bit or exacto knife cut the Second hole at the center point mark. This hole should have a diameter of 8mm.
• Using an 5mm drill bit or exacto knife cut the Third hole at the center point mark. This hole should have a diameter of 5mm.
• Using an 6mm drill bit or exacto knife cut the Fourth hole at the center point mark. This hole should have a diameter of 6mm.
• Using an 6mm drill bit or exacto knife cut the Fifth hole at the center point mark. This hole should have a diameter of 6mm.
• Using an 5mm drill bit or exacto knife cut the Sixth hole at the center point mark. This hole should have a diameter of 5mm.
- Lastly, attach 3d printed Whistle Mouthpiece onto the pipe and play!
Note:
I play music and craft musical instruments for a living. Contact me if you need a whistle professionally made (instagram/flute_maker).
This Whistle mouthpiece is my own invention and creation. My design allows to change the tone of the whistle from warm to bright by simply swapping out the fipple. Amazing! Normally you need separate whistles from different whistle makers to accomplish this.
Please enjoy your very own whistle you made for less than $2 USD in materials! Truly a penny whistle!

/https://fbi.cults3d.com/uploaders/12966651/illustration-file/50966b8c-567d-484a-a5d2-0d3cb84f9f33/IMG_20171003_122616_830.jpg)


