Skip to content

Laser Cutter Adapter and Script for Thing-O-Matic

Advertising
Advertising
?
Creation quality: 0.0/5 (0 votes)
Evaluation of members on the printability, utility, level of detail, etc.

  • 3.5k views
  • 4 downloads

License
3D design format
STL Folder details Close
  • s3_arctic_laser_adapter_for_thing-o-matic.stl

Learn more about the formats

Publication date 2018-10-23 at 16:49
Design number 35289

3D printer file info

3D model description

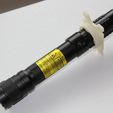
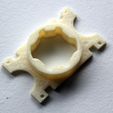
I purchased the 1 watt S3 Arctic Spyder laser from wickedlasers.com and created an adapter in Sketchup to mount it on the Thing-O-Matic MK6 filament stand and wrote a gMax Maxscript to generate cutting paths.

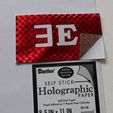
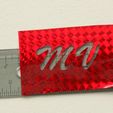
The laser is powerful enough to cut through lightweight materials such as paper or thin vinyl, dark materials work much better than light materials. It can engrave a fair number of materials also. I've found that "self-stick" vinyl sticker blanks are great for creating stickers or stencils (tattoos!).

A 12 volt solenoid is used to block/unblock the laser light that hits the target surface. The solenoid is connected to the Thing-O-Matic's Automated Build Platform output pins. Using a solenoid to block the laser light is necessary because there is no way to programmatically turn on or off the laser that I'm using. You need to block the light between shapes or you'll have burn marks between the shapes.

Unfortunately you are on your own for hooking up your own laser light blocker solution. My solenoid solution is pretty hacked together but is functional enough to get the job done. It's simply a piece of duct tape attached to a wire connected to the solenoid plunger.

Videos:

Laser cutting in action: http://www.youtube.com/watch?v=u-Gb6AApnGM

Explaining how to use Gmax to create cutting paths: http://www.youtube.com/watch?v=zv2o-0cIW0s

You can download gmax from here (free): http://www.turbosquid.com/gmax

The 1 watt S3 Artic Spyder laser from wickedlasers.com ($300 USD): http://www.wickedlasers.com/arctic This laser is blue UV laser and is not a toy, it will blind you faster than you can say, "Hey, will this thing blind me?"

3D printing settings

  1. Print out the adapter plate model to hold the laser

  2. Insert laser into adapter. It’s a tight fit so sand the edges down.

  3. Remove hot end from Thing-O-Matic MK6 filament stand

  4. Put laser adapter into filament stand where hot end once was

  5. Save “gmax laser cutting script.ms” to computer

To generate a cutting path from gmax using attached script (see video: http://www.youtube.com/watch?v=zv2o-0cIW0s)

  1. Download, register, install, and start gmax

    a. http://www.turbosquid.com/gmax

    b. It’s free, but Windows only.

  2. Configure unit settings in gmax to make it easier to work with

    a. Customize -> Unit Setup. Choose "Metric" and "millimeters" from the drop down menu

    b. Customize -> Preferences. Change System Unit Scale to "1 unit = 1mm"

    c. Customize ->Gird and Snap Settings. Choose Home Grid and set Grid Spacing to 1mm

  3. Open the “gmax laser cutting script.ms” file that you saved to your computer (MaxScript -> Open Script)

  4. Show the MaxScript Listener window

    a. MAXScript -> MaxScript Listener

  5. Enable the MaxScript macro recorder

    a. MAXScript -> MacroRecorder

  6. Switch to Spline editing mode

    a. Create tab > Shapes sub tab

  7. Click the Text button

    a. Set size to 30mm for starters

  8. Type some text and align it in the center of the grid in the top viewport

  9. Convert the text to an Editable Mesh

    a. Right click on object and choose “Convert to Editable Mesh”

  10. Switch to vertex mode

    a. Press ‘1’ or in the “Selection” window choose “Vertex”

  11. For each letter select vertices and look at the MaxScript Listener window to obtain selected vertex start and end indices

    a. Write down each pair grouping. The laser cuts that path, and then between groups it closes the visor and moves to the next grouping

    b. For letters that have inner shapes, like O, P, D, Q, etc.. you must select the outer vertices as a separate group and the inner vertices as a separate group. This is necessary so that the laser visor is closed when it moves to cut out the inner shape. Use CTRL key to add more vertices and ALT to subtract vertices.

  12. Update the vertexSubElements array variable in the “gmax laser cutting script.ms” file with the pairs of start and end vertices your wrote down

  13. Update the G1_SPEED variable in script depending on material being cut/etched.

  14. Get out of vertex mode and select the object because the script works against the selected object

  15. Evaluate the “gmax laser cutting script” script to generate gcode

    a. In the MaxScript editor window choose File -> Evaluate All

  16. Copy the generated gcode from the MAXScript Listener window into a file that will be opened in ReplicatorG

Thing-O-Matic steps

  1. Open ReplicatorG

  2. Open the gcode file that you saved in the previous steps

  3. Manually move laser to center of build platform

  4. Open Control Panel and click the “Make current position zero” button

  5. Place cutting material on build platform

  6. PUT ON SAFETY GLASSES!!!

  7. Turn on laser

  8. In Control Panel click the “Build Platform belt” checkbox to open visor

  9. Manually adjust Z height to optimal laser focus distance

  10. Uncheck “Build platform belt” checkbox in Control Panel

  11. Close control panel

  12. Click Build button

  13. Marvel at your Thing-O-Matic laser cutter / engraver

Advertising


Issue with this design? Report a problem.

Would you like to support Cults?

You like Cults and you want to help us continue the adventure independently? Please note that we are a small team of 3 people, therefore it is very simple to support us to maintain the activity and create future developments. Here are 4 solutions accessible to all:

  • ADVERTISING: Disable your banner blocker (AdBlock, …) and click on our banner ads.

  • AFFILIATION: Make your purchases online by clicking on our affiliate links here Amazon.

  • DONATE: If you want, you can make a donation via Ko-Fi 💜.

  • WORD OF MOUTH: Invite your friends to come, discover the platform and the magnificent 3D files shared by the community!


Sharing and downloading on Cults3D guarantees that designs remain in makers community hands! And not in the hands of the 3D printing or software giants who own the competing platforms and exploit the designs for their own commercial interests.

Cults3D is an independent, self-financed site that is not accountable to any investor or brand. Almost all of the site's revenues are paid back to the platform's makers. The content published on the site serves only the interests of its authors and not those of 3D printer brands who also wish to control the 3D modeling market.

100% secure payment by credit card, PayPal, Apple Pay, Google Pay, etc.
View all payment options.