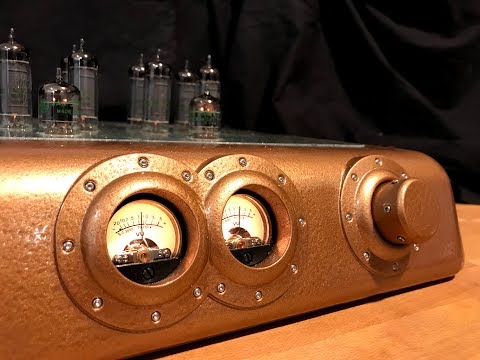
This is a steampunk style case for the Model 16LS Stereo Integrated Tube Amplifier kit. This project includes some modifications to the kit, including adding the following features:
Attenuator instead of the potentiometer for volume control - removing the scratchiest when adjusting volume, but also increasing the useful low volume range. I had a bad hum which was fixed by replacing this component too.
Optional - Right / Left balance attenuator (I have not yet implemented this, at the moment it just holds the right knob in place)
Stereo VU Meter, this lets you adjust the volume of the source system to the appropriate line level and amplify the signal through the vacuum tubes.
Automatic On/Off when music is playing (I often forget to turn off the amp when not in use). This is accomplished through a SparkFun Audio Shield, Arduino Uno, and a Solid State Relay.
Add C14 plug at the back of the unit with integrated On/Off switch and Fuse
Programmable button at back of unit - sends commands to Arduino for features such as manual On/Off.
External speaker jacks at back - instead of the goofy on-board vertical jacks.
External RCA input jacks at back - instead of the goofy front facing jacks.
Input selection switch to select between Bluetooth Input vs RCA jacks. (Note: I believe the audio quality is typically better via RCA direct from a quality source, vs Bluetooth)
The bottom of the case is made from 6mm thick MDF
The top of the case around the tubes is made from 3.2mm Glass (though you could use a different heat resistant material such as aluminum, copper sheet provided you keep it away from the electrical contacts, the thickness is not overly important)
The case body, and knobs are made from 3D printed PLA, epoxied together, sanded, putty and painted such that the joints are no longer visible.
Extra texture and contrast is provided by aging the copper through painting techniques, and stainless steel screws visible to the front of the case.
The internal electronics can be hidden by selecting a translucent, or opaque glass in various colours.
TubeAmpController.zip contains the Arduino code for the On/Off controller.
Video showing the features and construction. https://youtu.be/o66Rjmn4HOY
Bill of Materials
The following list of materials where not all acquired via the links, some of the stuff I was able to get at a local electronics store. The links just give an idea of what the parts look like so you can find them for yourself.
Tube Amp Kit Quantity 1
This is the tube amplifier kit, 16 watt stereo.
https://tubedepot.com/products/model-16ls-stereo-integrated-tube-amplifier
Attenuator 100K Quantity 1
Replaces the volume control potentiometer provided in the kit.
https://www.aliexpress.com/item/1PCS-Assembled-Dale-23-Step-Attenuator-2-Chl-Volume-potentiometer-100k/32614434098.html?spm=a2g0s.9042311.0.0.3dd54c4dWaUGFN
Attenuator no resistors Quantity 1
Use this to create your own left/right balance
https://www.aliexpress.com/item/Free-shipping-New-1pc-2-Pole-23-Step-Rotary-Switch-Attenuator-Volume-Control-Pot-Potentiometer-DIY/1849976093.html?spm=a2g0s.9042311.0.0.35744c4d2h7XL0
SparkFun Spectrum Shield Quantity 1
This allows the arduino to determine if there is any sound being sent to the amp. It can be used for other things, for example creating an equalizer display.
https://www.sparkfun.com/products/13116
Arduino Uno Quantity 1
This is the the micro controller board which gets programmed to turn on the tube amp when it detects sound/music. Similarly, it turns it off automatically after the music stops.
https://store.arduino.cc/usa/arduino-uno-rev3
VU Meter x2 & Controller Quantity 1
These provide an analogue representation of the signal being sent to each channel (left/right). It can be used to adjust the volume of the source device for optimal amplificiation.
https://www.amazon.ca/gp/product/B01HCU4AYW/ref=ppx_yo_dt_b_asin_title_o06__o00_s00?ie=UTF8&psc=1
Solid State Relay Quantity 1
There are plenty of sources for these relays. The important feature is they can switch 110V AC through 5V DC from the Arduino.
https://www.amazon.ca/SODIAL-24V-380V-SSR-40-Temperature-Controller/dp/B0746JMZM5/ref=sr_1_4?ie=UTF8&qid=1548557571&sr=8-4&keywords=solid+state+relay
110V AC to 5V DC Transformer Quantity 1
This is used to power the Arduino
110V AC to 12V DC Transformer Quantity 1
This is used to power the VU Meter
Banana Speaker Jack Pair Quantity 2
https://www.amazon.ca/Karcy-Terminals-Connector-Amplifier-Speaker/dp/B079DPK2TK/ref=sr_1_5?ie=UTF8&qid=1548673913&sr=8-5&keywords=Gold+Plated+Speaker+Amplifier+Binding+Post+for+Banana+Jack+Plug+Adapter
RCA Input Jack Pair Quantity 1
https://secure.sayal.com/zinc/zinc_SEARCH.asp?txtSEARCH=170589
Input Selection Switch Quantity 1
Switch to select which input is being used. 5mm hole, similar to this switch.
https://shop.sayal.com/products/sabb-1212c
Push Button Switch 19mm Quantity 1
The one I used came from another project, but this is an example of a button that should work.
https://www.digikey.ca/product-detail/en/e-switch/PV1S640NN/EG5143-ND/4028686?utm_adgroup=&mkwid=sH9ZTXGw1&pcrid=311904885792&pkw=&pmt=&pdv=c&productid=4028686&slid=&gclid=Cj0KCQiA7briBRD7ARIsABhX8aCO9Ztj7oDf_-T4KmsfslLGZ__JW4KsC7qbk-3XlJjBZ1aD45tKQwkaAuM6EALw_wcB
C14 Power Input/Plug/Switch/Fuse Quantity 1
https://canada.newark.com/corcom-te-connectivity/psjs0sbx0/power-entry-connector-250vac-10a/dp/40P6081
M2x5mm screws Quantity 30
These are decorative on the front of the case
https://www.amazon.ca/gp/product/B01E5CEKFY/ref=oh_aui_search_asin_title?ie=UTF8&psc=1
M2x16mm hex sock screws Quantity 4
These are used as set screws to hold the knobs on, they are cut to the current length so they stick out the desired amount
https://www.amazon.ca/gp/product/B06Y4N8XWG/ref=oh_aui_search_asin_title?ie=UTF8&psc=1
M2x8mm hex sock screws Quantity 8
These are decorative on the two knobs
https://www.amazon.ca/gp/product/B06Y4N8XWG/ref=oh_aui_search_asin_title?ie=UTF8&psc=1
M2 brass insert 4mm x 3.5mm Quantity 14
These hold the Arduino to the case, also used in the volume/balance knobs to keep the set screws from stripping the plastic.
https://www.amazon.ca/gp/product/B01D56EVI2/ref=oh_aui_search_asin_title?ie=UTF8&psc=1
M3 brass insert 5mm x 5mm Quantity 8
Used in the PCB standoffs
https://www.amazon.ca/gp/product/B00Y20YLKY/ref=oh_aui_search_asin_title?ie=UTF8&psc=1
8x32 brass insert 8mm x 8mm Quantity 10
These hold the MDF base to the case. I intended to use metric inserts, but accidentally used these imperial inserts. You can change them out to something else if you prefer.
https://www.amazon.ca/gp/product/B015A3AHZO/ref=ppx_yo_dt_b_asin_title_o02__o00_s00?ie=UTF8&psc=1
Diamond Hole Drill Bits Set Quantity 1
I only used to hole saws on the glass top: 20mm and 22mm holes for the two different size tubes
https://www.amazon.ca/gp/product/B07C8HQYZD/ref=ppx_yo_dt_b_asin_title_o04__o00_s00?ie=UTF8&psc=1
MDF sheet 6mm (1/4") thick Quantity 1
Used to make the base see Base MDF Board Cutting Diagram.PNG for details
https://www.homedepot.com/p/Medium-Density-Fiberboard-Common-1-4-in-x-2-ft-x-4-ft-Actual-0-216-in-x-23-75-in-x-47-75-in-1508104/202089069
Glass 3.3mm thick Quantity 1
Used to make the top see Glass Cutting Diagram.PNG for details. You can select whatever glass you want though if you pick a clear glass and wish to etch it. You can sand blast it, or try Etching Cream
Glass Etching Cream Quantity 1 (optional)
http://www.leevalley.com/en/wood/page.aspx?p=32861&cat=1,250,43298,43302
2 Conductor shielded Wire Quantity 3 meters
Here is an example of some wire that will work. I used what was available in a small roll at my local electronics supplier.
http://www.alphawire.com/Products/Cable/Alpha-Essentials/Communication-and-Control-Cable/2400C?popup=pdf
Base colour paint Quantity 1
You can use whatever you would like, but I used this as the base colour. I will be adding more aging and weathering layers to give the amp some character.
https://www.homedepot.com/p/Rust-Oleum-Universal-12-oz-All-Surface-Hammered-Copper-Spray-Paint-and-Primer-in-One-6-Pack-247567/204601952
:format(webp)/https://fbi.cults3d.com/uploaders/13893581/illustration-file/aa4b40c9-7c63-4807-9ffa-3bf9d0e415bd/f72079d00272426cbaba507e7ea00d3f_display_large.jpg)


/https://preview3d-images.cults3d.com/1nl1c37ctbtly7be1ok5hjca18m6)
/https://preview3d-images.cults3d.com/q42t3gm52c2pltjvvgfmuqpj9r54)
/https://preview3d-images.cults3d.com/7hm5jb08x9wjaxtnf0zoox7aaqng)
/https://preview3d-images.cults3d.com/wop7l12823vity3w64dky7jdssae)
/https://preview3d-images.cults3d.com/gpdc07zm1wd64x8vowq0v87wa9di)
/https://preview3d-images.cults3d.com/t6yg017svom22yzdkdmfiwgl6zw9)
/https://preview3d-images.cults3d.com/r6qwczo2app27dzfn2382xdy1vzl)
/https://preview3d-images.cults3d.com/pb7uzrfy7djwaagydlwqyonyuo1s)
/https://preview3d-images.cults3d.com/58olan3oqxq0h2qd70hqjp476vjf)
/https://preview3d-images.cults3d.com/5c5uhuipkp787aituf7tlrmbwoyc)
/https://preview3d-images.cults3d.com/h1cq78p4wwzwg8kaphpxvvg2qz8w)


