Skip to content

water change set for my aquariums - Compatible with 1/2" gardena garden hose

Advertising
Advertising
?
Creation quality: 5.0/5 (1 vote)
Evaluation of members on the printability, utility, level of detail, etc.

  • 3.4k views
  • 4 likes
  • 1 download

License
3D design format
STL Folder details Close
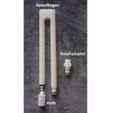
  • Ablaufbogen.stl
  • Duschadapter.stl
  • Korb.stl

Learn more about the formats

Last update 2021-01-11 at 15:50
Publication date 2019-05-15 at 15:31
Design number 56918

3D printer file info

3D model description

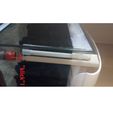
I designed the water change set for my aquariums to save me a lot of work and running.

User manual water change set:
Construction:
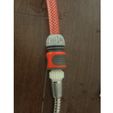
1. Hook in the drainage bend, connect existing garden hose with garden coupling. (there must be a clear click to hear)
2. Connect the other end of the hose with the enclosed adapter to a shower hose.
3. Fill the hose with water through the shower
4. Disconnect the garden hose from the shower adapter and let the aquarium water run into the shower
5. Replace the garden hose on the shower adapter and fill the tank with fresh water. (Check the temperature of the fresh water regularly during filling).

degradation:
6. Disconnect the garden hose from the shower adapter
7. Remove the drainage bow from the aquarium and pick it up with the hose
8. Let remaining water out of the bow and hose into the shower
9. Disconnect the drain bend from the hose
10. Roll up the hose


Ich habe das Wasserwechselset für meine Aquarien entworfen, um mir viel Arbeit und Laufen zu ersparen.

Bedienungsanleitung Wasserwechsel Set:
Aufbau:
1. Den Ablaufbogen einhängen, vorhandenen Gartenschlauch mit Gardenakupplung verbinden. (es muss ein deutliches einrasten zum hören sein)
2. das andere Ende vom Schlauch mit dem beiligenden Adapter an einen Duschschlauch anschließen.
3. den Schlauch mit Wasser über die Dusche befüllen
4. den Gartenschlauch vom Duschadapter trennen und das Aquariumwasser in die Dusche laufen lassen
5. den Gartenschlauch wieder an den Duschadapter aufstecken und das Becken mit Frischwasser befüllen. (Temperatur vom Frischwasser während dem befüllen regelmässig überprüfen).

Abbau:
6. Gartenschlauch vom Duschadapter trennen
7. Ablaufbogen aus dem Aquarium entfernen und mit dem Schlauch aufnehmen
8. Restwasser aus dem Bogen und Schlauch in die Dusche laufen lassen
9. Ablaufbogen vom Schlauch trennen
10. Schlauch aufrollen

3D printing settings

Print PLA, 100% infill to be waterproof, Nozzle 0,4 or 0,6 mm, Layer 0,15 mm, no support, brim 8mm

Advertising


Issue with this design? Report a problem.

Would you like to support Cults?

You like Cults and you want to help us continue the adventure independently? Please note that we are a small team of 3 people, therefore it is very simple to support us to maintain the activity and create future developments. Here are 4 solutions accessible to all:

  • ADVERTISING: Disable your banner blocker (AdBlock, …) and click on our banner ads.

  • AFFILIATION: Make your purchases online by clicking on our affiliate links here Amazon.

  • DONATE: If you want, you can make a donation via Ko-Fi 💜.

  • WORD OF MOUTH: Invite your friends to come, discover the platform and the magnificent 3D files shared by the community!


Sharing and downloading on Cults3D guarantees that designs remain in makers community hands! And not in the hands of the 3D printing or software giants who own the competing platforms and exploit the designs for their own commercial interests.

Cults3D is an independent, self-financed site that is not accountable to any investor or brand. Almost all of the site's revenues are paid back to the platform's makers. The content published on the site serves only the interests of its authors and not those of 3D printer brands who also wish to control the 3D modeling market.

100% secure payment by credit card, PayPal, Apple Pay, Google Pay, etc.
View all payment options.