Skip to content

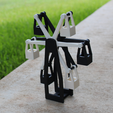
Ferris Wheel Planter

Advertising
Advertising
?
Creation quality: 5.0/5 (2 votes)
Evaluation of members on the printability, utility, level of detail, etc.

  • 6k views
  • 22 likes
  • 303 downloads

License
3D design format
STL Folder details Close
  • ferris-wheel-holder.stl
  • ferris-wheel-part-one-1.stl
  • ferris-wheel-part-two-1.stl

Learn more about the formats

Last update 2019-12-19 at 21:33
Publication date 2019-07-24 at 17:14
Design number 65542

3D printer file info

3D model description

This is my Ferris Wheel Planter. You can find it on TinkerCAD here:

https://www.tinkercad.com/things/e8S2aN5m0Xl-ferris-wheel-planter

Assembly

1) Print the 3 included files on your printer at 30% infill and at medium quality. Supports are required, but a raft is not.

2) Remove all of the supports from your print.

3) OPTIONAL: If you want to, you can now paint your ferris wheel parts. However, this is not recommended as the paint can lead to the rods being too thick for the carts to fit on them. If you are going to paint them, make sure that you have read the rest of the steps so that you know where not to paint.

4) Lay the ferris wheel part with the six rods facing upward. Put all 6 carts on these rods.

5) For extra support, put a dab of glue on the top of each of the rods, and put the second ferris wheel part with the 6 slots facing downwards directly parallel to the first ferris wheel part. Make sure that the rods are secure inside the slots, and clamp by placing a heavy book on top (don't do this part if you printed this any smaller than the attached files, or if you printed on a low infill). I would recommend using either regular glue, super glue, or hot glue for this job. Super glue might be a bit tricky as by the time you have put glue on all 6 rods and gotten the parts all together, it would most likely have already dried. I used hot glue, which worked surprisingly well.

6) Once everything has dried, try swiveling the carts on their axles. If any of the glue accidentally got stuck to one of the carts (especially if you used hot glue), this step should help break the bond. If needed use a small knife to cut away the glue stuck to the cart.

7) Place the completed ferris wheel on the rod of the first half of the stand. Lay both parts on the table, with the exposed rod sticking straight up.

8) Apply glue to the rod, and place the matching slot on the second half of the stand on top. Clamp with a heavy book. Make sure that the 2 supports at the base of the stand are fitted into their appropriate slots. You can also use a little bit of glue on this part.

9) You are done!

3D printing settings

The files that I have attached make the ferris wheel a little more than 8 inches tall, which is the perfect printing size. Seeing as this design has 6 separate carts for you to put planters in, if you print it any smaller you will only have room for the smallest of plants. I printed all of the parts with 30% infill. I would recommend printing this at medium quality, though I printed some of these parts on a fast print. Also, you do not want to print this with a raft as all of the pieces lay flat against the build plate.

Advertising


Issue with this design? Report a problem.

Would you like to support Cults?

You like Cults and you want to help us continue the adventure independently? Please note that we are a small team of 3 people, therefore it is very simple to support us to maintain the activity and create future developments. Here are 4 solutions accessible to all:

  • ADVERTISING: Disable your banner blocker (AdBlock, …) and click on our banner ads.

  • AFFILIATION: Make your purchases online by clicking on our affiliate links here Amazon.

  • DONATE: If you want, you can make a donation via Ko-Fi πŸ’œ.

  • WORD OF MOUTH: Invite your friends to come, discover the platform and the magnificent 3D files shared by the community!


Sharing and downloading on Cults3D guarantees that designs remain in makers community hands! And not in the hands of the 3D printing or software giants who own the competing platforms and exploit the designs for their own commercial interests.

Cults3D is an independent, self-financed site that is not accountable to any investor or brand. Almost all of the site's revenues are paid back to the platform's makers. The content published on the site serves only the interests of its authors and not those of 3D printer brands who also wish to control the 3D modeling market.

100% secure payment by credit card, PayPal, Apple Pay, Google Pay, etc.
View all payment options.