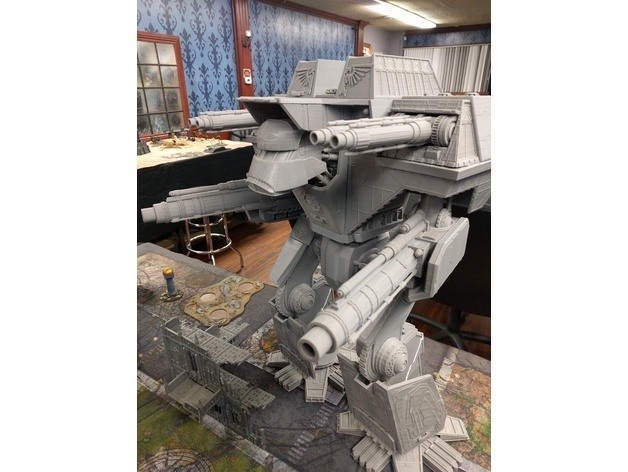
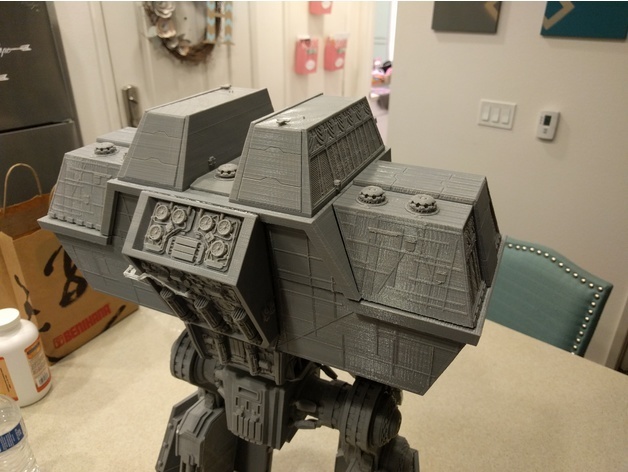
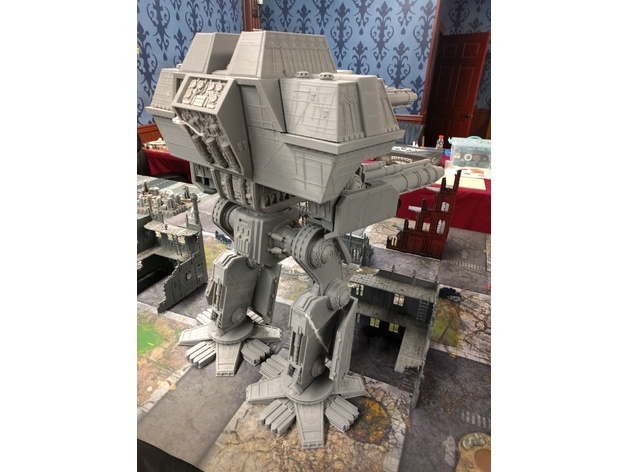
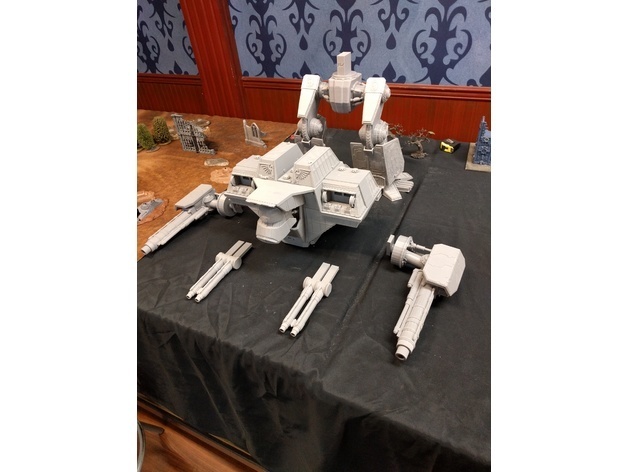
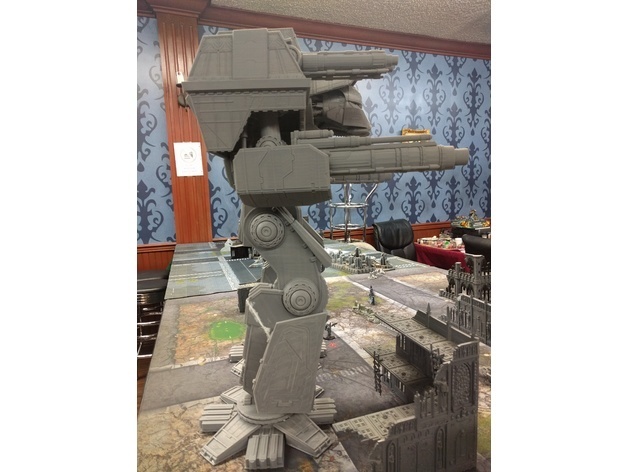
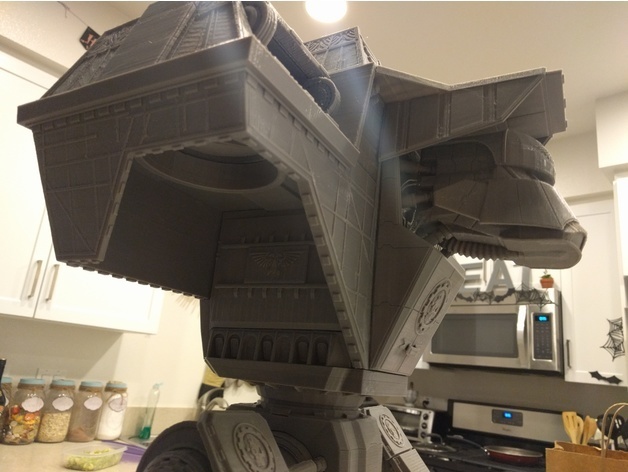
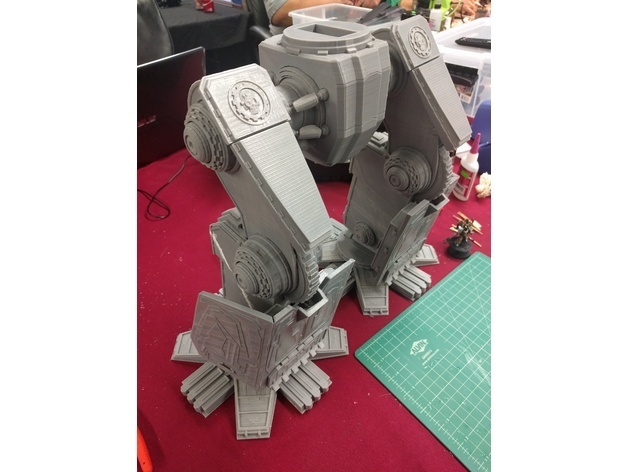
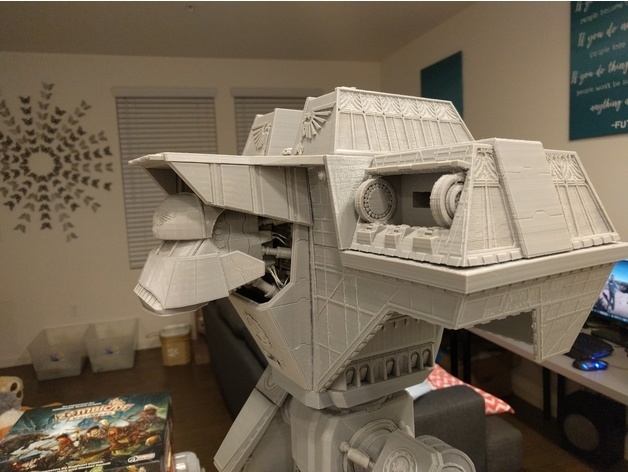
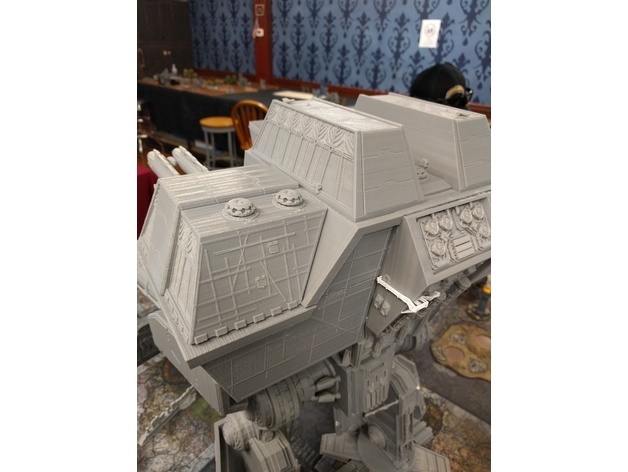
Warlord Titan
:format(webp)/https://fbi.cults3d.com/uploaders/13097345/illustration-file/8331083a-192c-4806-90ac-3197fd8a622c/4af75324d8046955cc615f71855ed4bb_preview_featured.jpg)


/https://preview3d-images.cults3d.com/variants/jrrinme5qi7uoh2s2lvc5k9k7akw/848ec152657411c3fb217bef17c5a518f412feacc875ce6f22e14239149a46cd)
/https://preview3d-images.cults3d.com/variants/l6xjfx7jwqbvp5agl2qi1mq5z6ty/848ec152657411c3fb217bef17c5a518f412feacc875ce6f22e14239149a46cd)
/https://preview3d-images.cults3d.com/variants/0xgfwu9mmjoimv3bwrwerf9c9n67/848ec152657411c3fb217bef17c5a518f412feacc875ce6f22e14239149a46cd)
/https://preview3d-images.cults3d.com/variants/dvos8nisq63s4qk7zgarcszhbup2/848ec152657411c3fb217bef17c5a518f412feacc875ce6f22e14239149a46cd)
/https://preview3d-images.cults3d.com/variants/xi4727cpiv51h8gudfgwrctt80zf/848ec152657411c3fb217bef17c5a518f412feacc875ce6f22e14239149a46cd)
/https://preview3d-images.cults3d.com/variants/mpaj9sn31ftgb6w4d0j6dx5fyr1g/848ec152657411c3fb217bef17c5a518f412feacc875ce6f22e14239149a46cd)
/https://preview3d-images.cults3d.com/variants/7dh45mg6l6ylyhpq7gwcxgtzhfmd/848ec152657411c3fb217bef17c5a518f412feacc875ce6f22e14239149a46cd)
/https://preview3d-images.cults3d.com/variants/y97a6d702jmb1scufqychotpgyxh/848ec152657411c3fb217bef17c5a518f412feacc875ce6f22e14239149a46cd)
/https://preview3d-images.cults3d.com/variants/61tmxaq1z1ej13zq7qczalkmqqft/848ec152657411c3fb217bef17c5a518f412feacc875ce6f22e14239149a46cd)
/https://preview3d-images.cults3d.com/variants/9owmg3wd2sbw8yyu7fyyctk2c7p7/848ec152657411c3fb217bef17c5a518f412feacc875ce6f22e14239149a46cd)
/https://preview3d-images.cults3d.com/variants/zo757ypuczfrg8tpurhe9urukkhy/848ec152657411c3fb217bef17c5a518f412feacc875ce6f22e14239149a46cd)
/https://preview3d-images.cults3d.com/variants/rqqgo847567poqd9mtnqu2rk62oi/848ec152657411c3fb217bef17c5a518f412feacc875ce6f22e14239149a46cd)
/https://preview3d-images.cults3d.com/variants/xvdny53z60fsbbi8c0pxemn78ib5/848ec152657411c3fb217bef17c5a518f412feacc875ce6f22e14239149a46cd)
/https://preview3d-images.cults3d.com/variants/65q431kv3f8ux8z56fpyw3dluu2t/848ec152657411c3fb217bef17c5a518f412feacc875ce6f22e14239149a46cd)
/https://preview3d-images.cults3d.com/variants/dg7553gayazzt05ls6i60ruliiee/848ec152657411c3fb217bef17c5a518f412feacc875ce6f22e14239149a46cd)
/https://preview3d-images.cults3d.com/variants/r200yvnk5v3nqkbbk00lv290rk8m/848ec152657411c3fb217bef17c5a518f412feacc875ce6f22e14239149a46cd)
/https://preview3d-images.cults3d.com/variants/tzomg089pxsx00juhwdylbdz9a5x/848ec152657411c3fb217bef17c5a518f412feacc875ce6f22e14239149a46cd)
/https://preview3d-images.cults3d.com/variants/e3u6vvzl7916nkkljt7nhqmp4waq/848ec152657411c3fb217bef17c5a518f412feacc875ce6f22e14239149a46cd)
/https://preview3d-images.cults3d.com/variants/de15jpcnk3oc60ihkvnf0zrr9i2p/848ec152657411c3fb217bef17c5a518f412feacc875ce6f22e14239149a46cd)
/https://preview3d-images.cults3d.com/variants/hmkn6dzzm8a7r325vjrqnpmewf8z/848ec152657411c3fb217bef17c5a518f412feacc875ce6f22e14239149a46cd)
/https://preview3d-images.cults3d.com/variants/iq6cl6he5jhx3w3dpusfo9vqwe6h/848ec152657411c3fb217bef17c5a518f412feacc875ce6f22e14239149a46cd)
/https://preview3d-images.cults3d.com/variants/g6kymf8i0jxseauyjwrqqe9qy2ud/848ec152657411c3fb217bef17c5a518f412feacc875ce6f22e14239149a46cd)
/https://preview3d-images.cults3d.com/variants/fucrq6h4y49iqqkaud6u5vkw5dc1/848ec152657411c3fb217bef17c5a518f412feacc875ce6f22e14239149a46cd)
/https://preview3d-images.cults3d.com/variants/2utp6d75v3rmtieryknkxpa7hbii/848ec152657411c3fb217bef17c5a518f412feacc875ce6f22e14239149a46cd)
/https://preview3d-images.cults3d.com/variants/71prwh9iwn3y4ez49vhodmvrkus1/848ec152657411c3fb217bef17c5a518f412feacc875ce6f22e14239149a46cd)
/https://preview3d-images.cults3d.com/variants/628tg47xl3i5eeic34fahehzss1i/9ce1a1278a90847fe525f7bdea66ae6081035e320afa813bf6efbbbe4c5d9f85)
/https://preview3d-images.cults3d.com/variants/x68rt3x4570nzm7ef1jrj3n3s6wl/848ec152657411c3fb217bef17c5a518f412feacc875ce6f22e14239149a46cd)
/https://preview3d-images.cults3d.com/variants/prn453kpqrmrl1cbz8wa5589xn7f/848ec152657411c3fb217bef17c5a518f412feacc875ce6f22e14239149a46cd)
/https://preview3d-images.cults3d.com/variants/k8hd4pqumhkvfr1435mcjp64m308/848ec152657411c3fb217bef17c5a518f412feacc875ce6f22e14239149a46cd)
/https://preview3d-images.cults3d.com/variants/r5klrw01fzhxrmw25d393k1rwq15/848ec152657411c3fb217bef17c5a518f412feacc875ce6f22e14239149a46cd)
/https://preview3d-images.cults3d.com/variants/6od5dkasvnm122t3z4ttj0ep4ohl/848ec152657411c3fb217bef17c5a518f412feacc875ce6f22e14239149a46cd)
/https://preview3d-images.cults3d.com/variants/2lakau0d0h4qdkrbch8k4dvpvugp/848ec152657411c3fb217bef17c5a518f412feacc875ce6f22e14239149a46cd)
/https://preview3d-images.cults3d.com/variants/q4tmt6sseicdlop4sjpeqhr79mf7/848ec152657411c3fb217bef17c5a518f412feacc875ce6f22e14239149a46cd)
/https://preview3d-images.cults3d.com/variants/es3ee3j0i8wrcdii4cjhife0u0xf/9ce1a1278a90847fe525f7bdea66ae6081035e320afa813bf6efbbbe4c5d9f85)
/https://preview3d-images.cults3d.com/variants/ht50gyhc7zp91yz3w8jb6d542t3p/848ec152657411c3fb217bef17c5a518f412feacc875ce6f22e14239149a46cd)
/https://preview3d-images.cults3d.com/variants/zzjpie2ja15zm5ppvupy00ilqyqz/848ec152657411c3fb217bef17c5a518f412feacc875ce6f22e14239149a46cd)
/https://preview3d-images.cults3d.com/variants/np59edy58mvha2lf7u975ugwho5q/848ec152657411c3fb217bef17c5a518f412feacc875ce6f22e14239149a46cd)
/https://preview3d-images.cults3d.com/variants/uinrb3qhhcf5b7zr0ei5d0tj0d8r/848ec152657411c3fb217bef17c5a518f412feacc875ce6f22e14239149a46cd)
/https://preview3d-images.cults3d.com/variants/nlnhy0qydfgjh3mjli343b4jnfha/848ec152657411c3fb217bef17c5a518f412feacc875ce6f22e14239149a46cd)
/https://preview3d-images.cults3d.com/variants/qdr5lltdkjssjhntikmdvjc4lqe2/848ec152657411c3fb217bef17c5a518f412feacc875ce6f22e14239149a46cd)
/https://preview3d-images.cults3d.com/variants/33gjyr4a9rnrkjj8ljmfvhgfl1zt/848ec152657411c3fb217bef17c5a518f412feacc875ce6f22e14239149a46cd)
/https://preview3d-images.cults3d.com/variants/1w3zktir0o11epje1rqqsi0pqt5w/848ec152657411c3fb217bef17c5a518f412feacc875ce6f22e14239149a46cd)
/https://preview3d-images.cults3d.com/variants/wf62vaiiwltkuwb33p892dx5jrp8/848ec152657411c3fb217bef17c5a518f412feacc875ce6f22e14239149a46cd)
/https://preview3d-images.cults3d.com/variants/bs9d9w39v2gga8ni8ineq1vqp367/848ec152657411c3fb217bef17c5a518f412feacc875ce6f22e14239149a46cd)
/https://preview3d-images.cults3d.com/variants/phanifw2tgodfxjii6n106zb0gii/848ec152657411c3fb217bef17c5a518f412feacc875ce6f22e14239149a46cd)
/https://preview3d-images.cults3d.com/variants/u0pfo632o5so49b4yx4uhjpn0lps/848ec152657411c3fb217bef17c5a518f412feacc875ce6f22e14239149a46cd)
/https://preview3d-images.cults3d.com/variants/w0pmk15w1g91m9jdzhk1agjlzl0o/848ec152657411c3fb217bef17c5a518f412feacc875ce6f22e14239149a46cd)
/https://preview3d-images.cults3d.com/variants/u6efxe9hmmsponw6av91djgc30fs/848ec152657411c3fb217bef17c5a518f412feacc875ce6f22e14239149a46cd)
/https://preview3d-images.cults3d.com/variants/yjk7b0wk8tqdigwxytgzm63arguz/848ec152657411c3fb217bef17c5a518f412feacc875ce6f22e14239149a46cd)
/https://preview3d-images.cults3d.com/variants/qcsa0g4g1evdp7ugqk9qf2zcsydq/848ec152657411c3fb217bef17c5a518f412feacc875ce6f22e14239149a46cd)
/https://preview3d-images.cults3d.com/variants/51bn3elli44oqocp6mrz4do6avaj/848ec152657411c3fb217bef17c5a518f412feacc875ce6f22e14239149a46cd)
/https://preview3d-images.cults3d.com/variants/bcinieantdkxynml4vrdyed11lbq/848ec152657411c3fb217bef17c5a518f412feacc875ce6f22e14239149a46cd)
/https://preview3d-images.cults3d.com/variants/su4xwy0wk6yge697tuafabzrz8zt/848ec152657411c3fb217bef17c5a518f412feacc875ce6f22e14239149a46cd)
/https://preview3d-images.cults3d.com/variants/cfmjfck4wi13sgohf5txlj24dehr/848ec152657411c3fb217bef17c5a518f412feacc875ce6f22e14239149a46cd)
/https://preview3d-images.cults3d.com/variants/757qdxb4vkwmxy99ohm35ra4iwxm/848ec152657411c3fb217bef17c5a518f412feacc875ce6f22e14239149a46cd)
/https://preview3d-images.cults3d.com/variants/l2zidfwd4xxo1h298wsl0y0fu8ql/848ec152657411c3fb217bef17c5a518f412feacc875ce6f22e14239149a46cd)
/https://preview3d-images.cults3d.com/variants/ucm9gl6z94ro6tb4zyomxlxubcuu/848ec152657411c3fb217bef17c5a518f412feacc875ce6f22e14239149a46cd)
/https://preview3d-images.cults3d.com/variants/ohkf2jhcaii3q9iv5a7hc0lm7emu/848ec152657411c3fb217bef17c5a518f412feacc875ce6f22e14239149a46cd)
/https://preview3d-images.cults3d.com/variants/7ho94vrqi49u586floxs7ghtjonl/848ec152657411c3fb217bef17c5a518f412feacc875ce6f22e14239149a46cd)
/https://preview3d-images.cults3d.com/variants/e5j5fikfnyj4hla4144bi5rd8mel/848ec152657411c3fb217bef17c5a518f412feacc875ce6f22e14239149a46cd)
/https://preview3d-images.cults3d.com/variants/evucteuc1ptw25sbacc2y7fxfag8/848ec152657411c3fb217bef17c5a518f412feacc875ce6f22e14239149a46cd)
/https://preview3d-images.cults3d.com/variants/0ngus8p86qywtk55nwyprcs21vfu/848ec152657411c3fb217bef17c5a518f412feacc875ce6f22e14239149a46cd)
/https://preview3d-images.cults3d.com/variants/2fwnww8at1jt5cpofkzkiv5vyds6/848ec152657411c3fb217bef17c5a518f412feacc875ce6f22e14239149a46cd)
/https://preview3d-images.cults3d.com/variants/snp7o2xnr9jix44y7n8sw508nwou/848ec152657411c3fb217bef17c5a518f412feacc875ce6f22e14239149a46cd)
/https://preview3d-images.cults3d.com/variants/2vzjnp1k1uzfszyrc350143fla5l/848ec152657411c3fb217bef17c5a518f412feacc875ce6f22e14239149a46cd)
/https://preview3d-images.cults3d.com/variants/yj4yrbgcz1mj45zxeuj69xmnzn4o/848ec152657411c3fb217bef17c5a518f412feacc875ce6f22e14239149a46cd)
/https://preview3d-images.cults3d.com/variants/jmhgd0e16fk3mcsp07i9pe6t5tca/848ec152657411c3fb217bef17c5a518f412feacc875ce6f22e14239149a46cd)
/https://preview3d-images.cults3d.com/variants/7wd8sf9w284rzse6o6ld5mhu4m9q/848ec152657411c3fb217bef17c5a518f412feacc875ce6f22e14239149a46cd)
/https://preview3d-images.cults3d.com/variants/1zvuqu2w2ggq5hclytguuu7r7q8z/848ec152657411c3fb217bef17c5a518f412feacc875ce6f22e14239149a46cd)
/https://preview3d-images.cults3d.com/variants/a3cnwwmuufgqtgb7srb2760y8yqk/848ec152657411c3fb217bef17c5a518f412feacc875ce6f22e14239149a46cd)
/https://preview3d-images.cults3d.com/variants/ej27vvr37iwyesutu7nl10cau3p3/848ec152657411c3fb217bef17c5a518f412feacc875ce6f22e14239149a46cd)
/https://preview3d-images.cults3d.com/variants/5ey1uqgmzb2bkz3429zmeb4l3fq1/848ec152657411c3fb217bef17c5a518f412feacc875ce6f22e14239149a46cd)
/https://preview3d-images.cults3d.com/variants/bfnz8adowxwbos84umqgy59gq1pl/848ec152657411c3fb217bef17c5a518f412feacc875ce6f22e14239149a46cd)
/https://preview3d-images.cults3d.com/variants/g6lovertwzkb4lva6mti2jdaaloz/848ec152657411c3fb217bef17c5a518f412feacc875ce6f22e14239149a46cd)
/https://preview3d-images.cults3d.com/variants/96uhz0ere7ybzdq4ghpfrbftfdol/848ec152657411c3fb217bef17c5a518f412feacc875ce6f22e14239149a46cd)
/https://preview3d-images.cults3d.com/variants/hczstge197iqlx9swfgc6ovjf8nm/848ec152657411c3fb217bef17c5a518f412feacc875ce6f22e14239149a46cd)
/https://preview3d-images.cults3d.com/variants/uyg9dny6risbsp06bg3vwa5qxkti/848ec152657411c3fb217bef17c5a518f412feacc875ce6f22e14239149a46cd)
/https://preview3d-images.cults3d.com/variants/ii7puqjwo1dbzvpskism08y9vgrr/848ec152657411c3fb217bef17c5a518f412feacc875ce6f22e14239149a46cd)
/https://preview3d-images.cults3d.com/variants/q99z3bofztcxen5qfbznqc1bgpjc/848ec152657411c3fb217bef17c5a518f412feacc875ce6f22e14239149a46cd)
/https://preview3d-images.cults3d.com/variants/kl2ho3lrfa5z73dx2g8377tdibsn/848ec152657411c3fb217bef17c5a518f412feacc875ce6f22e14239149a46cd)
/https://preview3d-images.cults3d.com/variants/68oj57dvg4jqltw7687rpznsncqb/848ec152657411c3fb217bef17c5a518f412feacc875ce6f22e14239149a46cd)
/https://preview3d-images.cults3d.com/variants/3ey9mxxhmh9lfuji4x610f549x5x/848ec152657411c3fb217bef17c5a518f412feacc875ce6f22e14239149a46cd)
/https://preview3d-images.cults3d.com/variants/zaeklc8kgoyzs34i8ut5cznxtqrg/848ec152657411c3fb217bef17c5a518f412feacc875ce6f22e14239149a46cd)
/https://preview3d-images.cults3d.com/variants/udcvn8c85wuh3ja9lrqiklmgwx8n/848ec152657411c3fb217bef17c5a518f412feacc875ce6f22e14239149a46cd)
/https://preview3d-images.cults3d.com/variants/gzd1v41yqo7pxflqeozrro9vvy3h/848ec152657411c3fb217bef17c5a518f412feacc875ce6f22e14239149a46cd)
/https://preview3d-images.cults3d.com/variants/g1idm5q00ifws3mjrnrqibaapmy8/848ec152657411c3fb217bef17c5a518f412feacc875ce6f22e14239149a46cd)
/https://preview3d-images.cults3d.com/variants/v6q8k2ppr98x5rvbsd4p4zoluxtp/848ec152657411c3fb217bef17c5a518f412feacc875ce6f22e14239149a46cd)
/https://preview3d-images.cults3d.com/variants/c63la36dhfllzmj9qx7xz3z1vtul/848ec152657411c3fb217bef17c5a518f412feacc875ce6f22e14239149a46cd)
/https://preview3d-images.cults3d.com/variants/ofxzp6583e0ng1854o254dwrgx3u/848ec152657411c3fb217bef17c5a518f412feacc875ce6f22e14239149a46cd)
/https://preview3d-images.cults3d.com/variants/zwshdl5ecndn2hs7laiccvx1bmys/848ec152657411c3fb217bef17c5a518f412feacc875ce6f22e14239149a46cd)
/https://preview3d-images.cults3d.com/variants/m2fgsnpui1omgu3im8yykt6m4fbc/848ec152657411c3fb217bef17c5a518f412feacc875ce6f22e14239149a46cd)
/https://preview3d-images.cults3d.com/variants/jeetdg0mcp5vh8588r5kfkwglrz6/848ec152657411c3fb217bef17c5a518f412feacc875ce6f22e14239149a46cd)
/https://preview3d-images.cults3d.com/variants/rh5f9m9hy7gwu140yvzxi3dk2s3t/848ec152657411c3fb217bef17c5a518f412feacc875ce6f22e14239149a46cd)
/https://preview3d-images.cults3d.com/variants/p3196g7qrw2vi82vra36goma7ypj/848ec152657411c3fb217bef17c5a518f412feacc875ce6f22e14239149a46cd)
/https://preview3d-images.cults3d.com/variants/xsvjlyah72dzs9uia6jg2yznael6/848ec152657411c3fb217bef17c5a518f412feacc875ce6f22e14239149a46cd)
/https://preview3d-images.cults3d.com/variants/0mkktn74japslhdps9lbdj40x19w/848ec152657411c3fb217bef17c5a518f412feacc875ce6f22e14239149a46cd)
/https://preview3d-images.cults3d.com/variants/b0lt8gk9dk4o6om3ueiibv4jyztq/848ec152657411c3fb217bef17c5a518f412feacc875ce6f22e14239149a46cd)
/https://preview3d-images.cults3d.com/variants/3umcb84httay3iovong8o91k39q8/848ec152657411c3fb217bef17c5a518f412feacc875ce6f22e14239149a46cd)
/https://preview3d-images.cults3d.com/variants/dm37pivw8ig2w2ujuk7p3zcmpd3h/848ec152657411c3fb217bef17c5a518f412feacc875ce6f22e14239149a46cd)
/https://preview3d-images.cults3d.com/variants/etx8z0ib5k7u2edwjxkxt8lu5f0t/848ec152657411c3fb217bef17c5a518f412feacc875ce6f22e14239149a46cd)
/https://preview3d-images.cults3d.com/variants/v3z53w31in68bqdd5tu5ca66om6w/848ec152657411c3fb217bef17c5a518f412feacc875ce6f22e14239149a46cd)
/https://preview3d-images.cults3d.com/variants/yn6s53sechp0gjkw1epnuxsz9vou/848ec152657411c3fb217bef17c5a518f412feacc875ce6f22e14239149a46cd)
/https://preview3d-images.cults3d.com/variants/idmcwbtvl7ke6t7pznwvxrwp3q11/848ec152657411c3fb217bef17c5a518f412feacc875ce6f22e14239149a46cd)
/https://preview3d-images.cults3d.com/variants/u047ggpwrednx2qmisyw9id115v1/848ec152657411c3fb217bef17c5a518f412feacc875ce6f22e14239149a46cd)
/https://preview3d-images.cults3d.com/variants/fvnd1qg30ku7ha98kvt2r427uvf2/848ec152657411c3fb217bef17c5a518f412feacc875ce6f22e14239149a46cd)
/https://preview3d-images.cults3d.com/variants/0kody2377akbei1olvvqvjqnbybu/848ec152657411c3fb217bef17c5a518f412feacc875ce6f22e14239149a46cd)
/https://preview3d-images.cults3d.com/variants/5eukt50wcgks4b456dvnt5qw1r8n/848ec152657411c3fb217bef17c5a518f412feacc875ce6f22e14239149a46cd)
/https://preview3d-images.cults3d.com/variants/vxmou9gti24gw5sherapyb8zccz7/848ec152657411c3fb217bef17c5a518f412feacc875ce6f22e14239149a46cd)
/https://preview3d-images.cults3d.com/variants/if2fo24nw6c2wwxkn4wd3pvxazku/848ec152657411c3fb217bef17c5a518f412feacc875ce6f22e14239149a46cd)
/https://preview3d-images.cults3d.com/variants/b4mq1vvcqseb3hcb0l7vr57tkr3e/848ec152657411c3fb217bef17c5a518f412feacc875ce6f22e14239149a46cd)
/https://preview3d-images.cults3d.com/variants/g7vkgt9z3fxej73q3g6nva48mbi5/848ec152657411c3fb217bef17c5a518f412feacc875ce6f22e14239149a46cd)
/https://preview3d-images.cults3d.com/variants/esatjq90b7p7o7hs4v60kdnjuefd/848ec152657411c3fb217bef17c5a518f412feacc875ce6f22e14239149a46cd)
/https://preview3d-images.cults3d.com/variants/zshpsjosvf7dysyy1th8gmohrsql/848ec152657411c3fb217bef17c5a518f412feacc875ce6f22e14239149a46cd)
/https://preview3d-images.cults3d.com/variants/tsllpd59ii2eegy8n6dkmc535ape/848ec152657411c3fb217bef17c5a518f412feacc875ce6f22e14239149a46cd)
/https://preview3d-images.cults3d.com/variants/ef1x72w64u7py8ecqe1yleoo5azj/848ec152657411c3fb217bef17c5a518f412feacc875ce6f22e14239149a46cd)
/https://preview3d-images.cults3d.com/variants/04axavomweljjishywcy7wphylyr/848ec152657411c3fb217bef17c5a518f412feacc875ce6f22e14239149a46cd)
/https://preview3d-images.cults3d.com/variants/hb5ow1xy91totxty6abkabcaz777/848ec152657411c3fb217bef17c5a518f412feacc875ce6f22e14239149a46cd)
/https://preview3d-images.cults3d.com/variants/drqxmue6xyf84tybj3dh5w1oya33/848ec152657411c3fb217bef17c5a518f412feacc875ce6f22e14239149a46cd)
/https://preview3d-images.cults3d.com/variants/7kaxosfhaxbvlufnvub0acosemtq/848ec152657411c3fb217bef17c5a518f412feacc875ce6f22e14239149a46cd)
/https://preview3d-images.cults3d.com/variants/epwm8jv1tuk1lnvbl5zckb3szpjt/848ec152657411c3fb217bef17c5a518f412feacc875ce6f22e14239149a46cd)
/https://preview3d-images.cults3d.com/variants/2bu9qicy2xo3vbpm1pu9n4kld99n/848ec152657411c3fb217bef17c5a518f412feacc875ce6f22e14239149a46cd)
/https://preview3d-images.cults3d.com/variants/82r4lxn0jx76cofcxf9q4dqsk4b1/848ec152657411c3fb217bef17c5a518f412feacc875ce6f22e14239149a46cd)
/https://preview3d-images.cults3d.com/variants/2bfqch3vxdz0p9dszzieirnzu0tb/848ec152657411c3fb217bef17c5a518f412feacc875ce6f22e14239149a46cd)
/https://preview3d-images.cults3d.com/variants/n7ldy25drhkcy28a1plxek36uodt/848ec152657411c3fb217bef17c5a518f412feacc875ce6f22e14239149a46cd)
/https://preview3d-images.cults3d.com/variants/64duxec476sqqo1c7i08a6gof7eo/848ec152657411c3fb217bef17c5a518f412feacc875ce6f22e14239149a46cd)
/https://preview3d-images.cults3d.com/variants/vj652ivwazgsryqqobkcwc90k9jn/848ec152657411c3fb217bef17c5a518f412feacc875ce6f22e14239149a46cd)
/https://preview3d-images.cults3d.com/variants/tp8fin6hut96p18ii0icjtmy9way/848ec152657411c3fb217bef17c5a518f412feacc875ce6f22e14239149a46cd)
/https://preview3d-images.cults3d.com/variants/tvulxmylvm0sm63wmfm3vc073g2w/848ec152657411c3fb217bef17c5a518f412feacc875ce6f22e14239149a46cd)
/https://preview3d-images.cults3d.com/variants/ctd4ew2jb9r199s86gowhgb2ncg9/848ec152657411c3fb217bef17c5a518f412feacc875ce6f22e14239149a46cd)
/https://preview3d-images.cults3d.com/variants/w1b2fxbgew9jdjp1gozo4ftz2gbh/848ec152657411c3fb217bef17c5a518f412feacc875ce6f22e14239149a46cd)
/https://preview3d-images.cults3d.com/variants/89bktmkk4gk15uvjw46b9m04x9hd/848ec152657411c3fb217bef17c5a518f412feacc875ce6f22e14239149a46cd)
/https://preview3d-images.cults3d.com/variants/p4w0td8ydm4hf772lu0ia7c9vcpm/848ec152657411c3fb217bef17c5a518f412feacc875ce6f22e14239149a46cd)
/https://preview3d-images.cults3d.com/variants/67rvks6e3j4n6tc54ew2hrhbkvfu/848ec152657411c3fb217bef17c5a518f412feacc875ce6f22e14239149a46cd)
/https://preview3d-images.cults3d.com/variants/a5moh6r2beeq55u9si43in7fvb99/848ec152657411c3fb217bef17c5a518f412feacc875ce6f22e14239149a46cd)
/https://preview3d-images.cults3d.com/variants/kdtnm6imvbw8xa847b5ffwy2lh4b/848ec152657411c3fb217bef17c5a518f412feacc875ce6f22e14239149a46cd)
/https://preview3d-images.cults3d.com/variants/v80d4h0p0nol7j8vgq3zk4ccypq8/848ec152657411c3fb217bef17c5a518f412feacc875ce6f22e14239149a46cd)
/https://preview3d-images.cults3d.com/variants/pyxagtik7ugj8w8voed6w5ce8hmx/848ec152657411c3fb217bef17c5a518f412feacc875ce6f22e14239149a46cd)
/https://preview3d-images.cults3d.com/variants/cx11ze7slcg7x9gko9rqg0hqpwts/848ec152657411c3fb217bef17c5a518f412feacc875ce6f22e14239149a46cd)
/https://preview3d-images.cults3d.com/variants/53xmn20l4lm8w1uqe76hpgy318js/848ec152657411c3fb217bef17c5a518f412feacc875ce6f22e14239149a46cd)
/https://preview3d-images.cults3d.com/variants/sbo79y8f9lq3jbf6m7kieklgbpsy/848ec152657411c3fb217bef17c5a518f412feacc875ce6f22e14239149a46cd)
/https://preview3d-images.cults3d.com/variants/neclsjfyvhduaky729v1vkh137g4/848ec152657411c3fb217bef17c5a518f412feacc875ce6f22e14239149a46cd)
/https://preview3d-images.cults3d.com/h9c4cwq610r4svz2r1oo0dnpdcn9)
/https://preview3d-images.cults3d.com/variants/23gtds0y7r3qeqq8zgoto220r5py/848ec152657411c3fb217bef17c5a518f412feacc875ce6f22e14239149a46cd)
/https://preview3d-images.cults3d.com/variants/rh53spzk3cfzrz3cj5m3fjqvdb0k/848ec152657411c3fb217bef17c5a518f412feacc875ce6f22e14239149a46cd)
/https://preview3d-images.cults3d.com/variants/l7w5f4vmaxy79o9gste5oqfqiel6/848ec152657411c3fb217bef17c5a518f412feacc875ce6f22e14239149a46cd)
Advertising
Advertising
?
Creation quality:
5.0/5
(8 votevotes)
Evaluation of members on the printability, utility, level of detail, etc.
Your rating:
0/5
- 72.6k views
- 480 likes
- 4.3k downloads
- 24 collections
- 7 comments
- 2 makes
| License | |
|---|---|
| 3D design format |
STL and ZIP Folder details Close
|
| Last update | 2021-01-25 at 19:45 |
| Publication date | 2020-08-11 at 14:43 |
| Design number | 183811 |


Issue with this design?
Report a problem.
Would you like to support Cults?
You like Cults and you want to help us continue the adventure independently? Please note that we are a small team of 3 people, therefore it is very simple to support us to maintain the activity and create future developments. Here are 4 solutions accessible to all:
ADVERTISING: Disable your banner blocker (AdBlock, …) and click on our banner ads.
AFFILIATION: Make your purchases online by clicking on our affiliate links here Amazon.
DONATE: If you want, you can make a donation via Ko-Fi 💜.
WORD OF MOUTH: Invite your friends to come, discover the platform and the magnificent 3D files shared by the community!
Sharing and downloading on Cults3D guarantees that designs remain in makers community hands! And not in the hands of the 3D printing or software giants who own the competing platforms and exploit the designs for their own commercial interests.
Cults3D is an independent, self-financed site that is not accountable to any investor or brand. Almost all of the site's revenues are paid back to the platform's makers. The content published on the site serves only the interests of its authors and not those of 3D printer brands who also wish to control the 3D modeling market.