Skip to content

Benchtop Power Supply Housing

Advertising
Advertising
?
Creation quality: 5.0/5 (1 vote)
Evaluation of members on the printability, utility, level of detail, etc.

  • 2.7k views
  • 1 like
  • 2 downloads
  • 1 collection

License
3D design format
F3D and STL Folder details Close
  • button-block.stl
  • clip.stl
  • din-supply-housing.f3d
  • foot.stl
  • light-guide.stl
  • main-housing.stl
  • module-retainer.stl

Learn more about the formats

Last update 2019-12-08 at 15:20
Publication date 2019-12-03 at 19:33
Design number 89219

3D printer file info

3D model description

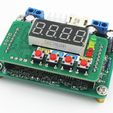
This is a housing for a benchtop power supply using the "MingHe B3606" CC/CV module. There are several variants of this module, this is for the 36V/3A 50x66mm version.

If you have a hard time finding the module for purchase try a image search with Google Image or Google lens off the above picture of the module.

The download includes the Fusion360 source files.

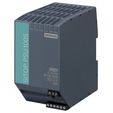
The design utilizes a Siemens SITOP PSU100S DIN Rail Power Supply as a DC source.
And yes, if you have to buy the Siemens supply new this build is not really economically viable. But as these are often available used on ebay for a reasonable price this might still be interesting for some.

Other DIN supplies might fit as well. The dimensions of the used supply are: 70x126x126 mm.

There are three through holes for binding posts. I decided to use the 3rd to lead out the unregulated 24V/10A from the Siemens supply. Alternatively this position could be used for PE.

Printing

The printing should be straight forward. Support is required at least for the front cutouts of the module as these need to be quite precise.

The feet are ideally printed with TPU. An alternative that provides very good grip, is to cut fitting pieces of silicone rubber hose and press them in.

The light-guides for the modules LEDs are not strictly necessary but make them less directional. Print with transparent PLA or translucent white.

For the raised lettering on the buttons I switched materials from black to grey during printing.

Materials

In addition to the printed pieces you will need:

  • Three insulated binding posts.

  • A switched and fused IEC socket and two screws to mount it.

  • Two short M3 screws to fix the power supply module with the supplied frame to the housing. The screws that come with the module should work for this.

  • Cabling.

Happy Printing

Advertising


Issue with this design? Report a problem.

Would you like to support Cults?

You like Cults and you want to help us continue the adventure independently? Please note that we are a small team of 3 people, therefore it is very simple to support us to maintain the activity and create future developments. Here are 4 solutions accessible to all:

  • ADVERTISING: Disable your banner blocker (AdBlock, …) and click on our banner ads.

  • AFFILIATION: Make your purchases online by clicking on our affiliate links here Amazon.

  • DONATE: If you want, you can make a donation via Ko-Fi πŸ’œ.

  • WORD OF MOUTH: Invite your friends to come, discover the platform and the magnificent 3D files shared by the community!


Sharing and downloading on Cults3D guarantees that designs remain in makers community hands! And not in the hands of the 3D printing or software giants who own the competing platforms and exploit the designs for their own commercial interests.

Cults3D is an independent, self-financed site that is not accountable to any investor or brand. Almost all of the site's revenues are paid back to the platform's makers. The content published on the site serves only the interests of its authors and not those of 3D printer brands who also wish to control the 3D modeling market.

100% secure payment by credit card, PayPal, Apple Pay, Google Pay, etc.
View all payment options.