Skip to content

Reverse Clock

Advertising
Advertising
?
Creation quality: 5.0/5 (2 votes)
Evaluation of members on the printability, utility, level of detail, etc.

  • 4.2k views
  • 9 likes
  • 47 downloads
  • 2 collections

License
3D design format
STL Folder details Close
  • Center Base.stl
  • Hour Circle.stl
  • Minute Hand.stl
  • Stand.stl

Learn more about the formats

Publication date 2020-02-23 at 15:27
Design number 111453

3D printer file info

3D model description

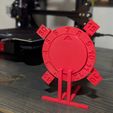
An inverted clock in which the numbers turn and there is only a single arrow as a hand. The clock is meant to be read from the inner circle out, straight up from the 12 o'clock position, if it wasn't already obvious.

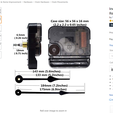
I've included a picture of a motor I believe matches the exact dimensions of a similar motor I picked up locally at Michaels used in this machine. Due to cropping issues, I couldn't fit the name and everything in there, but it can be found for less than $10 on a very popular shopping site.

The hour circle was originally meant to friction hold on the white plastic area of the clock motor that the hour hand would normally attach to, however, I ended up needing to use some glue to properly secure it without falling off. Be careful to not get glue on any other parts of the motor stem as it will prevent the clock from turning. Also, it is imperative to align the hour hand to the 12 o'clock position when gluing it down as the minute hand only goes on one of two ways so when you set the clock everything aligns properly. For example, if improperly aligned, the minute hand might look like it's the top of the hour, but the hour circle looks as if it's 10:40, not 11:00. After a couple of days of observing, it might be best to glue the minute hand into place as well.

Install the AA battery, set the clock and insert the clock motor into the square opening with the proper time aligning with the arrow on top, it should friction hold everything securely. Make sure to set them time before inserting it into the hole as you can't do it once it's in and it can be a pain to get back out.

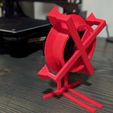
Once the clock is installed, insert the stubby ends of the stand into the clock where the two squares holes are located.

If, in the event it does not hold the motor securely enough in place or it wobbles due to looser tolerances, there are numbs on the back of the clock face which can be used for a printed "latch" that might be snapped on to hold it in. I didn't need it myself so I didn't include it in the final design, but it should be simple enough to print.

I should say that obviously these plastic pieces are much heavier than their lightweight clock hand counterparts it was intended for, so I can't say for sure how long the battery or internal clock gears will last.

Good luck and thanks for checking it out!

3D printing settings

It was made to be printed without any supports to save material. The center base must be printed with the flat side down, and the square opening for the motor facing upward. The hour circle and minute hand can be printed with the numbers face upward. Cura might ping the hour circle for needing supports, but it came out good enough on my Ender 3 Pro. The stand can be printed without supports if the longest legs are facing up.

I printed at 195 degrees at 45 mm/s. Seems to work best for me! But everyone knows their own printers. :)

Advertising


Issue with this design? Report a problem.

Would you like to support Cults?

You like Cults and you want to help us continue the adventure independently? Please note that we are a small team of 3 people, therefore it is very simple to support us to maintain the activity and create future developments. Here are 4 solutions accessible to all:

  • ADVERTISING: Disable your banner blocker (AdBlock, …) and click on our banner ads.

  • AFFILIATION: Make your purchases online by clicking on our affiliate links here Amazon.

  • DONATE: If you want, you can make a donation via Ko-Fi 💜.

  • WORD OF MOUTH: Invite your friends to come, discover the platform and the magnificent 3D files shared by the community!


Sharing and downloading on Cults3D guarantees that designs remain in makers community hands! And not in the hands of the 3D printing or software giants who own the competing platforms and exploit the designs for their own commercial interests.

Cults3D is an independent, self-financed site that is not accountable to any investor or brand. Almost all of the site's revenues are paid back to the platform's makers. The content published on the site serves only the interests of its authors and not those of 3D printer brands who also wish to control the 3D modeling market.

100% secure payment by credit card, PayPal, Apple Pay, Google Pay, etc.
View all payment options.