Skip to content

Retro gamepads

Advertising
Advertising
?
Creation quality: 5.0/5 (1 vote)
Evaluation of members on the printability, utility, level of detail, etc.

  • 5.4k views
  • 13 likes
  • 100 downloads
  • 1 collection
  • 1 comment

License
3D design format
DXF and STL Folder details Close
  • Bottom-Amiga.STL
  • Bottom-Atari.STL
  • Bottom-CPC.STL
  • Bottom-Sega.STL
  • Bottom-Sinclair.STL
  • Button1.STL
  • Button2.STL
  • ButtonUP.STL
  • Decal.DXF
  • Dpad01.STL
  • Dpad02.STL
  • Dsub-Amiga.STL
  • Dsub-Amstrad.STL
  • Dsub-Atari.STL
  • Dsub-SEGA.STL
  • Dsub-Sinclair.STL
  • Top-Amiga.STL
  • Top-Atari.STL
  • Top-CPC.STL
  • Top-SEGA.STL
  • Top-Sinclair.STL

Learn more about the formats

Last update 2020-11-10 at 08:44
Publication date 2020-11-02 at 14:24
Design number 221306

3D printer file info

3D model description

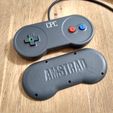
A very responsive and comfortable gamepad for vintage computers and consoles. The photos show the Amstrad CPC version. All are the same ergonomically, with different branding.

The support piece in the D-pad space will punch out with a punch and hammer after printing.Just place the shell on something with free space under the D-pad area and punch the support piece.

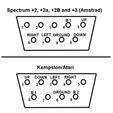
Wiring the 9-pin d-sub for Amiga, Atari, Kempston or SEGA is:
1-up
2-down
3-left
4-right
5-not used (5V if a turbo mode is added)
6-button 1
7-not used
8-ground
9-button 2

Wiring the 9-pin d-sub for Amstrad CPC is:
1-up
2-down
3-left
4-right
5-not used
6-button 1
7-button 2
8-common

Wiring the 9-pin d-sub for Sinclair ZX Spectrum +2... is:
1-not used
2-not used
3-not used
4-button 1
5-up
6-right
7-left
8-ground
9-down

The shell has room for a sliding switch on the top which can be used for whatever you like. I use it to switch the function of button 2 between button "2" and "up" function for games that use up for jumping. The SEGA controller has room for two switches since some Master System games swap the jump button from the usual 2 position to 1. With the extra switch they can be swapped back and forth as desired using a separate switch. This sliding switch fits tightly in the spaces: https://www.aliexpress.com/item/32830139886.html

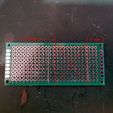
Cut this 30x70 mm prototype board to fit the slots in the botton shell as shown in the photos. 35 mm from one end and 12 mm from the other end and discard the middle piece. Sand the edges to make it a good fit in the bottom gamepad half, though it's not critical that it's a perfect fit. It's possible to simply break the board with big pliers and it will break along the holes as that's the weak point, but it won't be a tight fit in the shell that way:
https://rover.ebay.com/rover/1/711-53200-19255-0/1

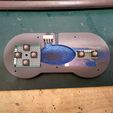
Solder the buttons in place as shown in the photo of the gamepad internals. Make sure the pins end up in the cavity of the plastic shell under the PCB. Drill a 3 mm hole in the middle between the d-pad switches and an M3x8 mm button head screw can then be used in the center of the pcb under the d-pad for pivot. It will be adjustable through the hole in the d-pad with an allen wrench to fine tune the feel and compensate for wear after a while. Screw: https://www.ebay.com/itm/25-100pcs-Stainless-Steel-Metric-Thread-M3-Button-Head-Hex-Socket-Cap-Screw-Bolt/163197027192

Search for "momentary button 8x8" on Ebay to find the right buttons with two pins. Four pin buttons won't fit. Examples:
https://www.ebay.com/itm/20Pcs-8x8mm-Panel-PCB-Silica-Gel-Momentary-Tactile-Tact-Push-Button-Switch-2P/183739694104

https://www.ebay.com/itm/8x8x5mm-2-Pins-Conductive-Silicone-Soundless-Tactile-Tact-Button-Micro-Switch/223948410355

https://www.ebay.com/itm/1-5PCS-Soft-Push-Silicone-Button-8mm-x-8mm-MOMENTARY-SWITCH-DIP-2-PINS/122681935176

You also need:
1,5x8 mm screws to hold together the shell: https://www.ebay.com/itm/Black-Self-Tapping-Screw-Phillips-Pan-Head-Small-Micro-M1-M1-2-M1-4-M1-6-M1-7-M2/383056920307
A cable. If you don't have 7 or more lead cable you can just buy one of these extensions and use the plug and cable:
https://www.ebay.com/itm/Cable-extension-Joystick-9-Pin-Amiga-Atari-ST-Sega-MegaDrive-Master-System/202666252153

Bottom-xxx - Bottom half of the shell
Button1 - Button with "1" written on it
Button2 - Button with "2" written on it
ButtonUP - Button with an up-triangle
Decal.DXF - 2D vectors for cutting of decals to fill the inset area around the buttons, for example wood grain for the Atari
Dpad01 - D-pad with triangles
Dpad02 - D-pad with arrows
Dsub-xxx - Slim connector housings to screw together with a stripped D-sub connector with hot glue inside
Top-xxx - Top half of the shell

3D printing settings

Light infill is enough. Nothing special is needed. Turn on the plastic cooling fan to make sure the support pieces will break off.

Advertising


Issue with this design? Report a problem.

Would you like to support Cults?

You like Cults and you want to help us continue the adventure independently? Please note that we are a small team of 3 people, therefore it is very simple to support us to maintain the activity and create future developments. Here are 4 solutions accessible to all:

  • ADVERTISING: Disable your banner blocker (AdBlock, …) and click on our banner ads.

  • AFFILIATION: Make your purchases online by clicking on our affiliate links here Amazon.

  • DONATE: If you want, you can make a donation via Ko-Fi πŸ’œ.

  • WORD OF MOUTH: Invite your friends to come, discover the platform and the magnificent 3D files shared by the community!


Sharing and downloading on Cults3D guarantees that designs remain in makers community hands! And not in the hands of the 3D printing or software giants who own the competing platforms and exploit the designs for their own commercial interests.

Cults3D is an independent, self-financed site that is not accountable to any investor or brand. Almost all of the site's revenues are paid back to the platform's makers. The content published on the site serves only the interests of its authors and not those of 3D printer brands who also wish to control the 3D modeling market.

100% secure payment by credit card, PayPal, Apple Pay, Google Pay, etc.
View all payment options.