EDIT - 23.09.2021:
I found a seller on Ali that sells an LCD with a driver that handles the composite video from Famicom very well and doesn't need any scaler to give good results. I changed the link in the description to the new board. I'm using this in my new Game Man. Smooth tear free scrolling, sharp image and no interlacing "jumping".
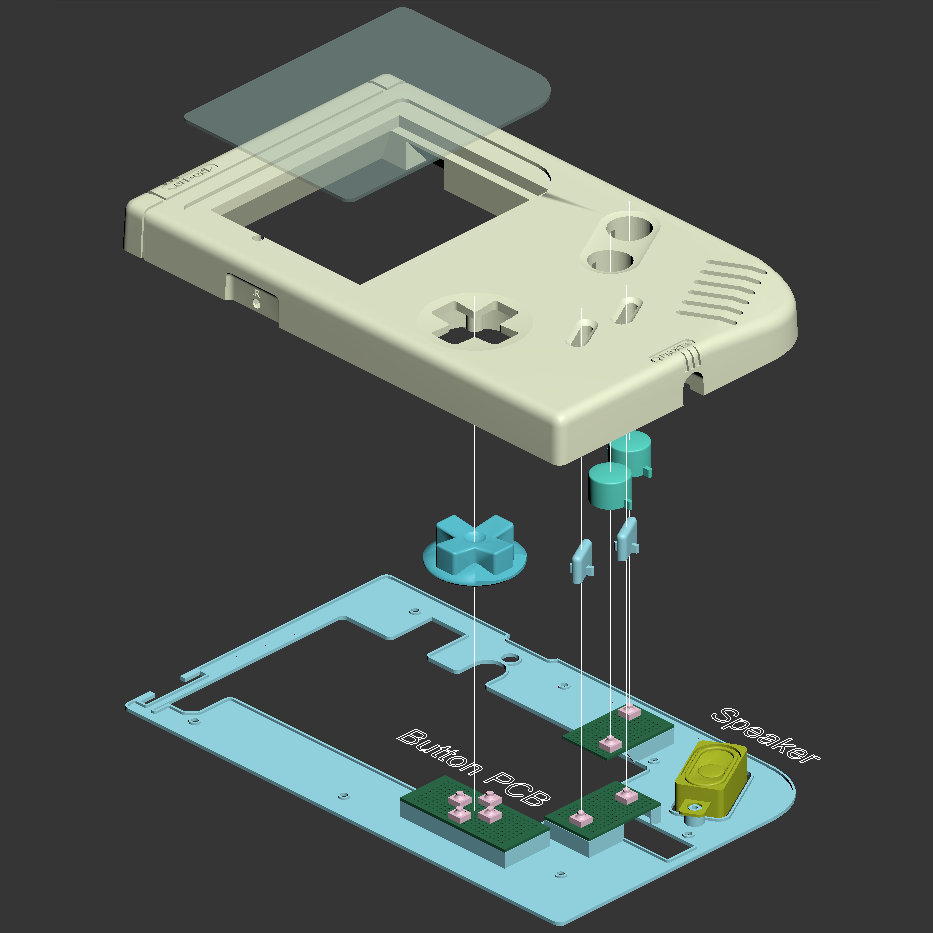
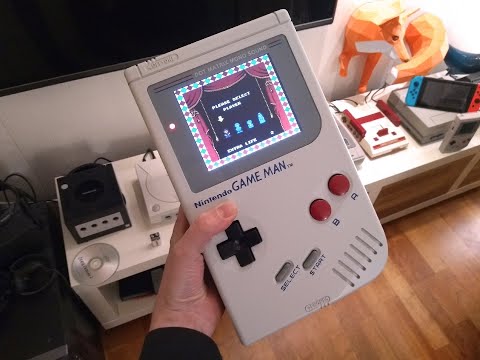
I designed this Nintendo GAME MAN case for fun. It's completely impractical and pointless. It was designed to fit an original Famicom motherboard and 5,6" 640x480 LCD, but can off course be used for any hardware, for example Raspberry Pi, with the same LCD screen I used. It can be printed on small printers with the "splitup" file set.
Demo video:
Build notes:
My 3D printable six or eight cell AA battery holder can be used to power it. I recommend 8 IKEA LADDA AA cells as they are amongst the best available anywhere (https://www.ikea.com/us/en/p/ladda-rechargeable-battery-70303876/):
https://cults3d.com/en/3d-model/tool/aa-six-cell-battery-holder
The one piece parts need a big printer as they cover a 295x180 mm area. I added split up parts that are under 150x180 mm in the Splitup.zip file for smaller printers.
The printer MUST be squared. If the printer produces parrallellogram shaped parts then the bottom and top halves will not mate together accurately.
The cartridge slot needs to be unsoldered from the PCB and connected using ribbon cables. A basic understanding of electronics is needed to build this. Please don't bombard me with simple questions on how to wire a potentiometer or plug.
The 1/4" output jack has switched pins that should be used to turn off audio and LCD if anything's connected.
A switching regulator is recommended over the old Famicom regulator.
Only use one of the audio channels on the little audio amplifier.
AV-modding the Famicom is needed to make it work, btu that's easy for anyone with a minimal knowledge of electronics. Guides are available online if needed.
The battery hatch has two parts that should be glued together face to face. The reason for this is to avoid unneccessary support that makes the visible surfaces ugly.
Use 3x12 mm or longer screws to hold the shell together.
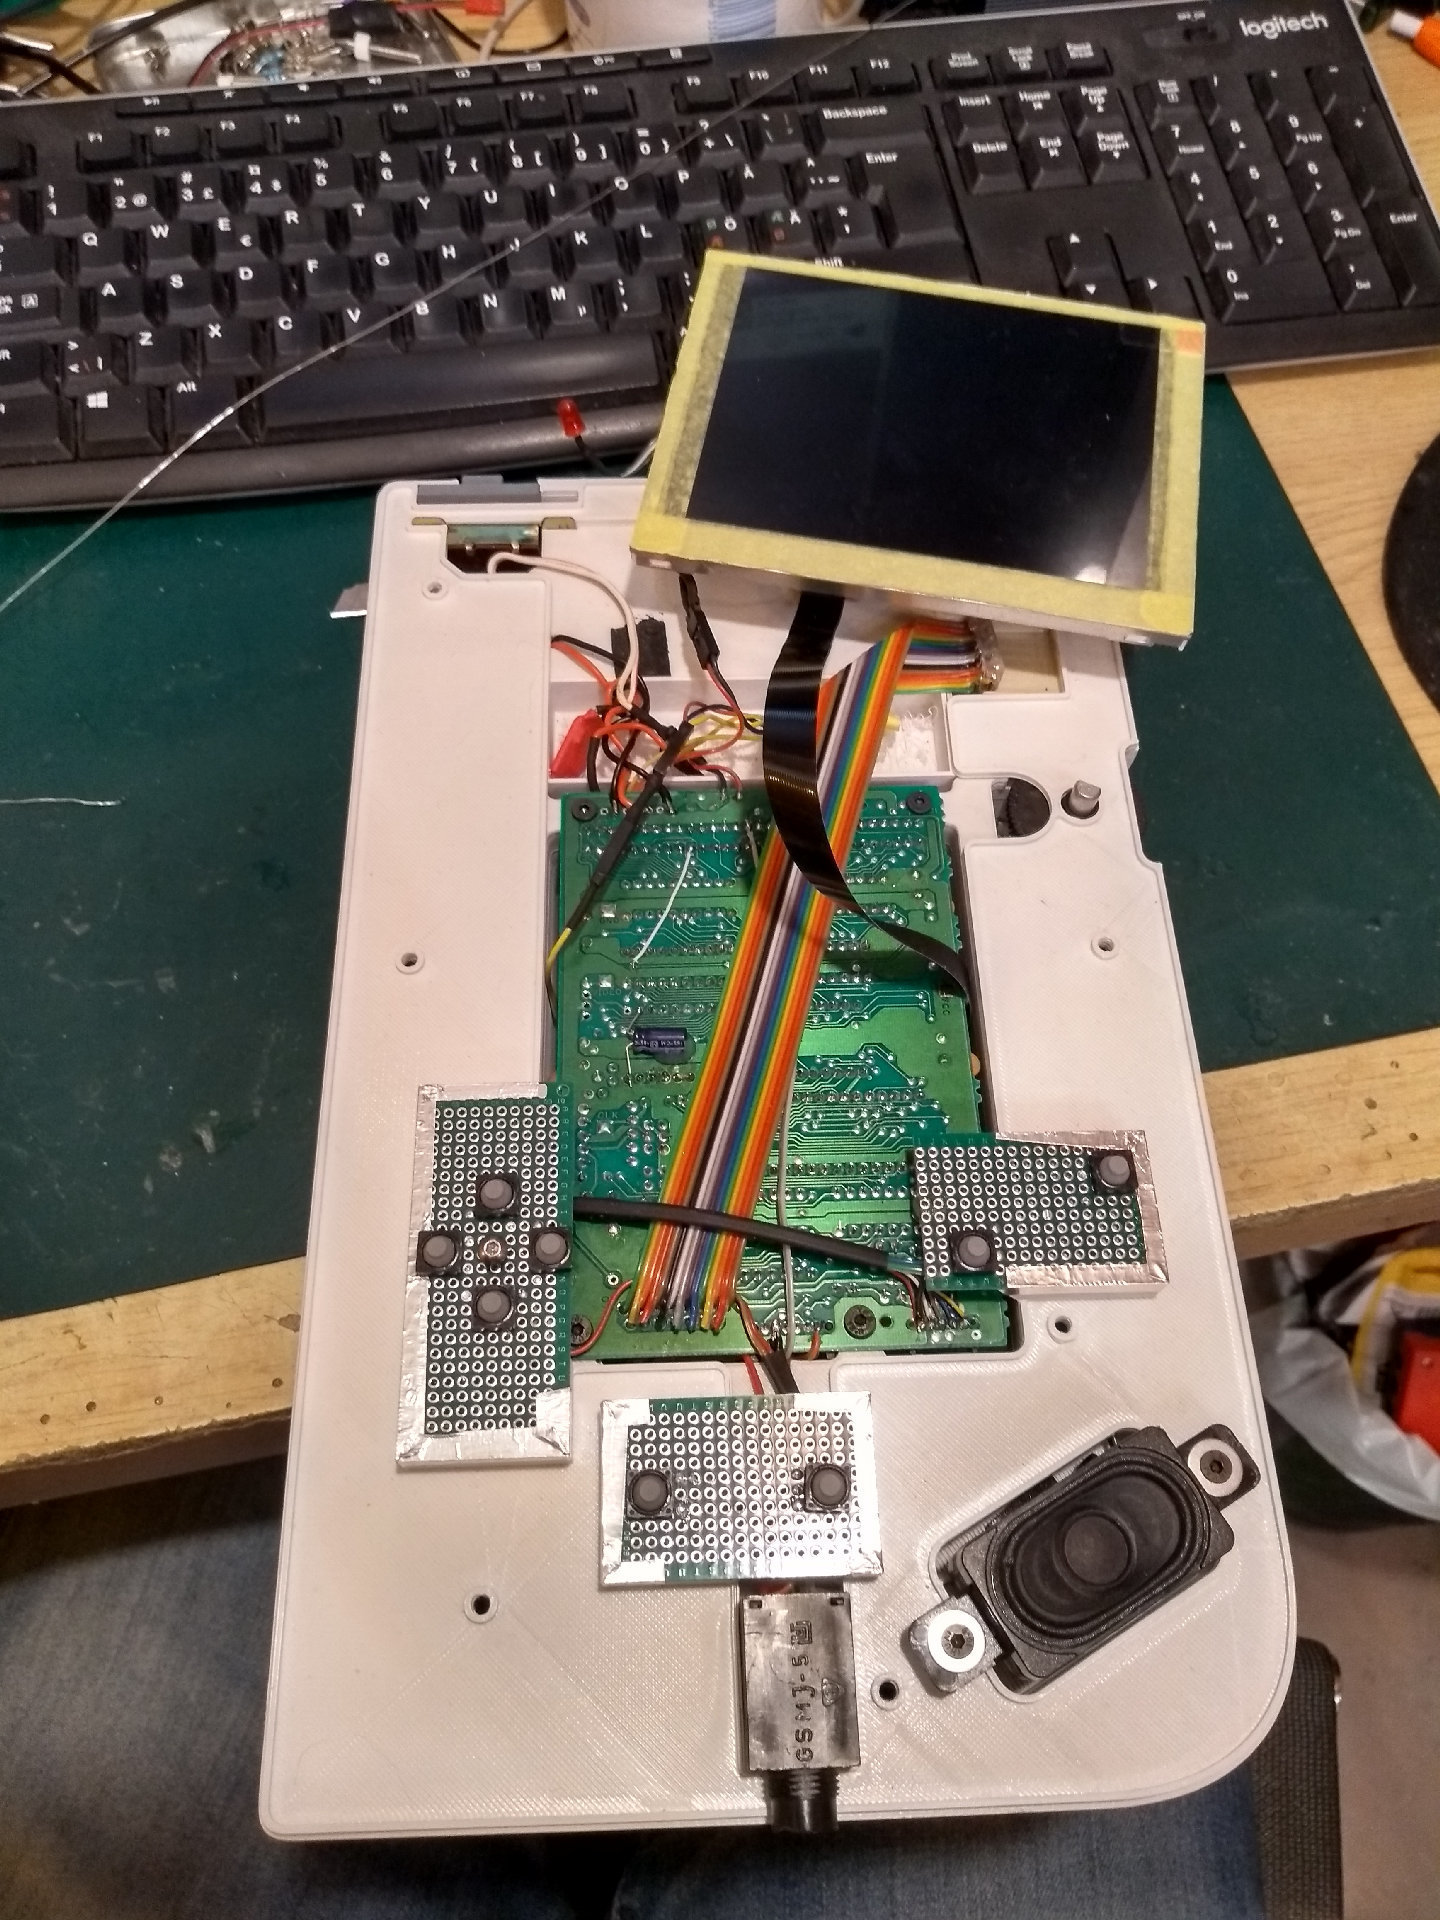
The PCB's for the A/B and Start/Select-buttons should be cut to 30x45mm and 30x48 mm respectively. Take care to solder the buttons in the right spots, using the picture of the internals as a reference. As you can see in the photo of the internals I have added a screw inbetween all the D-pad buttons to act as a pivot for the D-pad. This is recommended if you want to actually play with the thing. Drill and tap an M3 hole there and insert the little screw. Adjust the screw until the feel is perfect in all directions.
The cheap Famicom gamepad in the BOM has the required circuit inside to connect to the buttons for control. It must be connected to the Player 1 pads on the PCB and not the 15 pin Ext connector to work. One photo shows a closeup with the wire colors used in the cheap Famicom controller, and where they go on the Famicom motherboard.
Simplify 3D factory files are provided to show how I printed them Unless you have an Anycubic Chiron printer you will not be able to use them directly for printing.
Vector files for cutting with vinyl cutter:
-Glass01.DXF is the vector file for cutting the paint and cutting mask for the glass. It should be 149x113 mm when cutting in Silhouette Cameo for example.
-Face01.DXF is the mask for painting the text on the front face around the buttons. It has openings for aligning around the buttons.
BOM - Affiliate links are used on some things:
-Paint.
-1x donor Famicom: https://www.ebay.com/sch/i.html?_from=R40&_trksid=p2057872.m570.l1313&_nkw=famicom+junk&_sacat=0
-1x 5,6" 640x480 LCD: https://www.aliexpress.com/item/4000481041587.html?spm=a2g0s.9042311.0.0.74234c4dJMhAl7
-1x donor controller if you are not making your own circuit: https://www.aliexpress.com/item/4000586487752.html?spm=a2g0s.9042311.0.0.4c4e4c4d9DlMex
-Ribbon cable for the cartridge slot, 15 pin ext and other things: https://www.ebay.com/itm/10-14-16-20-26-30-34-40-Way-Multi-Coloured-Flat-Ribbon-Cable-Wire-28AWG/264453322487?mkcid=1&mkrid=711-53200-19255-0&siteid=0&campid=5338226872&customid=&toolid=10001&mkevt=1
-8x 8x8 silicone buttons: https://www.ebay.com/itm/8x8x5mm-2-Pins-Conductive-Silicone-Soundless-Tactile-Tact-Button-Micro-Switch/223948410355?mkcid=1&mkrid=711-53200-19255-0&siteid=0&campid=5338226872&customid=&toolid=10001&mkevt=1
-3x 30x70 mm prototyping boards for the buttons: https://www.ebay.com/itm/10Pcs-Double-Side-Prototype-PCB-Bread-board-Tinned-Universal-3x7-cm-30x70-mm/141663324910?mkcid=1&mkrid=711-53200-19255-0&siteid=0&campid=5338226872&customid=&toolid=10001&mkevt=1
-Clear 2mm acrylic sheet for making the 149x113 mm glass. Rela glass can also be used if you can handle glass cutting: https://www.ebay.com/itm/Clear-Acrylic-plate-Sheet-Plastic-Panel-Cut-Multi-Various-sizes-2-10mm-Thickness/223326352666?mkcid=1&mkrid=711-53200-19255-0&siteid=0&campid=5338226872&customid=&toolid=10001&mkevt=1
-7x 3x12mm or longer screws for assembly: https://www.ebay.com/itm/Self-Tapping-Screws-M1-M1-2-M1-4-M1-7-M2-M2-3-M2-6-M3-Pan-Head-Philips-Screws/274429244030?mkcid=1&mkrid=711-53200-19255-0&siteid=0&campid=5338226872&customid=&toolid=10001&mkevt=1
-1x 5,5mm female power connector: https://www.ebay.com/itm/123793068128?mkcid=1&mkrid=711-53200-19255-0&siteid=0&campid=5338226872&customid=&toolid=10001&mkevt=1
-1x volume potentiometer: https://www.ebay.com/itm/Taiwan-Alpha-RV16AF-16mm-Pot-Linear-Log-Mono-Dual-Potentiometer-17mm-Shaft-VR/153008349439?mkcid=1&mkrid=711-53200-19255-0&siteid=0&campid=5338226872&customid=&toolid=10001&mkevt=1
-1x Audio Amplifier: https://www.ebay.com/itm/PAM8403-2x3W-Mini-Digital-Power-Amplifier-Board-for-Class-D-Stereo-Audio-System/312780284002?mkcid=1&mkrid=711-53200-19255-0&siteid=0&campid=5338226872&customid=&toolid=10001&mkevt=1
-1x small speaker smaller than 72 mm and flatter than 17 mm. The prototype used a speaker from an old broken LCD monitor. Example:
https://www.ebay.com/itm/264648762392?mkcid=1&mkrid=711-53200-19255-0&siteid=0&campid=5338226872&customid=&toolid=10001&mkevt=1
-1x 1/4" switched jack: https://www.ebay.com/itm/Jack-Socket-6-35mm-1-4-Stereo-Switched-PCB-Mounting-GSMJ-5-NOS-1-pcs/133269286572?mkcid=1&mkrid=711-53200-19255-0&siteid=0&campid=5338226872&customid=&toolid=10001&mkevt=1
-1x 1/4" Jack cable for AV output: https://www.ebay.com/itm/2m-6-35mm-1-4-STEREO-TRS-JACK-PLUG-to-2-x-RCA-PHONO-MALE-RED-WHITE-AUDIO-CABLE/351650920200?mkcid=1&mkrid=711-53200-19255-0&siteid=0&campid=5338226872&customid=&toolid=10001&mkevt=1
:format(webp)/https://fbi.cults3d.com/uploaders/12943812/illustration-file/c746f08f-c644-41cc-a01f-dff2b8b21551/GameMan01.jpg)


/https://preview3d-images.cults3d.com/variants/1x1ljv59d6psghj97mzu45uwk6dm/9ce1a1278a90847fe525f7bdea66ae6081035e320afa813bf6efbbbe4c5d9f85)
/https://preview3d-images.cults3d.com/variants/pgs209wd7br2hlt93ug0tql5rztr/9ce1a1278a90847fe525f7bdea66ae6081035e320afa813bf6efbbbe4c5d9f85)
/https://preview3d-images.cults3d.com/variants/a1inyiqurdjo1atqa8hhpkh64zcy/9ce1a1278a90847fe525f7bdea66ae6081035e320afa813bf6efbbbe4c5d9f85)
/https://preview3d-images.cults3d.com/variants/bbcjrinh686sx3ze8alfo44h3i0n/9ce1a1278a90847fe525f7bdea66ae6081035e320afa813bf6efbbbe4c5d9f85)
/https://preview3d-images.cults3d.com/variants/vrrl97vtzexck147w4b5031ygqjd/9ce1a1278a90847fe525f7bdea66ae6081035e320afa813bf6efbbbe4c5d9f85)
/https://preview3d-images.cults3d.com/variants/eljhcisy7kd0zdhn2csbt6o8tt6v/9ce1a1278a90847fe525f7bdea66ae6081035e320afa813bf6efbbbe4c5d9f85)
/https://preview3d-images.cults3d.com/variants/s8e7h4w3fjfmc6yskc1kmgpi6cdc/9ce1a1278a90847fe525f7bdea66ae6081035e320afa813bf6efbbbe4c5d9f85)
/https://preview3d-images.cults3d.com/variants/c2f77osi9hn08oluczlqdzsfws07/9ce1a1278a90847fe525f7bdea66ae6081035e320afa813bf6efbbbe4c5d9f85)
/https://preview3d-images.cults3d.com/variants/ufd2vj6ty8j0vja0vuqwgnif5gti/9ce1a1278a90847fe525f7bdea66ae6081035e320afa813bf6efbbbe4c5d9f85)
/https://preview3d-images.cults3d.com/variants/r4f20srrtctynrxura5h9l9qnimk/9ce1a1278a90847fe525f7bdea66ae6081035e320afa813bf6efbbbe4c5d9f85)
/https://preview3d-images.cults3d.com/variants/u1u7utbot03x3lavsggk7o1g6d1g/9ce1a1278a90847fe525f7bdea66ae6081035e320afa813bf6efbbbe4c5d9f85)
/https://preview3d-images.cults3d.com/variants/vd4xy3azqlevij2hwqmzjdldh1c8/9ce1a1278a90847fe525f7bdea66ae6081035e320afa813bf6efbbbe4c5d9f85)
/https://preview3d-images.cults3d.com/variants/ouitk6ory6lz6js7jarjeq3snh4w/9ce1a1278a90847fe525f7bdea66ae6081035e320afa813bf6efbbbe4c5d9f85)
/https://preview3d-images.cults3d.com/variants/8s327tqb7xuixlwacrldqv33cuxk/9ce1a1278a90847fe525f7bdea66ae6081035e320afa813bf6efbbbe4c5d9f85)
/https://preview3d-images.cults3d.com/variants/vic064zi5u2ereoq33aa8caqf10z/9ce1a1278a90847fe525f7bdea66ae6081035e320afa813bf6efbbbe4c5d9f85)
/https://preview3d-images.cults3d.com/variants/ngkiyln7d13erzm3tztnrudlwpyh/cbbb7afd8a0ec9560f7f7940881f98c31dcb04582a03efcc135070de65821be8)
/https://preview3d-images.cults3d.com/variants/573ivboh99op10r9ara24yz3n8hv/cbbb7afd8a0ec9560f7f7940881f98c31dcb04582a03efcc135070de65821be8)


