A simple Arduino Nano LED candle for 2 to 6 LEDs.
You will need
Tools
- A computer with Arduino IDE installed and a mini USB cable.
- Soldering iron, solder and flux.
- Hot glue gun and glue.
- Wire cutters/strippers.
Materials
- 9v battery.
- 9v battery connector.
- 2 - 6x LEDs (a mixture of red, yellow and/or orange work best).
- 2 - 6x appropriate resistors for your LEDs (use this calculator or 220 Ohm resistors if unsure).
- A small amount of thin wire (~26AWG) (ideally in two colors; positive and negative).
- Heat shrink.
- Liquid electrical tape (or standard electrical tape).
- Cable tie (optional).
Building
Printing
- Customize the .SCAD file using OpenSCAD or use the .STL files.
- Print it - I recommend using a light filament (e.g. yellow or white) for the base and mount pieces and clear filament for the diffuser.
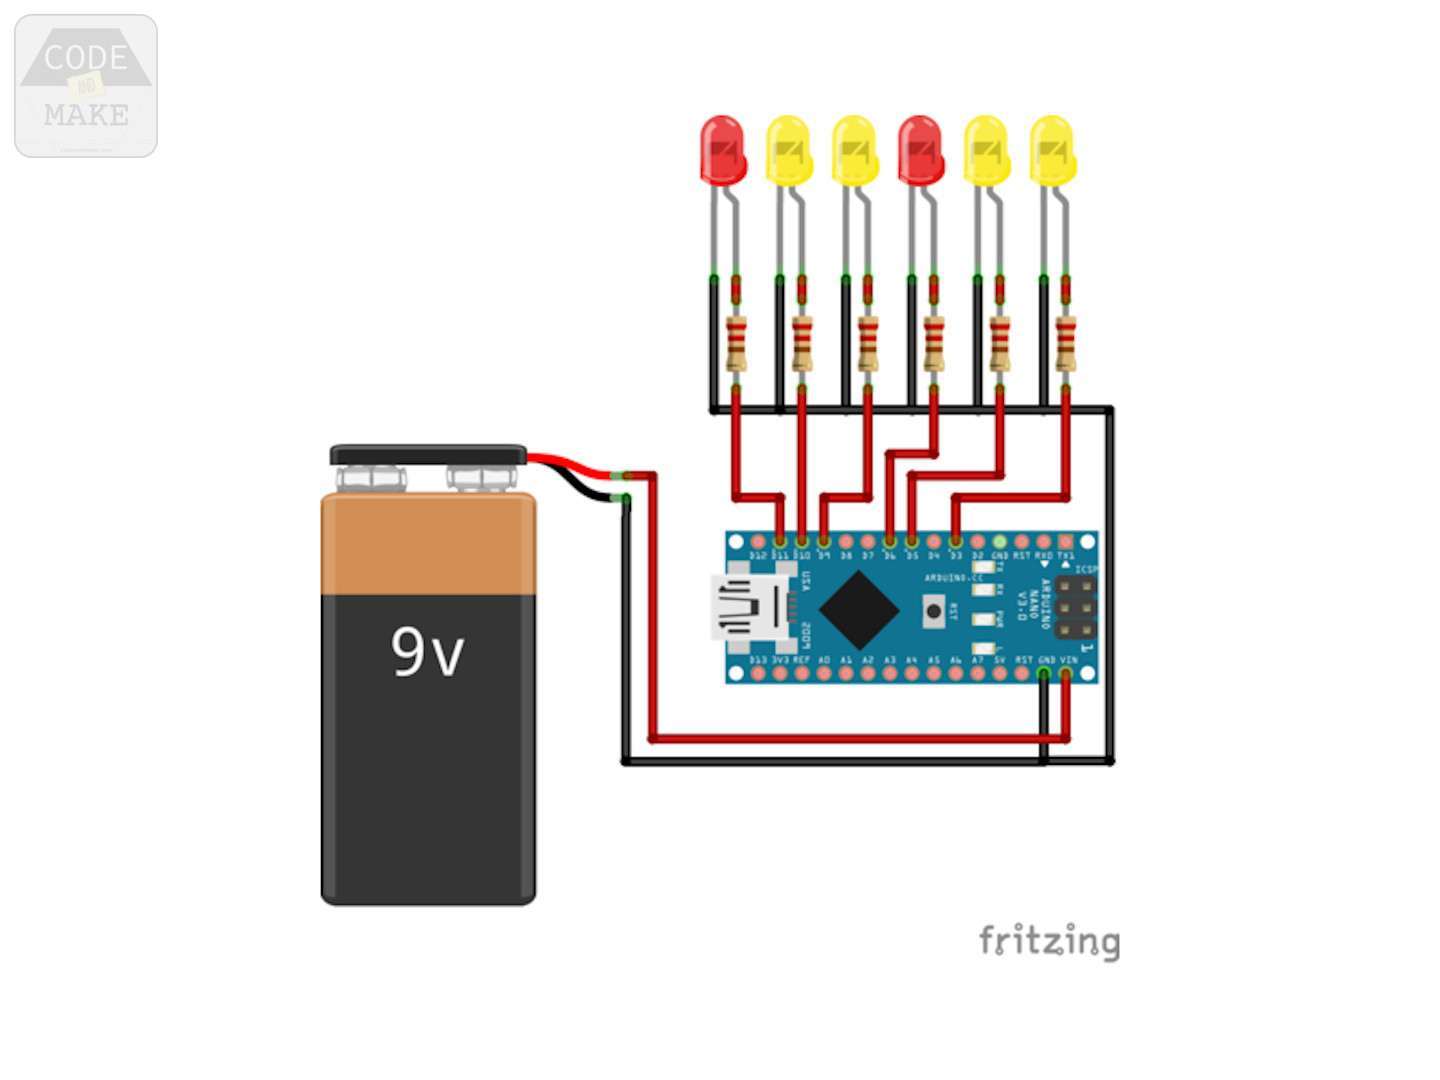
Wiring
Use the included wiring diagram as a reference.
If you are new to soldering, here is my tutorial which demonstrates how to solder an Arduino Nano. The tutorial shows how to solder pin headers to your Arduino Nano. You should not need to use pin headers for this project, you can solder wires directly to the board instead. However, you may still find this tutorial useful.
- Insert the LEDs into the LED mount with the negative (-ve) legs towards the center of the LED mount.
- Solder the negative legs of the LEDs together. Depending on your chosen configuration and LEDs you may not need wire for this step. The legs may be long enough to solder them together directly.
- Solder resistors to each of the positive (+ve) legs.
- Solder a short length (4 - 6") of your negative color wire to one of the negative LED legs.
- Solder short lengths (4 - 6") of your positive color wire to each of the resistors.
- Place some heat shrink over each of the positive legs and resistors so that no positive terminals are exposed.
- Use your soldering iron to shrink the heat shrink, being careful not to touch the LED mount with the soldering iron. I do not recommend using a heat gun.
- Solder the negative LED wire and the negative wire of the 9v battery connector to the
GND pin(s) of the Arduino Nano. You can twist and join them or solder them to separate GND pins.
- Solder the positive wire of the 9v battery connector to the
VIN pin of the Arduino Nano.
- Solder the positive LED wires to pins
D3, D5, D6, D9, D10 and/or D11. If you have fewer than 6 LEDs, use fewer pins.
Coding
If you haven't already, install Arduino IDE and configure it ready to program your Arduino Nano.
Here is my tutorial for installing the Arduino IDE in Ubuntu and configuring it for an Arduino Uno. The steps will be similar for the Arduino Nano and other operating systems.
- Connect the Arduino Nano to your computer via USB.
- Open the code file (
Arduino Nano LED Candle.ino) in Arduino IDE.
- If you used fewer than 6 LEDs, remove any unused pins from the
ledPins array:
int ledPins[] = { 3, 5, 6, 9, 10, 11 };
- Upload the code to the Arduino Nano and, in a few seconds, the LEDs should start to flicker.
- You can experiment with different
random numbers for different effects.
- Once happy, disconnect the USB cable and check that it works when powered via a 9v battery.
Taping
- Ensure the device is not powered (unplug the USB connector and battery).
- Bend the LED pins and wires to one side.
- If using a cable tie, tie it around the LED wires.
- Use some electrical tape (liquid or normal) to secure the wires to the underside of the LED mount. If using liquid electrical tape, allow it to cure before continuing.
Gluing
- Use a small amount of hot glue to attach the diffuser to the LED mount.
Using
To use, simply attach a 9v battery and insert the LED mount into the base, ensuring that the 9v battery and the Arduino Nano are sitting inside their respective compartments of the base.
Printing
Recommended slicer settings:
- Resolution: 0.1mm - 0.2mm
- Infill: 10% - 20%
- Supports: Doesn't Matter
- Rafts: Doesn't Matter
License
The "Customizable Arduino Nano LED Candle (2 - 6 LEDs)" model (.stl) is licensed under the CC BY license by Code and Make.
The "Customizable Arduino Nano LED Candle (2 - 6 LEDs)" code (.scad & .ino) is licensed under The MIT License by Code and Make.
Alternative code
If you would like to try different code, take a look at "flickering-flame" which uses an exponential low pass filter to enhance the effect. "flickering-flame" is designed for 5 LEDs, but it should be trivial to adapt it for a different number of LEDs.
"flickering-flame" is licensed under The MIT License by micromouseonline. A copy of the "flickering-flame" license is included below:
MIT License
Copyright (c) 2018 micromouseonline
Permission is hereby granted, free of charge, to any person obtaining a copy
of this software and associated documentation files (the "Software"), to deal
in the Software without restriction, including without limitation the rights
to use, copy, modify, merge, publish, distribute, sublicense, and/or sell
copies of the Software, and to permit persons to whom the Software is
furnished to do so, subject to the following conditions:
The above copyright notice and this permission notice shall be included in all
copies or substantial portions of the Software.
THE SOFTWARE IS PROVIDED "AS IS", WITHOUT WARRANTY OF ANY KIND, EXPRESS OR
IMPLIED, INCLUDING BUT NOT LIMITED TO THE WARRANTIES OF MERCHANTABILITY,
FITNESS FOR A PARTICULAR PURPOSE AND NONINFRINGEMENT. IN NO EVENT SHALL THE
AUTHORS OR COPYRIGHT HOLDERS BE LIABLE FOR ANY CLAIM, DAMAGES OR OTHER
LIABILITY, WHETHER IN AN ACTION OF CONTRACT, TORT OR OTHERWISE, ARISING FROM,
OUT OF OR IN CONNECTION WITH THE SOFTWARE OR THE USE OR OTHER DEALINGS IN THE
SOFTWARE.
We are proud to offer content to you absolutely free.
We love to create free content for you. As you might imagine, it takes a lot of time. Supporters help us fund materials and equipment to create future projects and tutorials. To show your appreciation, please use the link below:
https://codeandmake.com/support
We thank you so much for your support!
:format(webp)/https://fbi.cults3d.com/uploaders/16502974/illustration-file/151a37da-df70-4a53-b238-b87862de80d8/Arduino_Nano_LED_Candle_assembled.jpg)

/https://preview3d-images.cults3d.com/o05x8uuxf7jphv8nkf96moqxnwxj)
/https://preview3d-images.cults3d.com/variants/0o0jraquftwj710aur74alnjzggc/9ce1a1278a90847fe525f7bdea66ae6081035e320afa813bf6efbbbe4c5d9f85)
/https://preview3d-images.cults3d.com/variants/l35st28zdv0f12h3nzf7amdprx00/9ce1a1278a90847fe525f7bdea66ae6081035e320afa813bf6efbbbe4c5d9f85)


