3D model description
So I have been looking for a long time for a way to reach high up caches that will easily fit in the car all the time, (we are FTF fanatics) Ladders take up too much space or are too costly. I have a 6' extendable pole https://bit.ly/2M16Zu7 that goes to 18'/6m but our car (crosstrek) really isn't large enough for a 6' pole in it all the time. here is the mount for those poles in case you decide that is your path https://www.thingiverse.com/thing:1932441
On thingiverse I came upon https://www.thingiverse.com/thing:4065273 but the poster did not detail what type of pole or anything so I started my search. On aliexpress I found lots of carbon fiber collapsible fishing rods. The one i purchased had good reviews and was 33'/10m long but they have versions from 2.7m/9' to 10m/33' they are all the same length collapsed, 77cm/30" Here is a link to what I bought, https://bit.ly/2LWRfZc If you watch the video it can lift up to 2.5kg/5.5#
I decided the 6.7mm diameter was the right size, if you buy a different rod you may or may not have this size. And I unscrewed the bottom to remove the sections with smaller than 6.7mm diameter because if you don't extend them they can fall to the side and prevent the other sections from collapsing (ask me how i know)
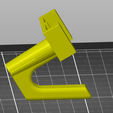
I used the hook from the light changing pole hook and shrunk it's width. combined with the slide on ability from the other hook and that was a good hook, although i experienced some problems with cracking at the layer lines when putting much weight on the hook. so I started experimenting with print orientation and I came up with a stronger orientation that i have not had any breaks with.
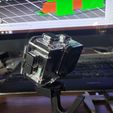
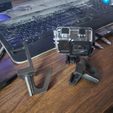
At the same time, with a suggestion from a friend that it would be pretty hard to see where the hook is going 30' in the air I started to imagine what it would be like to have an action cam up there to aid in searching and hooking. So back to the drawing board somewhat. I lopped off the top and grafted on a mount for my cam (apeman a100 $69 AC at amazon at the moment i write this amzn.com/B07DN6VQRC) but the mount was not moveable and did not allow you to see the hook or perhaps to see the cache if it was above or below. The apeman comes with so many mounts and a nice waterproof case I thought maybe I should try that. So I took one of the buckle type mounts and measured it up and created a mount and put it on top so the cam snaps into place safely and can be tilted as needed to see what you need to see.
So you have all my links and suggestions, now onto the files, for minimalism there is the slip on hook only. For those with an action cam, if your mounts include a buckle like mine you can just use it, but I have also 3d scanned my buckle in so you can see it and perhaps print that as well.
Future iterations may include a magnet to grab/replace in that fashion, and I'd also like to put a clamp on there, but the problem with a clamp is you would be putting a downward force (pulling a string) against the friction of the carbon fiber tube sections and i am not certain that would work without collapsing the rod. So that will take some time to get right.
3D printing settings
My strong suggestions are
1) if printing in abs remember to increase size 1-3% depending on your slicer and abs to account for shrinkage. This model is designed for pla/pet-g which does not shrink.
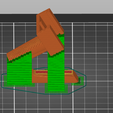
2) print in the orientation show in the pictures. While this does not give you 90° opposition for force vs layer lines, it does give you about 45° which is much better than 0° printing with the bottom of the hook down.
3) supports, as shown in the pictures, is suggested but as you can see from the image they are much less than if printed flat.
4) for that extra bit of strength I also suggest 3 perimeters, better safe than sorry when you have an action cam up there.

/https://fbi.cults3d.com/uploaders/13733784/illustration-file/5bc60976-dc8e-46c4-bb69-b7846f1a7bb7/20210116_130706.jpg)
