Please visit the new project website for the latest information on this project.
#Introduction
This is how I imagine a multi material feeder / extruder should be. Smart, versatile, reliable and being capable of handling different sorts of materials.
In contrast to other solutions, the SMuFF it's highly scale able. One can use the same base for a 3, 5 or even 9 material machine because of its modularity.
It's also able to replace your standard drive gear and make it a "Bondtech style" extruder, with all the benefits the advanced Bondtech gears will give you.
The SMuFF operates on it's own controller and has a lightweight GCode interpreter built in, which makes interfacing a breeze.
#Before
you start...
Have a look at the BOM to see which parts are needed. Needless to say that such a device, utilizing Bondtech gears, does not come cheap. A 5 material version will set you back 300-400 money units.
Also, I highly recommend it to experienced makers only. This device is a bit complex. Building and setting it up requires a lot of knowledge and quite some skills.
Please take the time and read all the Update sections below, since it describes mods and options you need to know before you start.
#What
it's not...
This is not a "out-of-the-box" solution. If you're looking for something that's ready to use, have a look at the Prusa MMU2.
Though you can configure it likewise, I wouldn't recommend using it with direct drive extruders. It works best with bowden hotends.
As of now, it will operate best on Duet3D boards, using a couple of tweaks and workarounds ([SMuFF-Ifc][4]) which don't require any firmware modifications.
On Marlin firmware driven 3D printers you have to have Marlin 2.0 set up and running, which enables you to run the SMuFF in Prusa MMU2 emulation mode.
Please have a look at Update 10 and also the wiki page for [Marlin Printers][3].
#What's next?
If you're still interested in building one, please bare with me. I will upload all the files, firmware and instructions needed for this project soon.
Meanwhile, leave a comment and tell me what you think.
#Update
1
Had to rework F03 and F04 because one of the hinges broke. Made them thicker and also got rid of the spring leveling thingy. It's not really needed if you make sure your springs are 15mm long and 6 mm in diameter.
#Update
2
Just uploaded the firmware for the i3 mini board. You'll find it on [Github][1].
#Update
3
Added a couple of [wiki pages][2] to Github.
#Update
4
I've added a couple of alternative parts:
* F03a - same as F03 but wastes less filament (print sideways)
* R03a - same as R03 but doesn't need additional bearing and pin
* S05a, S06a, S07 - in case you prefer optical endstops over mechanical ones
#Update
5
Restructured videos to include them in the preview..
https://www.youtube.com/watch?v=yfRpwxxeXY8
https://www.youtube.com/watch?v=SFA5YNk_v7U
https://www.youtube.com/watch?v=hSj8XV0dFw8
https://www.youtube.com/watch?v=DWaX2IlWaiA
Please also have a look at the assembly videos below.
#Update
6
Added part S01a, an alternative stepper motor mount for the Selector, which is 13mm longer and has a bore for a coupler, in case you don't have an stepper with integrated leadscrew and want to use a standard stepper-coupler-leadscrew combination instead.
#Update
7
Added an interface controller, based on the ESP32 on Thingiverse / Github.
Head over to [SMuFF-Ifc][4] for further details.
#Update
8
Added a new Selector, which seems more reliable.
Parts S07a and S07b serve the same purpose, whereas S07a needs an additional bearing 5 x 8 x 2.5 mm. The lid of the new Selector also integrates the endstop flag of the Selector and a printed spring on top, which pushes the Feeder endstop flag back, as soon as filament gets pulled out/retracted. So, this part is not optional.
One more important thing:
To get rid of constant filament jamming, you have to replace your heat break.
Since no matter how slow or fast you unload the filament, it always will get a bulge at the lower end and make the filament significantly thicker. This might be not a problem for the PTFE tube, but it is for the heat break.
Thanks to the findings of Prusa Research, there is a of-the-shelf solution though:
Go to the [E3D Online shop][5] and get the "Prusa specific heat break (MK2, MK3)". This one has a slightly larger bore (2.2 mm) than the standard ones, which makes it much easier for the bulged filament to get through.
If you don't use some kind of hardened steel heat break, you can try to drill it yourself but be aware that you have to be very precise.
I've tried a couple of things myself to overcome this issue (cutting, heating, re-shaping), but so far I think, swapping the heat break is the most elegant solution.
If you're still getting jams, try raising the nozzle temperature a few degrees up (5-10).
https://youtu.be/FZWWA7oHK2I
And once again:
https://youtu.be/7RgWLbfkb8k
50 mm/s printing speed, Z-Hop and Ooze-shield...
At 3:50 you can clearly see the ... fila-mess... ;o)
#Update
9
Have tested the feeder to its limits, just to make sure it doesn't run into under extrusion at some point.
So I printed a 3D Benchy at 180 mm/s, as you can see in the video below.
https://youtu.be/HZeQuryxBNI
Result is down below in the Makes (Testing) section.
Conclusion: Bondtech rocks! ;o)
Update 10
I've added a Prusa MMU2 emulation mode to the firmware. By switching this feature on in the configuration file, you enable the SMuFF to understand the GCodes usually sent to a Prusa MMU2.
Marlin 2.0 firmware already supports this feature and it's already implemented in the SKR 1.3 controller board.
Though, not sure if this works, since I've found quite some differences between the SKR firmware and the latest [MMU2 firmware][6]. The [SKR Marlin 2.0 firmware branch][7] seems a bit outdated (at least the attached serial-protocol.md says so).
So ... if you'd like to give it a try, let me know.
Update 11
I've updated the [Wiki][2] and added the final scripts for the Duet3D on [Github][1].
Update 12
Published a [Smart Filament Buffer][8] as a complement to this project.
Update 13
Changed the BOM to calculate length / parts depending on the count of materials (see top-right corner of the sheet).
Update 14
Working on a different selector drive, which is easier to build, faster and also easier to scale. Have a look at the teaser:
https://youtu.be/JOY8r10orWA
You need the new parts S01c.stl, S02c.stl, S03c.stl and S08c.stl. Furthermore you'll need a timing pulley GT2 20 teeth, an idler pulley with 20 teeth, a GT2 Belt 6mm / 380 mm in length, an M5 x 10 mm brass insert and a M5 x 30 mm screw.
Update 15
Did some minor design changes on the parts S01c/S02c. So you may re-download them, as soon as Thingiverse lets me upload.
Also, It's now proven that you can use a pancake stepper motor, just in case your standard stepper looks a bit bulky on this new assignment.
If you're going to use this drive system, please don't forget to change the StepsPerMillimeter setting in the SMUFF.CFG to 80 if you're using a standard 1.8° stepper or to 160 if your stepper features a 0.9° resolution.
You also might have to tweak the MaxSpeed parameter a bit in the "Selector" section.
Update 16
Chris Riley at [Chris' Basement][9] over on YouTube just released a video that takes care of attaching and configuring the Prusa MMU2 on any Marlin printer.
He covered the hardware as well as the software configuration under Marlin 2.0 step by step.
If you intend to run the SMuFF in Prusa emulation mode (as I stated in Update 10), I'd suggest, you head over to Chris' Basement and watch the video.
The software (Marlin 2.0) config starts at 5:33.
Since I don't have any Marlin printers, I can't test it myself but I'll do what my best to assist you get it running if things won't do as expected. Just let me know.
Please notice: Chris updated his LOG printer with an SKR 1.3 controller recently, which is the main reason for being able running Marlin 2.0 (Bigtreetech branch).
Update 17
Added a new Revolver flag (R05b) as mine tends to get loose after a couple of homing actions. For this one you have to flatten the end of the Revolver rod/screw where the flag sits.
Never mind if it doesn't show up in the STL preview... Thingiverse still has some issues with uploads.
Update 17a
Thingiverse starts to rearrange the pictures quite randomly... guess it's about time to move to another platform...
Update 18
Added firmware version 1.53 to [Github][1]. In addition to this I've published a new thingy (https://www.thingiverse.com/thing:3877555) which is needed for the all new controller board based on the 32-Bit SKR mini V1.1.
If that's of interest for you, head over to [Github][2] for the nitty gritty details.
Update 19
I've removed the "old" Selector endstops (the ones with the steel ball) simply because they turned out to be crap. Filament gets stuck in there quite often.
Update 20
Someone had to do it! https://youtu.be/CKxs7Ji0V_k
Update 21
I've figured on the latest device I've built, that the distance between the Revolver wheels and the lids is not optimal (too much pressure). It obviously depends on the assembly and the tolerances. This sometimes leads to the Revolver not being able to turn correctly.
So instead of adding material to R01, R02 I've decided to use spacers, simply because it's easier to print a different set of spacers than to remove material from the Revolver blocks.
The newly added parts (R01-Spacer, R02-Spacer) are set up to be 1.6 mm thick. If you need less thickness in your assembly, just scale down the Z measure in your slicer.
I've also created a mod where R01/R02 are able to take a compression spring in order to adjust the distances but it's a hassle to adjust R01/R02 accordingly, so that each set of gears gets the same pressure. Hence, I highly recommend using those spacers.
Update 22
I've just uploaded version 1.60 of the firmware to [Github][1]. Beside some optimizations and bug fixes, it has got a major feature: You're now able to change the settings through the UI at run time.
Please notice: This is going to be the last version which runs on 8-Bit micro controllers.
Read all about it on the Github Readme.md.
Update 23

I've replaced parts F03/F04 with the new F03d-1 and F04d. I did this redesign to get the filament transport more reliable and more quiet. With these new parts, the downward motion of the lid is more linear than circular.
Please notice that F03 now consists of two items. This was necessary to give the lid more stability and keep the whole thing maintainable as well. F03d-2 is designed to have a loose fit, so one can take it off easily when needed. Hence, you'll need an additional 2.2 x 2.9 mm self tapping screw to keep it in place.
F04d is now to be printed top side down with no supports at all, which makes it easier to print and does not need much post processing as the old one.
When assembling the lid, make sure you cut down your pins to about 18-19mm. Due to the linear movement, those pins may interlock if you leave them 20mm long.
Since I've redesigned this part, you no longer need any spacers for R01/R02 as I stated in Update 21. The pressure of the Revolver bearings is now supposed to be "on point" when filament is loaded.
If you've printed your SMuFF already, I highly recommend to print and replace the old ones with the new parts.
I've also uploaded an updated version of the firmware (1.63) to Github, which is more tolerant on feeder errors. It now retries up to 4 times to load the filament before it gives up and asks for user interaction.
Read more about it in the README.md.
Here's an screenshot of the test run results:
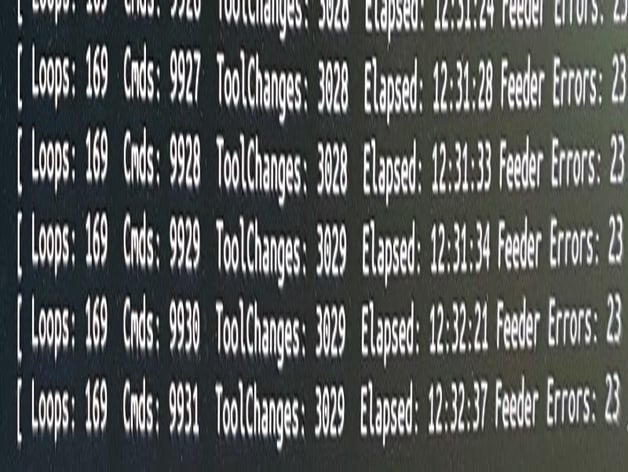
As you can see, the SMuFF (9 materials version) ran for about 12.5 hours and has accomplished over 3000 tool changes. In an normal print that would equal a model with 600 mm in height with one tool change per layer.
Update 24
I've just published a new "Revolver" option here (https://www.thingiverse.com/thing:3961216).
Here you can see it in action: https://youtu.be/uA2HJwa0xys
I decided to make an remix just to not over confuse you with all the options this project already has got.
Update 25
I've replaced parts S03b and S03c with S03b-1 and S03c-1 and also added S03c-2.
Basically, I've split the Selector carrier in two parts, which makes it easier to replace the endstop sensor on top or add some features like the servo variant or some laser detector, without the necessity of reprinting the whole carrier.
You'd simply create a new top piece, slide it onto the carrier and secure it with a screw.

From bottom to top: S03c-1, S03c-2.
BTW: I've also published the latest firmware (1.64) which is needed for the servo variant.
Update 26
Updated the BOM. The spacer rods for the Revolver had been calculated wrong. Instead of 138 mm (for the 5 materials version) they need to be 122 mm.
Update 27
(and most probably the final update)
I've uploaded the STEP files to Grabcad (https://grabcad.com/library/smuff-smart-multi-filament-feeder-with-bondtech-gears-1).
Update 28
You might have read in the comments section, duhredstonegod asked for a OctoPrint plugin to control the SMuFF.
Just out of curiosity, I've made one and from the first tests it looks promising.
I was testing it under "Dry run" conditions and since I'm not using OctoPrint myself (which is kind of redundant with Duet3D boards), it needs some serious testing. Please let me know if you want to give it a try.
All I need is your Github user name (or email address) and I'll add you to the - yet private - repository, so you can download/install and test it.
If you're interested, drop me a PM.
Update 29
In this update I'd like to share a new video from Joe, the 3D Maker Noob, who's tackling the most common issues in 3D printing: Clogging and Jamming.
He explains in detail what causes these issues and why cheap printers are prone to this.
If you're planning to use the SMuFF on your stock printer, head over to YouTube and watch [this video][10]. It may give you some ideas on what's going wrong since Clogging and Jamming are the most critical issues when it comes to printing with multiple materials/filaments (as I've already stated in Update 8).
*And btw., just in case you didn't know: Joe's
:format(webp)/https://fbi.cults3d.com/uploaders/17119678/illustration-file/964b4d49-1c52-4b92-8cfa-ae94862e7ab7/SMuFF_Render_newsmall.png)


/https://preview3d-images.cults3d.com/t1us9jiijfvbi74jy7jvzlj3s5sc)
/https://preview3d-images.cults3d.com/variants/mexvsag2tjc925e5lb53xww35qom/9ce1a1278a90847fe525f7bdea66ae6081035e320afa813bf6efbbbe4c5d9f85)
/https://preview3d-images.cults3d.com/variants/l5t5r0v6wrflx3uq1tzk561uamh6/9ce1a1278a90847fe525f7bdea66ae6081035e320afa813bf6efbbbe4c5d9f85)
/https://preview3d-images.cults3d.com/variants/2quk293qvx1jpt65bmlj788q737z/9ce1a1278a90847fe525f7bdea66ae6081035e320afa813bf6efbbbe4c5d9f85)
/https://preview3d-images.cults3d.com/variants/ydrs34p88831bcmjkccxrwbij67q/9ce1a1278a90847fe525f7bdea66ae6081035e320afa813bf6efbbbe4c5d9f85)
/https://preview3d-images.cults3d.com/variants/xva2zc7s5l6twpp83mhgljoyy0gm/9ce1a1278a90847fe525f7bdea66ae6081035e320afa813bf6efbbbe4c5d9f85)
/https://preview3d-images.cults3d.com/variants/vlcn37tlo7h5mhmao4xwpcevhh0i/9ce1a1278a90847fe525f7bdea66ae6081035e320afa813bf6efbbbe4c5d9f85)
/https://preview3d-images.cults3d.com/ixs6qqfaj5zr2bx2jtsdaju78fpb)
/https://preview3d-images.cults3d.com/variants/266cxrbdmmnq92g5vmy2v2esfnxo/9ce1a1278a90847fe525f7bdea66ae6081035e320afa813bf6efbbbe4c5d9f85)
/https://preview3d-images.cults3d.com/variants/35tevagf1xiblyoyte1kx209usao/9ce1a1278a90847fe525f7bdea66ae6081035e320afa813bf6efbbbe4c5d9f85)
/https://preview3d-images.cults3d.com/variants/0yqx39e1930y0wlbn8lxwdy4nxek/9ce1a1278a90847fe525f7bdea66ae6081035e320afa813bf6efbbbe4c5d9f85)
/https://preview3d-images.cults3d.com/hg5so6v0x2egklpc1k0cds8yau64)
/https://preview3d-images.cults3d.com/variants/pgo4zpgol5j7m9319ycisj49f7jy/9ce1a1278a90847fe525f7bdea66ae6081035e320afa813bf6efbbbe4c5d9f85)
/https://preview3d-images.cults3d.com/w57u09o62aogz4yxa1t5e7st4dnx)
/https://preview3d-images.cults3d.com/variants/aseapqju4gf5x7rhtez76e1irmvx/9ce1a1278a90847fe525f7bdea66ae6081035e320afa813bf6efbbbe4c5d9f85)
/https://preview3d-images.cults3d.com/utrawuq45ih95mkre3z6hvjp11g1)
/https://preview3d-images.cults3d.com/e1155gs7r3o3x782e2z175ap5w2z)
/https://preview3d-images.cults3d.com/vccneoqxuqg6rxkk9k3hr50i0xhf)
/https://preview3d-images.cults3d.com/u08ls9h8r3ep30xxeu8j4a58jkbg)
/https://preview3d-images.cults3d.com/pccyjp0gkouyvarrb02amue5rh34)
/https://preview3d-images.cults3d.com/pi46rj28nqsymv5e52xc94ebpj1e)
/https://preview3d-images.cults3d.com/pwx6kxuceoqlawgv44lsyc0wk52y)
/https://preview3d-images.cults3d.com/variants/742hsgyu5lm8c2ph4fwii7r74r7y/9ce1a1278a90847fe525f7bdea66ae6081035e320afa813bf6efbbbe4c5d9f85)
/https://preview3d-images.cults3d.com/tsdwp02t01vqyhmiisrj8ca66yh0)
/https://preview3d-images.cults3d.com/9xp6s2bqcfp9u6cb1zpfuwy4ssk3)
/https://preview3d-images.cults3d.com/variants/mn10vopo9ta5nyiav7si8x3iswea/9ce1a1278a90847fe525f7bdea66ae6081035e320afa813bf6efbbbe4c5d9f85)
/https://preview3d-images.cults3d.com/qw5rk0ng024dnquow8lgmjj8qiz3)
/https://preview3d-images.cults3d.com/a0hanruct8p5dv0wqhd6njg5u8v9)
/https://preview3d-images.cults3d.com/n82cobvr7uwv2artsrm3rngjy512)
/https://preview3d-images.cults3d.com/1c8fbw9owbkm4i5gi4mh6zhhtdys)
/https://preview3d-images.cults3d.com/q5b01fguvenpfk8avpleml0q6cop)
/https://preview3d-images.cults3d.com/kole53afb4dsgoabfi8rdb465q5g)
/https://preview3d-images.cults3d.com/tv84z9g69edalm0mqzgpo9zbvhkz)
/https://preview3d-images.cults3d.com/lejwkmch8yskv0o2ml84oncbnro9)
/https://preview3d-images.cults3d.com/fioj6bpot4851vh00dw57d7ypn7v)
/https://preview3d-images.cults3d.com/variants/dmtiw4iq0m2aj6y6avmwfcy31k6l/9ce1a1278a90847fe525f7bdea66ae6081035e320afa813bf6efbbbe4c5d9f85)
/https://preview3d-images.cults3d.com/variants/oipl6a7lp6pe7cr12saue7bqnxht/9ce1a1278a90847fe525f7bdea66ae6081035e320afa813bf6efbbbe4c5d9f85)
/https://preview3d-images.cults3d.com/xsy8x1j4elxa7cosen50v4batd8h)
/https://preview3d-images.cults3d.com/variants/xderxuo4xixf98tdzswadv9973cd/9ce1a1278a90847fe525f7bdea66ae6081035e320afa813bf6efbbbe4c5d9f85)
/https://preview3d-images.cults3d.com/0ikrfyvekbt8g16r4qie5l1bxts0)
/https://preview3d-images.cults3d.com/variants/m3essvy2yqnrcmh0wundh3v40wif/9ce1a1278a90847fe525f7bdea66ae6081035e320afa813bf6efbbbe4c5d9f85)


