Skip to content

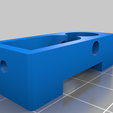
idler for jgmaker artist-D

Advertising
Advertising
?
Creation quality: 0.0/5 (0 votes)
Evaluation of members on the printability, utility, level of detail, etc.

  • 982 views
  • 4 downloads

License
3D design format
STL Folder details Close
  • idler_9.0_final.stl

Learn more about the formats

3D model size X 40.5 × Y 17.6 × Z 11.9 mm
Publication date 2021-03-01 at 08:38
?
Published to Thingiverse on: 2021-02-28 at 19:42
Design number 317127

3D printer file info

3D model description

Pièce de remplacement pour les extrudeurs de l'imprimante jgmaker artist-D.
la vis du roulement est changé par une vis M3x8mm.

Replacement part for the jgmaker artist-D printer extruders.
the bearing screw is changed by M3x8mm screw.

  • remove the nozzle by pressing the lowest push button.
  • remove the 2 push screws located on the side (for changing nozzle and for loading filament)
  • remove the filament -remove the tablecloth -remove the 2 screws above the carriage holding the belt -Unscrew the 4 screws of the extruder cover held on the mgn -all the block should fall -Unscrew the 2 screws located on the top (on either side of the pneufit -Unscrew the 2 screws located on the front of the cover (where there were the push buttons) -the cover should separate from the extruder block -Remove the 2 screws holding the connector plate -remove the connector from the nema -Remove the 2 screws holding the fan to the nozzle -Remove the 2 screws of the radiator cooling fan
  • unscrew the pneufit -Unscrew the 2 screws holding the nema to the radiator
  • remove the nema from the radiator
  • remove the part to be changed (pay attention to the spring). -remove the bearing and put it on the new part (I changed the screw for m3x8) -insert the part and the spring while maintaining pressure on the part and add the nema, make small rotations of the nema so that it fits correctly (the nema must come pressed against the radiator)
  • screw the nema back to the radiator
  • screw the fan back to the radiator -pass the filament by pressing on the new part, to test the insertion of filament
  • insert the tablecloth -fix the pneufit without the ptfe -insert the ptfe into the pneufit until it stops -insert the nozzle (the ptfe protruding from the nozzle may need to be cut because on all my nozzles almost all have a different height! If there is a cut, bevel the tip of the ptfe with a pencil sharpener so that it s 'fits well in the room)
  • make an extrusion test to see if it is good -if ok, screw everything back! NB: for the right extruder, there is a small complication since it is necessary to remove the screw located at the top of the carriage allowing the height adjustment. Removing it is easy, however, putting it back on less!

3D printing settings

-

Advertising


Issue with this design? Report a problem.

Would you like to support Cults?

You like Cults and you want to help us continue the adventure independently? Please note that we are a small team of 3 people, therefore it is very simple to support us to maintain the activity and create future developments. Here are 4 solutions accessible to all:

  • ADVERTISING: Disable your banner blocker (AdBlock, …) and click on our banner ads.

  • AFFILIATION: Make your purchases online by clicking on our affiliate links here Amazon.

  • DONATE: If you want, you can make a donation via Ko-Fi 💜.

  • WORD OF MOUTH: Invite your friends to come, discover the platform and the magnificent 3D files shared by the community!


Sharing and downloading on Cults3D guarantees that designs remain in makers community hands! And not in the hands of the 3D printing or software giants who own the competing platforms and exploit the designs for their own commercial interests.

Cults3D is an independent, self-financed site that is not accountable to any investor or brand. Almost all of the site's revenues are paid back to the platform's makers. The content published on the site serves only the interests of its authors and not those of 3D printer brands who also wish to control the 3D modeling market.

100% secure payment by credit card, PayPal, Apple Pay, Google Pay, etc.
View all payment options.