I present my latest invention: The Quick-Draw Crossbow!
Its a vertically oriented single shot crossbow pistol with a special holster that allows the pistol to be cocked while drawing it from the hip, making it ready to fire as soon as its free. This improves saftey when carrying as the bow is under no tension until drawn yet can be chambered with a bolt and fired in seconds.
This version 1.0 prototype is functional and fairly powerful, but as tension increases, so does the effort required to draw it from the holster. Future versions will try to address this with a compound mechanism to assist pulling the slider forward. Im also experimenting with a mechanism to automatically release the slider lock when returning the bow to the holster.
This bow uses 6mm diameter (~1/4 in) bolts I found here. Theyre approx 150mm in length with fletchings 17.35mm wide and 1mm thick. Diagram of the bolts included.
Stay tuned for more updates and more whacky weapons!
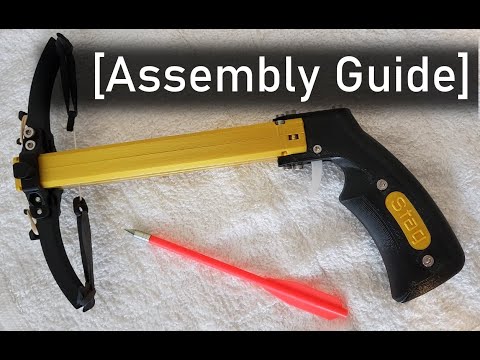
I just added a video guide for assembly here
DISCLAIMER: By downloading these files, you agree that I shall not be liable for any damage, injury or harm resulting directly or indirectly from the use of these files or instructions. Always be safe and aware when operating these mechanical toys and enjoy!
Required Parts
Here are the required parts for the Crossbow
M4x8 Screws [x3]
M4x20 Screws [x6]
M3x20 [x2]
M3x8 [x1]
M3x12 [x4]
M4 Hex nuts [x4]
Strong large rubber bands for the bow arms [x2]
Thin braided nylon string
Small rubber bands for the trigger tension and slider lock pins [x3]
Here are the required parts for the Holster
M4x14 Screws [x12]
M4 Hex Nuts [x12]
Assembly Instructions:
See the bottom section with pictures for assembly
Figure 1A: Loop a small rubberband around the end hook on the InternalTrigger and secure on the small peg on Barrel_Bottom
Figure 1B: Cut a piece of filament to about 21mm and feed through the axis of the InternalTrigger and the hole in Barrel_Bottom. Should be a loose fit as this is temporary.
Figure 2: Glue the two ArrowRetentionTabs to the raised portion of the slots on Barrel_Top.
Figure 3: Lay Barrel_Top on Barrel_Bottom such that the filament feeds through the trigger axis hole, connecting the InternalTrigger with the Barrel Halves. Slide the SliderFrame onto the Barrels and push it all the way to the muzzle end, ensuring the orientation matches this picture.
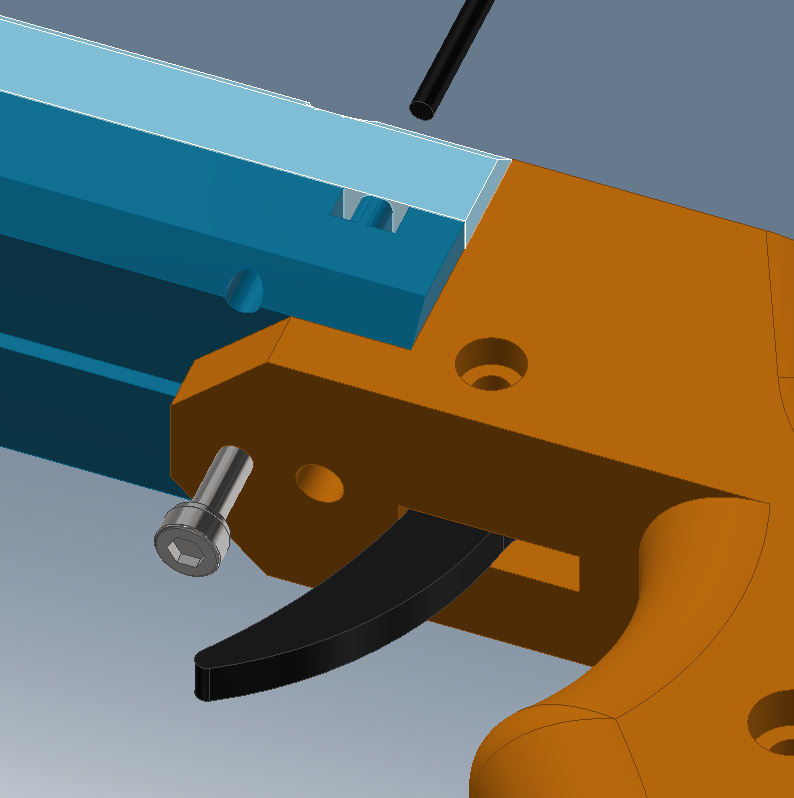
Figure 4: Place the InternalTriggerPin into the rectangular slot with the flat end facing outwards.
Figure 5: Place the ExternalTrigger in the cutout chamber of Grip_L, then use an M3x20mm screw to connect the left Grip to the right grip through the trigger axis hole. Proceed to use two M4x20 screws and nuts to secure the grips together.
Figure 6: Use an M3x20 or M3x16 and screw it into the smaller hole on the bottom of the grip. This screw should then go through the trigger axis hole on the Barrel_Bottom, pushing the filament upwards. Once the M3 screw is through the InternalTrigger, you can remove the filament and discard it. Ensure the ExternalTrigger can rotate and push the InternalTriggerPin, which should rotate the InternalTrigger. Check that it works properly by looking through the string channel.
Figure7: Secure the GripTopPlate to the Grip and the Barrel_Top using 2 M4x8 screws and an M3x8 screw. Use another M4x8 screw for the larger hole in the bottom of the grip to secure it to Barrel_Bottom.
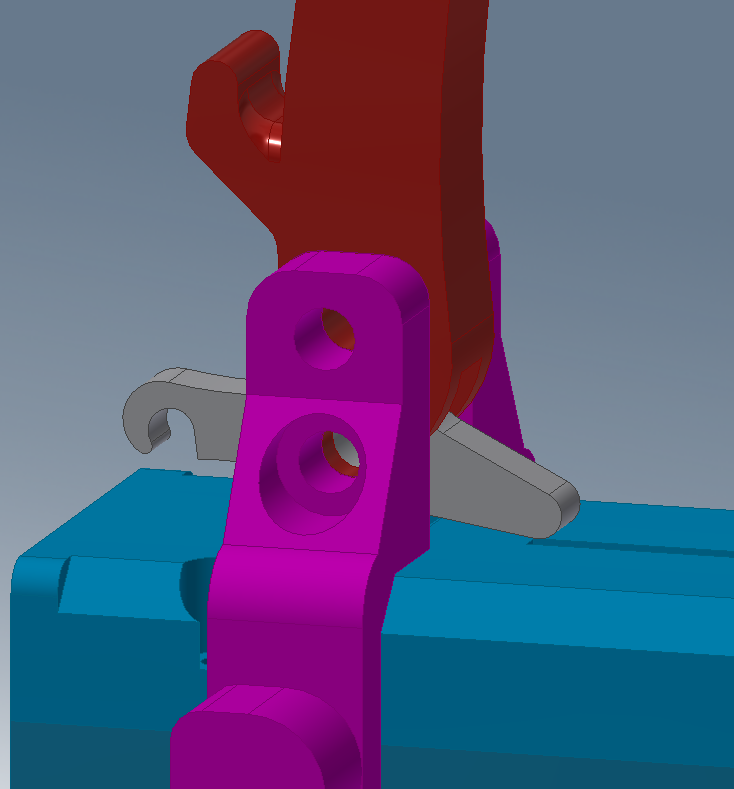
Figure 8A: Place the SliderLockPin into the small slot on the bottom of BowArm, then place both in one of the channels of SliderFrame. Secure them with two M4x20 screws. Ensure that the SliderLockPin can rotate freely. Repeat for the other BowArm and LockPin on the other side.
Figure 8B: Loop a small rubber band around the SliderLockPin's hook and around the hook on the BowArm. Repeat for the other BowArm. You should be able to slide the entire SliderFrameAssembly forward along the barrel and have the lock pins click into the small slots on the top and bottom of the barrel. To unlock the slider, Pinch the two SliderLockPins and push the slider towards the grip.
Figure 9: Finally, secure the Barrel halves together using 4 M3x12 screws. Ensure the front screws are flush and that the slider can pass over them easily.
Next, take the string and feed it through the string channel between the two barrel halves. Using the two BandToStringLoops, feed one end of the string through the smaller hole of the BandToStringLoop, then double knot it so it cant be pulled through the hole.
Do the same for the other end of the string such that the length of string is a little bit longer than the height of the barrel. The BandToStringLoops should be nearly touching the top and bottom of the barrel.
Now use your two large rubber bands to connect each BandToStringLoop to the hole in the tip of the BowArms. Ive included two versions of the arms depending on how you want to attach the rubber bands. The version with the suffix "_HookEnd" allows you to simply loop the open ends of the rubber band around the hook. The version with the suffix "_Static" has a hole, so you can either loop the band through the hole or screw in an M4x20 screw through it and loop the bands around the screw. Ensure you have good enough tension so that you can pull the slider all the way back and have the string engage the InternalTrigger. You should be able to cock the bow by pushing the slider all the way forward until the SliderLockPins click into place and lock the Slider in the forward position. Pull the trigger to fire!
Holster Assembly
NOTE: For a left handed holster, simply mirror Holster_Inner and Holster_Outer.
Figure 1: Place 4 M4 hex nuts into the recesses in Holster_Inner and press tightly so that they are flush against the surface.
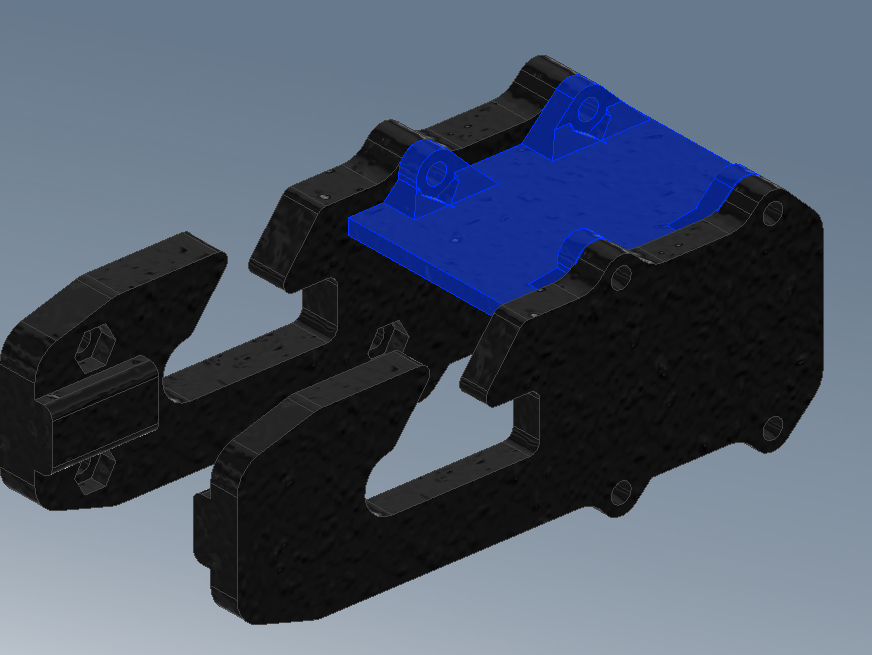
Figure 2: Place the Holster_TopPlate between Holster_Inner and Holster_Outer and use 4 M4x14 screws to secure them together. Repeat for the bottom plate using another 4 M4x14 screws. You can optionally use M4 hex nuts to secure the screws if its not tight enough.
Figure 3: Using the last 4 M4x14 screws, secure the HolsterBeltLoop to the Holster_Inner, ensuring they engage with the Hex nuts placed in Figure 1.
There are two small holes in the bottom of Holster_Inner that you can loop a thick string through to tie the holster to your leg. This helps keep the holster steady and aligned while drawing the pistol, especially when the bow tension is high. Just loop a string in one hole and out of the other, then tie the string around your thigh.
Loading and Firing Instructions
With the holster placed on your right hip, take the pistol and push the slider all the way towards the muzzle until it locks in place. When placing in the holster, its not necessary for the string to be cocked so you can hold the trigger down when sliding to prevent the string from being pulled under tension.
Place the barrel pointing down near the holster and slide the thick pegs on the sides of the SliderFrame into the hook shaped slots on the holster, then push down until the pegs are against the bottom of the hook shaped slots.
Using your other hand, pinch the SliderLockPins so that they release, then push the pistol down into the holster until the string clicks into the InternalTrigger.
With the pistol fully holstered, take a bolt and push it into the muzzle of the barrel as far as it can go. The arrow retention tabs should hold the bolt in place by pressing against the fletchings.
When ready to shoot, pull the grip up, trying to keep the barrel as aligned as possible with the holster (avoid twising or pulling at an angle). When the SliderLockPins click into place, you then push down and forward such that the SliderFrame pegs exit the angled part of the hook shaped slot on the holster. Once clear from the hoslter, just aim and fire!
:format(webp)/https://fbi.cults3d.com/uploaders/17487350/illustration-file/bb65b3e7-fcc2-45b6-a1b9-bd48496353de/SideView.jpg)


/https://preview3d-images.cults3d.com/variants/469wz61ic6v6padbfbqc9p7mxbx9/cbbb7afd8a0ec9560f7f7940881f98c31dcb04582a03efcc135070de65821be8)
/https://preview3d-images.cults3d.com/variants/f8cv0mfenir3rw0hw0w4rrlwxozu/cbbb7afd8a0ec9560f7f7940881f98c31dcb04582a03efcc135070de65821be8)
/https://preview3d-images.cults3d.com/variants/hdunffnscm7zdf7e405xp315abyn/cbbb7afd8a0ec9560f7f7940881f98c31dcb04582a03efcc135070de65821be8)
/https://preview3d-images.cults3d.com/variants/ffd9ihad3f1my1rov37ez11z5uss/cbbb7afd8a0ec9560f7f7940881f98c31dcb04582a03efcc135070de65821be8)
/https://preview3d-images.cults3d.com/variants/p01jlbutq32ndmoyb9s7nzp57vt9/cbbb7afd8a0ec9560f7f7940881f98c31dcb04582a03efcc135070de65821be8)
/https://preview3d-images.cults3d.com/variants/01lg9assgd6wjia35hdam84lpmr2/cbbb7afd8a0ec9560f7f7940881f98c31dcb04582a03efcc135070de65821be8)
/https://preview3d-images.cults3d.com/variants/g7qomwf0puwhmbtsg5gfgp4z4a6c/cbbb7afd8a0ec9560f7f7940881f98c31dcb04582a03efcc135070de65821be8)
/https://preview3d-images.cults3d.com/variants/9htwbmx3f4ulspagf8k3l2lzwu0n/cbbb7afd8a0ec9560f7f7940881f98c31dcb04582a03efcc135070de65821be8)
/https://preview3d-images.cults3d.com/variants/guhlhv53haw2i58j6fa7s38exggv/cbbb7afd8a0ec9560f7f7940881f98c31dcb04582a03efcc135070de65821be8)
/https://preview3d-images.cults3d.com/variants/0ap50431ydl2gmyg60xs7ipvsnhe/cbbb7afd8a0ec9560f7f7940881f98c31dcb04582a03efcc135070de65821be8)
/https://preview3d-images.cults3d.com/variants/fmhfpdt3m8m07kbwgpf1a2n2luro/cbbb7afd8a0ec9560f7f7940881f98c31dcb04582a03efcc135070de65821be8)
/https://preview3d-images.cults3d.com/variants/6bdlwj8iu2b8glwd52svatkng84b/cbbb7afd8a0ec9560f7f7940881f98c31dcb04582a03efcc135070de65821be8)
/https://preview3d-images.cults3d.com/variants/7l5vfdj1v19b3j2n5jklaeovrqep/cbbb7afd8a0ec9560f7f7940881f98c31dcb04582a03efcc135070de65821be8)
/https://preview3d-images.cults3d.com/variants/srtxofc8l7bh7i93pst1n2ydzh7i/cbbb7afd8a0ec9560f7f7940881f98c31dcb04582a03efcc135070de65821be8)
/https://preview3d-images.cults3d.com/variants/q3cxr64t3i1t40ae3llkznf8il2c/cbbb7afd8a0ec9560f7f7940881f98c31dcb04582a03efcc135070de65821be8)
/https://preview3d-images.cults3d.com/variants/iep1dyggbnbl2nxhqa14bnbwq1na/cbbb7afd8a0ec9560f7f7940881f98c31dcb04582a03efcc135070de65821be8)
/https://preview3d-images.cults3d.com/variants/wiafug2zbdgtoscrqc3zt5wzg5jq/cbbb7afd8a0ec9560f7f7940881f98c31dcb04582a03efcc135070de65821be8)
/https://preview3d-images.cults3d.com/variants/79y7eo2nusyde3i81o30iap4jelq/cbbb7afd8a0ec9560f7f7940881f98c31dcb04582a03efcc135070de65821be8)
/https://preview3d-images.cults3d.com/variants/jiskpmiymd0dh17p0yk5mc25z32t/cbbb7afd8a0ec9560f7f7940881f98c31dcb04582a03efcc135070de65821be8)
