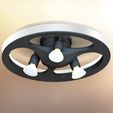
Eine Leuchte welche ich für unsere Küche entworfen habe. Gerade die Kombination von LED-Strip für indirekte Beleuchtung und GU10-Strahlern für eine gerichtete Wirkung war Ziel dieses Projekts.
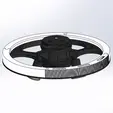
Um die Teile auf die Druckplatform zu verkleinern, habe ich sie in Stücke aufgeteilt. Der Diffusor wird 4 mal benötigt. Die GU10-Parts und die Corpus-Teile werden 3 mal benötigt.
Die Teile habe ich nach dem Zusammenstecken mit Acrylglas-Kleber (acrifix) zusammengeklebt. Jeweils von der Innenseite, so das man es hinterher nicht sieht.
https://www.amazon.de/dp/B00TIY449W/ref=cm_sw_em_r_mt_dp_jYRWFbPZKJYJJ?_encoding=UTF8&psc=1
ACHTUNG Sicherheitshinweis! Hier wird mit Netzspanung 230 V AC gearbeitet, dies sollte nur von Fachleuten durchgeführt werden!!!
Alle Teile können ohne Support gedruckt werden. Bei wallmount.stl müssen die enthaltenen Support Strukturen hinterher entfernt werden.
Sie benötigen 1 m LED-Strip mit einer Breite von 8 mm, ein paar Drähte, Leitungsklemmen, GU10 Fassungen und ein kleines Netzteil für den LED-Strip und ein paar M3x20 Schrauben und passende Muttern.
Solltet ihr einen Strip mit 60 LEDs je Meter verwenden, empfehle ich ein Netzteil zu verwenden, bei welchem man die Spannung auf 10 V einstellen kann. So kann die Wärmeentwicklung verringert werden.
Beachtet das das Netzteil genug Leistung bietet. Manche werden sehr heiß (um die 100 °C am Tc Punkt) was das PETG nicht lange aushält. Ich habe ein MeanWell HDR-30-12 verwendet, bei welchem ich das Gehäuse entfernt habe.
https://www.amazon.de/dp/B06XWRWSHT/ref=cm_sw_em_r_mt_dp_U_VM74EbMNNGAP1
GU10 Lampen Fassungen z. B.
https://ebay.us/HOnaxF
Der wallmount-adapter.stl muss sicher auf die Leuchte geklebt werden. Die Aufhängung kann mit einer Schraube erledigt werden. So kann die Leuchte angeschlossen und leicht mit einer kleinen Drehung nach rechts eingehängt werden.
Die Verschaltung sollte für Fachleute kein Problem darstellen, deshalb gehe ich hier nicht weiter darauf ein.
Der dome.stl ist zur optischen Aufwertung der Leuchte darunter geklebt.
Falls jemand Verbesserungen vornehmen möchte, habe ich corpus_complete.STL und diffusor_complete_smooth.STL mit hochgeladen.
A lamp that I designed for our kitchen. The aim of this project was precisely the combination of LED strips for indirect lighting and GU10 spotlights for a directional effect.
In order to shrink the parts to the printing platform, I split them into pieces. The diffuser is required 4 times. The GU10 parts and the corpus parts are required 3 times.
After putting them together, I glued the parts together with acrylic glass glue (acrifix). Each from the inside so that you can't see it afterwards.
https://www.amazon.de/dp/B00TIY449W/ref=cm_sw_em_r_mt_dp_jYRWFbPZKJYJJ?_encoding=UTF8&psc=1
ATTENTION safety notice! Mains voltage 230 V AC is used here, this should only be carried out by specialists!
All parts can be printed without support. With wallmount.stl, the support structures contained must be removed afterwards.
You need 1 m LED strip with a width of 8 mm, a few wires, cable clamps, GU10 sockets and a small power supply for the LED strip and a couple of M3x20 screws and matching nuts.
If you use a strip with 60 LEDs per meter, I recommend using a power supply unit with which the voltage can be set to 10 V. This can reduce the generation of heat.
Make sure that the power supply offers enough power. Some of them get very hot (around 100 ° C at the Tc point) which the PETG cannot withstand for long. I used a MeanWell HDR-30-12 from which I removed the housing.
The wallmount-adapter.stl must be securely glued to the luminaire. The suspension can be done with a screw. The lamp can be connected and easily hung with a small turn to the right.
The interconnection should not be a problem for experts, so I won't go into it here.
The dome.stl is glued underneath to enhance the look of the lamp.
If someone wants to make improvements, I uploaded corpus_complete.STL and diffusor_complete_smooth.STL.

/https://fbi.cults3d.com/uploaders/14902455/illustration-file/365e353a-e83d-4aaa-8521-4365fea5a85b/Rendering_1.JPG)


