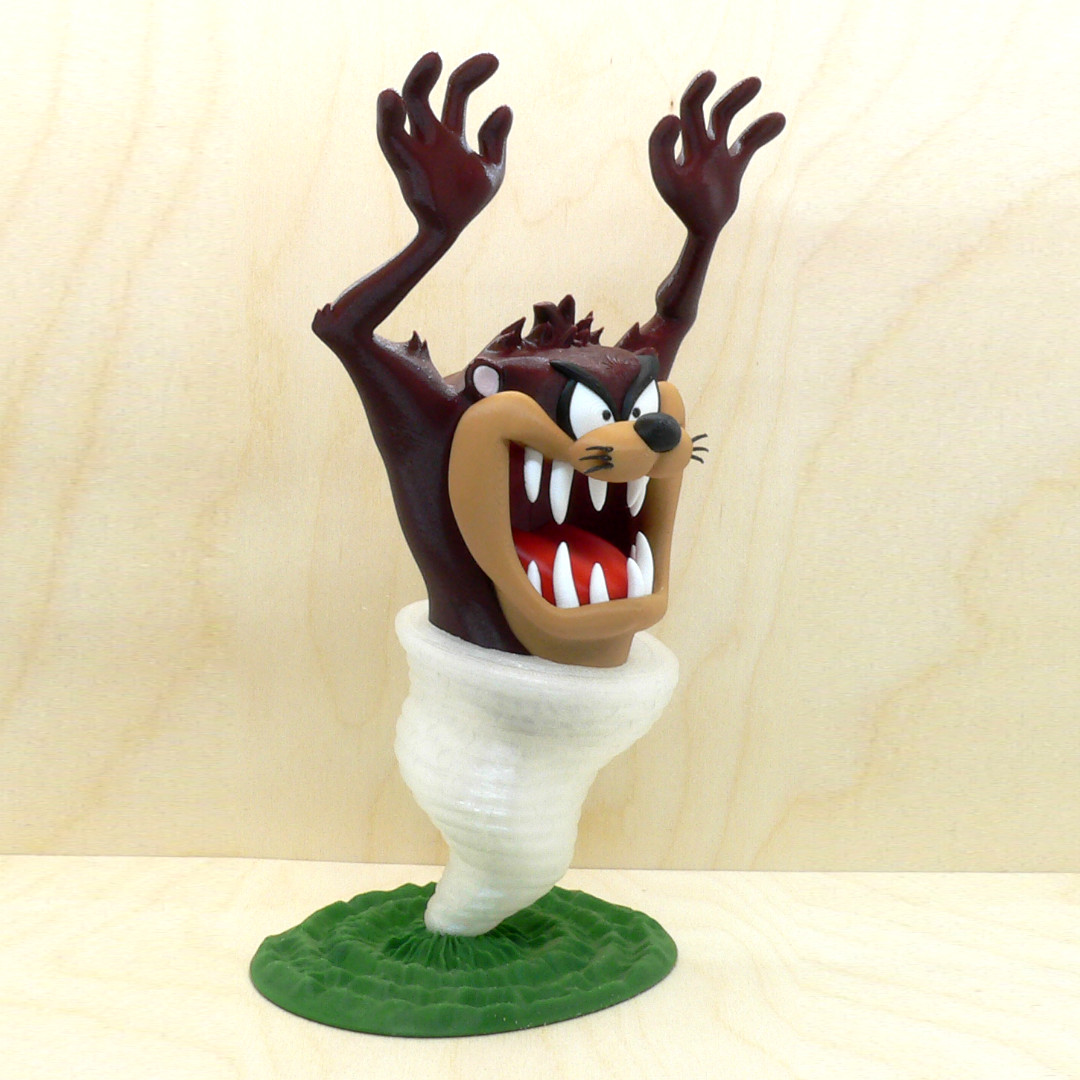
Tazmanian Devil, commonly referred to as Taz is from Warner Bros.' Looney Tunes and Merrie Melodies cartoons.
Taz is generally portrayed as a ferocious, albeit dim-witted, carnivore with a notoriously short temper and little patience. Though he can be very devious, he is also sweet at times. Taz has an ability to spin like a vortex and bite through nearly anything. He does have one weakness, he can be calmed by almost any music.
No supports are required. If you have the proper filament colors, no painting is needed.
The assembled model is 270mm tall.
Enjoy!
...........................................................................................................
Print Instructions:
Supports: No
Resolution: .2mm
Infill: 10%
Notes:**
Refer to the notes below for a few helpful printing and assembly instructions.
...........................................................................................................
Building the model
Colors
Black: (Paramount3D PLA - Black)
eye_blacks (contains two pieces)
nose
eyebrows
whiskers (contains six different pieces laid out for assembly)
..
Dark Brown: (Hatchbox PLA - Brown)
body
..
Light Brown: (Paramount3D PLA -Dark Complextion)
face
..
Green: (Paramount3D PLA - St Andrews Green)
base
..
White: (Overture PLA - White)
eye_white_left
eye_white_right
teeth_top (contains six different pieces laid out for assembly)
teeth_bottom (contains six different pieces laid out for assembly)
..
Pink: (CookieCad PLA - Pale Pink)
ear_right
ear_left
..
Dark Red: (Paramount3D PLA - Iron Red)
mouth_right
mouth_left
..
Light Red: (Paramount3D PLA - Volcano Orange)
tongue
..
Clear: (Unknown PLA - Cyrstal Clear)
whirlwind
..
...........................................................................................................
Printing and assembly tips
Printing tips
1 - No supports are required.
2 - There are some pieces that may need brims or rafts, use your discretion. When setting up my prints I prefer to be conservative, especially since the base of many parts are hidden when inserted into another part.
*I used brims on:
- eye_blacks
- whiskers (be sure the brim connects all the whiskers)
3 - When printing the teeth, the order of placement is the same order that the teeth are printed. Each tooth is different, so it is extremely important to keep track of the order of the teeth. I suggest either printing with a brim/raft simply to keep them together, or take them off the bed one at a time and place them on a strip of tape in the same order (that's what I did). It's so easy to mix them up which will make assembly much more problamatic.
4 - I printed all the parts on my stock Prusa MK3S+ and Prusa Mini using the out of the box default settings for .2mm quality in PrusaSlicer (just changing the infil to 10% due to old habits). All the parts went from the printer to assmbly with no post processing or cleanup.
5 - Colors! I'm finding that the Looney Tunes characters are presented with slightly different colors and shades over the years. Use your personal preferences for this character.
6 - When removing parts from the printer bed, it's a good idea to place left/right parts into separate containers to help with the assembly process.
..
Assembly tips:
1 - Take your time gluing the model together and enjoy the process. Give some thought into which parts to glue together as groups and then gluing the groups together. Let the glue for each group to set completely before combining groups.
2 - I used 3D Gloop and E6000 to put this model together. I am not affiliated with 3D Gloop but have experimented with different glues for my models and have found that this glue is a great option for my models. Each type of glue has different pros/cons and I found that 3D Gloop was far easier to use than superglue (for me). The E6000 sticky glue that I also use allows more time to position parts and is still the best for smaller parts. 3D Gloop covers the middle ground for me and really works wonders. It leaves enough time to set, so parts can be positioned correctly and it dries fast enough to hold awkward parts without the need for taping. I used the PLA version that comes in a tube. For both glues using a smaller amount is usually better than more glue.
3 - The mouth_left/right parts fit perfectly, but needs to be pressed all the way in with some force. Insert the top outside tip of mouth_right into the face and then guide the part in pressing until it snaps in. mouth_left is inserted in a similar way but needs much more force to push it to fit next to mouth_right. I did not need any cleanup on these parts and tested inserting them a number of times without issue. No glue is needed, as the parts fit tightly.
4 - My apologies, but the teeth are a bit unwieldly to glue. After putting the mouth into the face and gluing the tongue in, do the teeth before gluing the face to the body. Be careful to insert the teeth in the correct order and rotation. Fortunately, even with my 'fat fingers' I was able to use 3D Gloop without tweezers to put them in.
5 - Be sure to put in the eyes and eyebrows into the body before inserting the face.
6 - The whiskers are laid out in the order to insert them into the face. Simply remove them one at a time from the brim and apply before removing the next one. 3D gloop was perfect for this part.
7 - Refer to the assembly diagrams in the pictures section as well as the uploaded pictures for putting the model together. The model is meant to be glued.
Do not hesitate to ask questions, feedback is essential to making better models.
:format(webp)/https://fbi.cults3d.com/uploaders/12888752/illustration-file/00652974-9a86-4440-a686-c609cf84f57c/taz-angleb1.jpg)


/https://preview3d-images.cults3d.com/variants/b7a4sern3s6uoz4bpysnqg38dao8/740653c6971db8cfdca21475487b95b09ce19114e42428007af25545a7f8a383)
/https://preview3d-images.cults3d.com/variants/8cyu6gzpaoujmajflq1g2i48licu/740653c6971db8cfdca21475487b95b09ce19114e42428007af25545a7f8a383)
/https://preview3d-images.cults3d.com/variants/vqvvvc7ozd68x2d3xcwu394t2oh4/740653c6971db8cfdca21475487b95b09ce19114e42428007af25545a7f8a383)
/https://preview3d-images.cults3d.com/variants/61qia5ogqeki81g6apt2fql4ay9h/740653c6971db8cfdca21475487b95b09ce19114e42428007af25545a7f8a383)
/https://preview3d-images.cults3d.com/variants/r3u2lhhpu6dydv3m5uwtcv7ti0hk/740653c6971db8cfdca21475487b95b09ce19114e42428007af25545a7f8a383)
/https://preview3d-images.cults3d.com/variants/j57my7eimxxx5chwbtf3gxadbdbq/740653c6971db8cfdca21475487b95b09ce19114e42428007af25545a7f8a383)
/https://preview3d-images.cults3d.com/variants/3lj9etk28n7fb5um0zpwbxlnwrkr/740653c6971db8cfdca21475487b95b09ce19114e42428007af25545a7f8a383)
/https://preview3d-images.cults3d.com/variants/v3vt6xz4jdrfeb8ef4l7ezfx81hm/740653c6971db8cfdca21475487b95b09ce19114e42428007af25545a7f8a383)
/https://preview3d-images.cults3d.com/variants/emiss4jz1embmbqxv2ja3jy9vlts/740653c6971db8cfdca21475487b95b09ce19114e42428007af25545a7f8a383)
/https://preview3d-images.cults3d.com/variants/xoewro6hxq8j4lnu06r2763bcc76/740653c6971db8cfdca21475487b95b09ce19114e42428007af25545a7f8a383)
/https://preview3d-images.cults3d.com/variants/2s10rsrpm3xlq9n93ga0rva7xogh/740653c6971db8cfdca21475487b95b09ce19114e42428007af25545a7f8a383)
/https://preview3d-images.cults3d.com/variants/mtmrebasd40vok06d6ngexel7ubw/740653c6971db8cfdca21475487b95b09ce19114e42428007af25545a7f8a383)
/https://preview3d-images.cults3d.com/variants/cvq852avaep3wl1habpov5n1rw71/740653c6971db8cfdca21475487b95b09ce19114e42428007af25545a7f8a383)
/https://preview3d-images.cults3d.com/variants/nq389u1c5fppoxz1ll9s5jfsg6n0/740653c6971db8cfdca21475487b95b09ce19114e42428007af25545a7f8a383)
/https://preview3d-images.cults3d.com/variants/vuikkloi3h46ehey9y9cqmgs39a7/740653c6971db8cfdca21475487b95b09ce19114e42428007af25545a7f8a383)
/https://preview3d-images.cults3d.com/variants/5mphremb4loig6th3lm3m1bywxlo/740653c6971db8cfdca21475487b95b09ce19114e42428007af25545a7f8a383)
/https://preview3d-images.cults3d.com/variants/181w5r50njdu1on2f9iqva51iupz/740653c6971db8cfdca21475487b95b09ce19114e42428007af25545a7f8a383)


