Skip to content

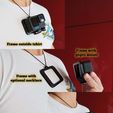
Gopro Magnetic Mount (for any action cam)

Advertising
Advertising
?
Creation quality: 0.0/5 (0 votes)
Evaluation of members on the printability, utility, level of detail, etc.

  • 1.3k views

License
3D design format
STL Folder details Close
  • Gopro Magnet_back.stl
  • Gopro_Magnet_front.stl

Learn more about the formats

Publication date 2021-11-15 at 08:59
Design number 564131

Bucefalo

3D printer file info

3D model description

Inspired by ulanzi magnetic quick release bracket mount
but NOT willing to pay 30 USD for it, i decided to create my own version!
the use of it is very wide i let you decide how BUT bear in mind few things:

1) don't put magnets nearby magnetic bands like credit card
2) magnet grade of those i used is N38 - the highest N-number the strongest is the magnet
3) before living your gopro hanging somewhere please BE CAREFUL i won't be responsible for any accident ..(i tested mine, it works well !!)

ok now INFO about this project
what do you need?
1 --- (8 round magnets 8mm x 3 mm )
i bought this magnets from amazon:
https://www.amazon.it/gp/product/B074C79DJS/ref=ppx_yo_dt_b_search_asin_image?ie=UTF8&psc=1&fbclid=IwAR3I_nAmNOfmh6-e4VNQ_znPhtvjizsPJSWTRZGSl-ModeYIb3c4ZIjjfng
if you don't find this just look for 8mm x 3mm round magnet, don't take a lower grade than N38

2 ---- gopro screw+nut

3D printing settings

I printed it in PLA 30% infill, i suggest NOT to increase infill % , an heavier frame could make your magnet be less effective ( feel free to make your own test)

VERY IMPORTANT
you must face your magnet in the right way or front and back will reject each other instead of join. One easy trick is (as shown in the picture) print the front frame first
than put it facing down (just like in the picture) on a table
now put the magnets above it in the 4 corners, let them match. When you'll pause the print for the back frame just put the magnet in the exact way on the paused print !

VERY IMPORTANT 2 (pause while printing)

open the STL file with your favorite slicer ( in my case cura )
SLICE it and go to PREVIEW tab
on my Cura the last layer before it covers the magnet is layer NUMBER 13
so what i did was go on my ender 3 and pause the print few seconds after it starts to print LAYER 13 !
Don't wait the end of layer 13 cause it'll start covering the hole created for the magnet !!

It might happen that on your printer the magnet won't fit, every printer has a slight difference so even 2 mm will be a problem, if you encounter problems i'll try to release another version with a " bigger " margin.

if you have comments/problems just leave a note in comment side ! thank you

Advertising


Issue with this design? Report a problem.

Would you like to support Cults?

You like Cults and you want to help us continue the adventure independently? Please note that we are a small team of 3 people, therefore it is very simple to support us to maintain the activity and create future developments. Here are 4 solutions accessible to all:

  • ADVERTISING: Disable your banner blocker (AdBlock, …) and click on our banner ads.

  • AFFILIATION: Make your purchases online by clicking on our affiliate links here Amazon.

  • DONATE: If you want, you can make a donation via Ko-Fi πŸ’œ.

  • WORD OF MOUTH: Invite your friends to come, discover the platform and the magnificent 3D files shared by the community!


Sharing and downloading on Cults3D guarantees that designs remain in makers community hands! And not in the hands of the 3D printing or software giants who own the competing platforms and exploit the designs for their own commercial interests.

Cults3D is an independent, self-financed site that is not accountable to any investor or brand. Almost all of the site's revenues are paid back to the platform's makers. The content published on the site serves only the interests of its authors and not those of 3D printer brands who also wish to control the 3D modeling market.

100% secure payment by credit card, PayPal, Apple Pay, Google Pay, etc.
View all payment options.