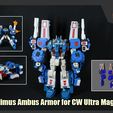
From the realms of Lost Light lore, here's an upgraded and beefier Maximus Ambus armour upgrade set for Combiner Wars Ultra Magnus!
Brainstorm's definitely one to go by the mantra - "if it's worth doing, it's worth overdoing!"
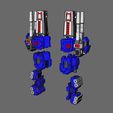
A multitude of barrels strewn around the armour provide spots for effect parts to be added for, well, effect.
As a homage to the Galaxy Force/Cybertron days of past, the forearm piece comes with a slot for a CyberKey if you have one handy! A further tip of the hat to the Armada days can be found on the shoulder pylons where minicon attachment points have been provided, alongside more modern 3mm pegs for effect parts:
For his alt mode, these addon parts can mostly be attached on various parts of his trailer. The shoulder cannons and forearm blasters rotate nicely in this configuration, and so can be angled more upward or forwards as you prefer.
=== ASSEMBLY ===
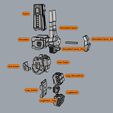
The attached diagram show the parts in this set, showing one side for clarity, the other side is just mirrored)
Some things to note for assembly:
+ The ShoulderCanon, Armor and its peg can be glued together, perhaps after painting as they are easier to paint in separate pieces.
+ The Leg Missile Pods, Leg Mount and LegArmor_Peg are similar - they can be glued together again preferably after painting.
For putting on the armour in bot mode:
+ Installing the pylons will push down the original shoulder pylons. by design to lengthen and move the elbow joint downwards slightly.
+ The shoulder armour notches into the 5mm port on the side of Magnus' original shoulder
+ For the forearm, the inner part needs to be pegged into the notch in Magnus' wrist, before the outer part "wraps" around it.
+ Leg pieces with the missile pods just attach to the side of his legs.
For putting on the armour in alt mode:
+ The shoulder canons notch onto the front bits of his trailer.
+ The forearm blaster will need to be attached to the mid-section of the trailer top. To do this, first attach the two "inner" parts by notching them in as shown, then sliding the out forearm blaster bit over them (with their flat sides facing each other):
+ The leg armor pieces peg on the same way as they do in bot mode.
+ The trickier remaining bits of the pylon and the shoulder pieces can either be left off the combined mode, or be pegged together and hooked onto the red side pieces of the trailer as earlier.
===
Also, here's a short video to more visually show how everything attaches onto Ultra Magnus: www.youtube.com/watch?v=zBLlas0B1TQ
Hope everyone enjoys our little triple nod to the IDW, Armada, and Cybertron franchises we so enjoy, and as always, happy 3d printing! =)
===
This model is not to be uploaded or sold in any form and is intended for personal use only.
Check out more of what we are up to over at our Facebook Page (http://www.facebook.com/FunbieStudios) or website (http://www.FunbieStudios.com/)
Support us on Patreon - https://www.patreon.com/FunbieStudios | Full listing of Models - https://funbiestudios.com/model-catalog


