What is this thing?
Not exactly sure what to call this thing. This is more like a project. I've only recently gotten into N-Scale trains. It started with a Bachmann starter set with a steam loco and a couple of cars (Durango & Silverton in case my other models didn't give it away). This came with a bunch of EZ-track. I had full intention of expanding my layout so I bought more EZ-track. Eventually I realized, I just can't do everything I want with EZ-track, not to mention how expensive it is.
Logically, I did the smart thing for my wallet and bought a bunch of Atlas code 80. While I enjoy the fact that it doesn't come attached to a roadbed, I was also a bit dismayed by the limitations of the track.
In the meantime, I worked on a few side projects like 2'x2' custom displays-- it let me test my creativity. Problem is, I was limited to an Atlas 9 13/16" radius circle. So, I dove into the realm of Kato and I finally found my brand of choice.
Problem: What do I do with the rest of the track?
Solution: This stuff.
I have more to add including switch compatibility and the Kato connectors. They'll be added soon. Right now, the end pieces contained in the zip files are all to connect to Bachmann EZ-Track.
I may eventually post the separate projects into different Things, but for now I'm keeping everything together and separating them by zips.
Better 80
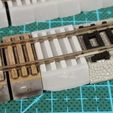
While I'm more about creativity than realism, code 80 is ridiculous. The rails are more than twice the size of a real track. I came up with a solution that works on small sections of track (like downtown / road crossing, etc) that makes the track look a bit more realistic. I tried to keep everything as close to actual scale as possible while embedding the track a bit to make the track the same height as 55.
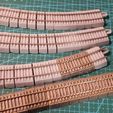
The cover picture on this shows finished pieces at various stages: without ballast, un-primed, freshly printed and painted roadbed. You can also see it connected to EZ-Track. This is a good use of extra flex track or rails. No need to pull apart perfectly good track. Unless you're me. I tested it on 9 13/16" atlas curved track as well as Atlas code 80 flex track.
Usage is easy. Print out a male and female end piece based on what type of track you're connecting to (currently only EZ-track is in file, Kato will be up soon), and print as many middle pieces as you need. Curved pieces are flush on ~ 9" radius but can be used for any size--the gap location and size will change.
Once positioned, the best thing to do is glue the universal connectors in place but it's not required.
As far as filling gaps, if the gap is small enough, glue the sections together and a tiny amount of fine ballast tends to cover and make it unnoticeable. For larger gaps, you can use a variety of different filler. I find small amounts of silicone sealant works best but wood filler / spackle looks the best. Silicone has enough give so you can pick it up and move it around and easily fill the top gaps without oozing up and out. Spackle / wood filler / plaster and the like work as well but will break easy if you remove the track from your layout.
When ready, apply ballast to the sides of the roadbed and between the tracks. Done. As this is a work in progress, I'll post some images of the different fillers when I have a chance.
EZ Flex
The EZ Flex Files work the same way as far as connecting goes. This is just the roadbed. There are a few different pieces here but they work under the same premise as the Better 80 pieces. There are some longer end pieces that work better for straight track and two styles of universal connectors. The shorter work better for straight pieces and the short / long work better for curves.
Once you have the layout, follow the same process-- glue the connectors and ballast as needed.
Code 80 flex
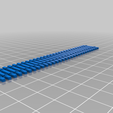
This is just a stl of the track I used on the Better 80 pieces. You can print / cut as needed and use on the EZ Flex pieces or use independently. Depending on your printing material, these can be pretty fragile. I used Siraya Tech Fast resin and the flexibility was good enough not to worry about normal use. I gave it to my 2-year-old to test and he successfully broke it.
** Kato coming soon **

/https://fbi.cults3d.com/uploaders/19615407/illustration-file/86a76524-0ba0-452b-834c-ebd017adcb00/Flex_80_to_55.jpg)
