Any suggestion is welcomed! Feel free to join my Facebook group to let me know what you want: https://www.facebook.com/groups/1115757609295068
Custom display base are also available from $5! Contact me to discuss what you want!
If you like my work, you can support me through Patreon or a tip through PayPal: https://www.patreon.com/gigapenguin3dprints
Description
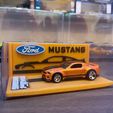
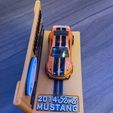
A base for Hotwheels Ford Custom Mustang, the one I'm using is from Cruise Boulvevard set. It should fit with any other 2014 Custom Mustang of the same casting. There are multiple back design that are slightly more general that should fit any Mustang.
As for other Hotwheels Mustang, the display base should fit because Hotwheels cars are not accurate to scale and most of them have very similar width and wheelbase.
If you wish to have a display base tweaked to fit to a specific Mustang from a different brand, please send me these dimension for the display base holes: https://imgur.com/5T6mb2L
The display base is separated into 3 parts for easy printing and colour swap. The parts are:
1) Name plate
- NamePlateBuild.STL (Specific to 2014 Ford Mustang)
- NamePlateBuild(Generic).STL
2) Base (BaseV2.STL, the center hole in the base)
3) Base back wall:
- BoxBackBuild.STL
- BoxBackBuild2.STL
- BoxBackBuild3.STL
- BoxBackBuild4.STL (As seen on pictures above)
4) Base Stripe (additional thin stripe to stick on the display base)
Base Back Wall and Name Plate Variant
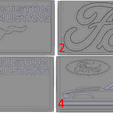
There are many variants of Base back wall, the one printed in my pictures are "BoxBackBuild4.STL", the last screenshot is a picture of difference of each "BoxBackBuild" design.
The difference for each base are:
BoxBackBuild:
A cut Ford Mustang logo at the center with "Ford" at the left side and "Custom Mustang" on the right
BoxBackBuild2:
A large "Ford" and "Mustang" is fit in between the gaps
BoxBackBuild3:
A full Mustang logo at the right side and on its left is a Ford logo with its blue oval then follow by "Mustang"
BoxBackBuild4:
The one that I printed out as my final and as seen in photos. Ford oval logo and follow by "Mustang" at the top of the back wall then a silhoutte of the 2014 Ford Mustang and a black stripe at the bottom to match the car livery.
There are 2 variants of Name Plate, the one in my pictures are "NamePlateBuild", the other name plate is a more generic with "2014" removed and "Ford" moved to the center.
Print Settings
Nozzle size = 0.4 mm (minimum, smaller better)
Layer height = 0.2 mm
Filament change layer for colours on "BoxBackBuild":
1) Start (Backgroundof the wall)
2) Layer 6 (General background colour, mine is in orange)
3) Layer 19 (Right stripe of the Mustang logo, blue in actual logo)
4) Layer 24 (Left stripe of Mustang logo, red in actual logo)
5) Layer 29 (Center stripe of Mustang logo, white in actual logo. It is also the "Ford" and "Custom Mustang" lettering colours)
6) Layer 32 (Mustang logo outline colours and the Mustang colour, silver or grey in the actual logo)
Filament change layer for colours on "BoxBackBuild2":
1) Start (Background of the wall)
2) Layer 19 (Outline of "Ford" and "Mustang")
3) Layer 24 (Lettering colours of "Ford" and "Mustang")
Filament change layer for colours on "BoxBackBuild3":
1) Start (Backgroundof the wall)
2) Layer 6 (General background colour, mine is in orange)
3) Layer 19 (Right stripe of the Mustang logo, blue in actual logo)
4) Layer 24 (Left stripe of Mustang logo, red in actual logo)
5) Layer 29 (Center stripe of Mustang logo, white in actual logo. It is also the "Ford" and "Custom Mustang" lettering colours)
6) Layer 32 (Mustang logo outline colours and the Mustang colour, silver or grey in the actual logo)
Filament change layer for colours on "BoxBackBuild4":
1) Start (Background of the wall, mine is in orange)
2) Layer 19 (Ford Mustang Silhoutte, bottom stripe and "Mustang" lettering colours, mine is in black)
3) Layer 24 (Ford logo background colour, mine is in blue)
4) Layer 29 (Ford logo outerline and "Ford" lettering colour, mine is in white)
Filament change layer for colours on "NamePlateBuild" and "NamePlateBuild(Generic)":
1) Start (Background colour, mine in orange)
2) Layer 9 (All outline and stripes colours, mine is in black)
3) Layer 24 (All lettering colours, mine is in white)
Assembly
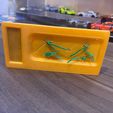
The car is tied by wires through the hole in the base
Back plate and name plate should slide in nicely into the display base. The name plate will need some double sided tape to hold it nicely.
Base stripe will be printed separately and i stick mine on the display base using double sided tape.
Others
I did not test the the forst 3 variants of the base back wall and the generic name plate but it should works fine.
Feel free to send me any feedback on how to improve the design. Suggestion on display base designs are welcomed too.
I can be contacted through Instagram or Twitter too:
Twitter: https://twitter.com/Giga_Penguin
Instagram: https://www.instagram.com/GigaPenguin3DPrinting/
The transparent box I'm using to store the base and car in one of the picture is bought from here: https://shopee.com.my/Tarmac-Work-Protector-tarmac-box-i.13932494.1598531194


