Skip to content

Mechanical Iris - 3d Model (STL) files - 20 leaf, self-contained, centrefinder/stand included

Advertising
Advertising
?
Creation quality: 5.0/5 (1 vote)
Evaluation of members on the printability, utility, level of detail, etc.

  • 4.3k views
  • 2 likes
  • 6 downloads

License
3D design format
STL and ZIP Folder details Close
  • 20 leaf mechanical iris.zip
  • Actuator.stl
  • Base.stl
  • Centrefinder.stl
  • Housing.stl
  • Leaf.stl

Learn more about the formats

Publication date 2021-07-24 at 14:07
Design number 479530

3dTrinket

3D printer file info

3D model description

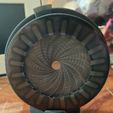
I've designed a 3d printable mechanical iris.
I wanted a design that would be self-contained (i.e. no external fixtures needed) so I made the housing screw into the base to hold it all together, and knurling on the edges where you grip it to make it easy to screw/unscrew.
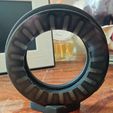
I also wanted to be able to locate the centre of the circle easily, so the stand doubles as a centre-finder, just by placing it inside the iris.
Finally, I wanted to make sure it works when printed, so I printed the STL files myself, and the results are what you see in the pictures. It closes and opens easily and smoothly.

Note, this listing is for all the required 3d model files as *.STL files in a *zip file, not a physical iris. Once I get the process down I may add the option to purchase a printed version.

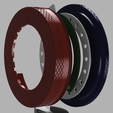
For the full iris, you will need to print 1x enclosure, 1x base, 1x centrefinder, 1x actuator, and 20x leaves.

Once printed, the assembly process is simple:

  1. Lay an individual leaf on the actuator, with the pin on one side slotted through the hole.
  2. Overlap each remaining leaf onto the previous one, taking care with the last few to not knock the previous ones out of placement.
  3. Fit housing over the actuator, ensuring the actuator tab extends out of the cutout in the housing. The top pins on each leaf should fit in the slots in the housing.
  4. Thread the base onto the bottom of the housing,

Note: tolerances are quite tight. I printed on a SLA printer (Anycubic Mono X) and it worked for me.
If you have any questions please get in touch and I will do my best to help.

3D printing settings

SLA printer:
0.05 layer height, standard resin.
2.0 sec exposure.

I'd suggest priting at 45 degrees, and lifted off platform to avoid deforming things, as tolerances are quite tight

Advertising


Issue with this design? Report a problem.

Would you like to support Cults?

You like Cults and you want to help us continue the adventure independently? Please note that we are a small team of 3 people, therefore it is very simple to support us to maintain the activity and create future developments. Here are 4 solutions accessible to all:

  • ADVERTISING: Disable your banner blocker (AdBlock, …) and click on our banner ads.

  • AFFILIATION: Make your purchases online by clicking on our affiliate links here Amazon.

  • DONATE: If you want, you can make a donation via Ko-Fi πŸ’œ.

  • WORD OF MOUTH: Invite your friends to come, discover the platform and the magnificent 3D files shared by the community!


Sharing and downloading on Cults3D guarantees that designs remain in makers community hands! And not in the hands of the 3D printing or software giants who own the competing platforms and exploit the designs for their own commercial interests.

Cults3D is an independent, self-financed site that is not accountable to any investor or brand. Almost all of the site's revenues are paid back to the platform's makers. The content published on the site serves only the interests of its authors and not those of 3D printer brands who also wish to control the 3D modeling market.

100% secure payment by credit card, PayPal, Apple Pay, Google Pay, etc.
View all payment options.