Skip to content

Garden Hose Mount/Holder for Wash Basin/Pool

Advertising
Advertising
?
Creation quality: 5.0/5 (1 vote)
Evaluation of members on the printability, utility, level of detail, etc.

  • 2.4k views
  • 2 likes
  • 18 downloads

License
3D design format
STL Folder details Close
  • GH G-Clamp Screw Cap.stl
  • GH G-Clamp Screw.stl
  • GH Pin A.stl
  • GH Pin B.stl
  • GH Spindle.stl
  • GH Water Hose mount.stl
  • Washtub Gardenhose Clamp #20 .stl

Learn more about the formats

Last update 2022-03-25 at 15:31
Publication date 2022-02-08 at 14:20
Design number 632885

3D printer file info

3D model description

Preface. If you like this and wish to have it customized to your needs, I'm willing to work with you on this and most of my other postings.

Updates: 03/25/22 OMG. I know better than to do this but I made a "minor change" without testing it and just realized that the screw hole was partially missing. Iteration #20 of the clamp fixes that.

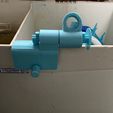
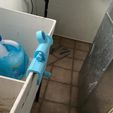
This is a mount for a garden hose to a wash basin or similar. I made this as I have a portable sump pump that when(of if) I ever use in my lower level will have to pump water into the washing machine's waste water tub. I didn't want to assure that the hose would remain in the tub and at the angle that I so desired.

The threading will allow another hose to be attached on the opposite side of the in-flow.

Usage:
1. Attach the G-Clamp to the tub wall.

2. Attach the garden hose to the hose mount.

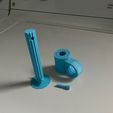
3. Align the spindle so that the pin hoses are verticle so that they the one will match the hole in the G-clamp and so that they don't fall out. Putting the pin in the G-clamp is not necessary but I put a hole there.
4. Turn the hose holder to the angle that you want.
5. Slide the hose holder onto the spindle and insert end pin.
6. Slide the spindle into the hose mount.

The only differences between the two pins is the length and the shorter one will work fine in both inserts to the spindle.

FYI. I printed a raft by mistake and never removed it as seen on the picture of the spindle.

3D printing settings

I strongly advise printign this in PETG. I printed with 250 microns.
The longest print is for the G-Clamp which was around 4-5 hours. I split the spindle from the G-Clamp to reduce one long print time. And as it turned out it is better this way should the spindle ever break it can be printed and replace, rather than printing the entire G-clamp.

Advertising


Issue with this design? Report a problem.

Would you like to support Cults?

You like Cults and you want to help us continue the adventure independently? Please note that we are a small team of 3 people, therefore it is very simple to support us to maintain the activity and create future developments. Here are 4 solutions accessible to all:

  • ADVERTISING: Disable your banner blocker (AdBlock, …) and click on our banner ads.

  • AFFILIATION: Make your purchases online by clicking on our affiliate links here Amazon.

  • DONATE: If you want, you can make a donation via Ko-Fi πŸ’œ.

  • WORD OF MOUTH: Invite your friends to come, discover the platform and the magnificent 3D files shared by the community!


Sharing and downloading on Cults3D guarantees that designs remain in makers community hands! And not in the hands of the 3D printing or software giants who own the competing platforms and exploit the designs for their own commercial interests.

Cults3D is an independent, self-financed site that is not accountable to any investor or brand. Almost all of the site's revenues are paid back to the platform's makers. The content published on the site serves only the interests of its authors and not those of 3D printer brands who also wish to control the 3D modeling market.

100% secure payment by credit card, PayPal, Apple Pay, Google Pay, etc.
View all payment options.