Remix of Bioshock Cat Splicer Mask by Annatar2 on Thingiverse. This adds LED lit eyes run off a CR2032 button battery and replaces the original whiskers. I printed the right and left halves of the mask as provided, with no supports but one side has to be flipped 180 in the slicer app. I couldn't do anything with the original whiskers that stand on-end so I made some. I decided on 3 different length of whiskers, short to long - front to back. Use whatever combination you like. I didn't intend to wear the mask - just hang it on a wall so I also added LED eyes to it that run off a 3v CR2032 button cell battery.
Tip 1: I painted and glued the whiskers on last so they wouldn't get broken off when I assembled the LED Eyes. I painted all except a centimeter on the end before gluing them, then touched up the glued ends afterward.
Tip 2: Use parchment paper under where you glue things with ABS or CA glue. The glue doesn't stick to the parchment paper so you can lay pieces with glue right onto it and it makes for easy cleanup after painting and sanding.
Tip 3: Never paint any area you will be gluing later. If there's paint on it - remove it with acetone or sand paper or blade - whatever it takes.
Once you have the mask together - print out the following parts:
a. Eyeball - 2x 100 percent infill
b. Pupil - 2x 100 percent infill
c. Hollow Pin - 4x 100 percent infill
d. Bolt for Back Cover - 2x 100 percent infill
e. Battery Holder - 1x
f. Case - 1x 30 percent infill
g. Cover - 1x 60 percent infill
h. Washer - 2x (use as needed to achieve desired spacing)
You will need:
1x of small toggle switch (base: 13x8mm, hole dia: 6mm)
2x of 3mm Clear LED (no resistors required)
about 28 cm each of red and black wire 24 gauge or similar
1x CR2032 battery
1x small paperclip - uncoated silvery looking metal
soldering pencil, small solder, heat-shrink or plasti-dip or if you don't have those just twist the wires together, fold a bit of electrical tape over them and stuff them into the case.
The eyeballs and the hollow pins should be the same color. The pupils, the inside of the case and the inside of the back cover should be black.
Test-fit the pupils and hollow pins before you actually assemble them. If they get stuck you can stick the end of a paintbrush or some similar item through the top or bottom holes and push it from the inside out. There is a top and bottom to the pupils - make sure the end with the circular indent on the back side is facing down toward the cut-off bottom side of the eyeballs.
Assemble the eyes and pupils and acetone gloss or clearcoat them if desired. Paint the inside of the case and back cover (the middle section of the case doesn't need to be black).
Assemble the unit - place an eyeball into the case, flat side down with a 2mm washer under it, and then insert the hollow pins into the top and bottom. Use a 1mm or 2mm thick washer under the eyeball to adjust the eye height as desired. I used 1 each of the 2mm washers. The pins should fit snuggly into the eyes and not require any glue to keep them in place - this way you can rotate the eyes left to right as desired. You can also swap out the eyes for ones of a different color if you don't glue the pins to the eyes or the case.
Take a small paperclip and cut it so you can use the pieces for the contacts of the CR2032 battery holder. For the top, positive contact, you can just insert the 2 cut ends through the holes and bend them over and bend the top over so it covers about half of the circle. For the bottom contact (often referred to as the negative, ground or common side) you need to bend the paperclip with sharp, right-angled corners so it will fit as flatly as possible against the bottom of the battery holder. It is pretty straight forward but requires some needle nosed pliers to cut and bend the paper clip. I also had to use a thumb tack to make the holes bigger so the paper clip would go through. This holder sucks but it does the job - I downloaded it here and didn't alter it.
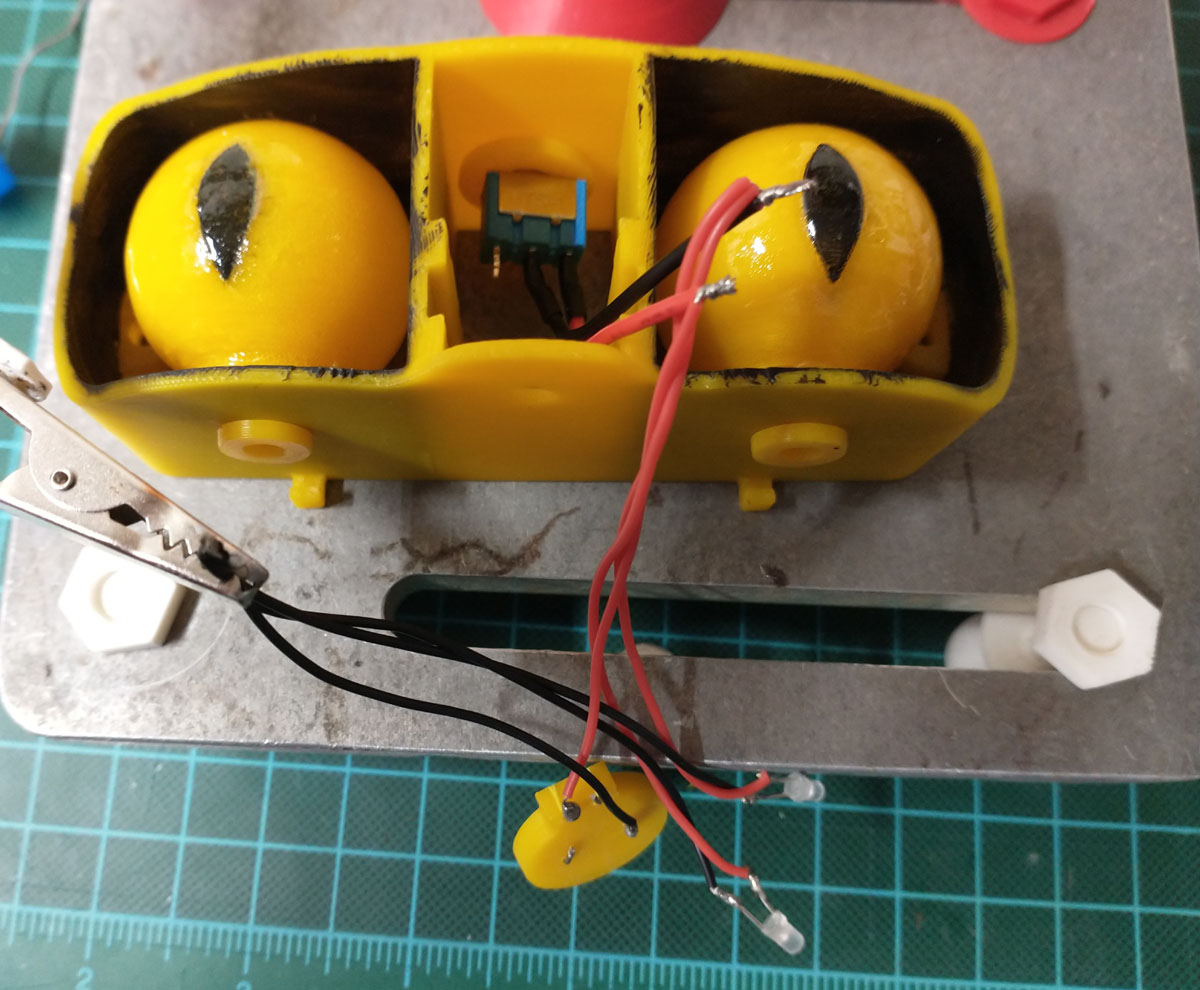
Insert a small toggle switch into the hole in the top of the eyeball case. Attach your wiring first if it makes it easier. Solder a red wire from the switch to the positive (top) contact of the battery holder. Solder the other wire on the switch to 2 red wires that will go to the 2 LED bulbs. Solder the other end of these 2 red wires to the positive side of a couple of 3mm Clear (white) LEDs. You do not need to use resistors with the LEDs because the battery voltage is only 3 volts and that is what they require. Take 1 black wire and solder it to the bottom (negative) contact of the battery holder. Take 2 black wires and solder 1 each to the negative side of the LEDs and join the other ends together with the 1 black wire from the battery holder. Don't forget to cover the exposed wires where they're soldered with heat shrink tubing or just brush on some liquid plastic. Also, BEFORE YOU SOLDER THEM - don't forget to run the red and black wires that go to each LED through the bottom hole near the front of the eyeball case. I forgot to, as you can see in my pics, and had to cut and resolder them. Also in my pics you can see that the wire coming out of the switch is black and its attached to my LED's red wires. It actually has a red stripe on the other side that you can't see.
Install the switch into the top of the case if it isn't already. Slide the battery holder into the center bottom of the case with the wires facing the front of the case and going down through the hole. Insert the LEDs into the bottom hollow pin for each eye - they should stay in place without needing to glue them.
At this point you have the LED eyes all assembled and wired and they work when you flip the switch. Now use some pretty thick glue - probably either your home-made ABS glue or else some thick, Gel type, CA (crazy, super) glue and glue the eyeball case to the back side of the mask. Make sure its glued good.
Take some wire and insert the ends through the 2 small holes in the back cover and twist together on the inside, making a loop to hang the mask by. Or hang it by the large hole in the back cover.
:format(webp)/https://fbi.cults3d.com/uploaders/16234014/illustration-file/b885aad6-b7d1-478c-9aa7-bd25c7605096/EYES-LIT-W.jpg)


/https://preview3d-images.cults3d.com/variants/k0nimxzuv64q5oq46bbawcodnjf2/0efb2e1d82dc631f5d34681a1ec0e058e5293ebb996af2b22972af828007c8d8)
/https://preview3d-images.cults3d.com/variants/w05433hdyyaziiznelupybqiojgw/0efb2e1d82dc631f5d34681a1ec0e058e5293ebb996af2b22972af828007c8d8)
/https://preview3d-images.cults3d.com/variants/wp9vd9gbuyj7ncv9yjg01wgp646y/0efb2e1d82dc631f5d34681a1ec0e058e5293ebb996af2b22972af828007c8d8)
/https://preview3d-images.cults3d.com/variants/4nkewer4tbzv9wvi9bi273cde7zw/0efb2e1d82dc631f5d34681a1ec0e058e5293ebb996af2b22972af828007c8d8)
/https://preview3d-images.cults3d.com/variants/3uz2fhzvsqhuqq5cvxuyy4cq9xnf/0efb2e1d82dc631f5d34681a1ec0e058e5293ebb996af2b22972af828007c8d8)
/https://preview3d-images.cults3d.com/variants/vj6a9sq6ht58h99gqhcybh70evdp/0efb2e1d82dc631f5d34681a1ec0e058e5293ebb996af2b22972af828007c8d8)
/https://preview3d-images.cults3d.com/variants/i46oak3oumukyaa0uyhzw6r5dtr9/0efb2e1d82dc631f5d34681a1ec0e058e5293ebb996af2b22972af828007c8d8)
/https://preview3d-images.cults3d.com/variants/15z1nfsvny2sbpunw7y3g9mdzdkd/0efb2e1d82dc631f5d34681a1ec0e058e5293ebb996af2b22972af828007c8d8)
/https://preview3d-images.cults3d.com/variants/p4jiajrpi8bc9d2rxnbkl0x6assz/0efb2e1d82dc631f5d34681a1ec0e058e5293ebb996af2b22972af828007c8d8)
/https://preview3d-images.cults3d.com/variants/1mhchuc7qx7aydz1dbbmpjwwd39g/0efb2e1d82dc631f5d34681a1ec0e058e5293ebb996af2b22972af828007c8d8)
/https://preview3d-images.cults3d.com/variants/iqh68yp6wjys7fdmc70j8fl1qwiv/0efb2e1d82dc631f5d34681a1ec0e058e5293ebb996af2b22972af828007c8d8)
/https://preview3d-images.cults3d.com/variants/yzxc9c3mgpy9cgq0s849xhkoj9bi/0efb2e1d82dc631f5d34681a1ec0e058e5293ebb996af2b22972af828007c8d8)
/https://preview3d-images.cults3d.com/variants/5m9mfp2iqv7bta4uq82ufsd3ubvq/0efb2e1d82dc631f5d34681a1ec0e058e5293ebb996af2b22972af828007c8d8)
/https://preview3d-images.cults3d.com/variants/vzn9kf51h8fq5qhk925tmy00gp0s/0efb2e1d82dc631f5d34681a1ec0e058e5293ebb996af2b22972af828007c8d8)
/https://preview3d-images.cults3d.com/variants/k9ve0b0uvpqd820myyj3akxc3llh/0efb2e1d82dc631f5d34681a1ec0e058e5293ebb996af2b22972af828007c8d8)


