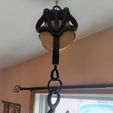
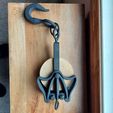
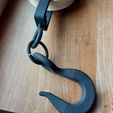
This is a vintage style pulley for hanging a plant or decorative item around your home or business. The length from the ceiling to the base of the hook is 20 inches. I printed frame parts in a matte PETG black for a cast iron look. The pulley is a wood filled PLA and is then stained with a MINWAX Golden Oak # 210B stain. Apply the stain with a stiff bristle brush in the direction of the print lines. Apply stain and then let dry for several days.
For assembly as shown, you will need the following parts.
1) One 2 " x 5/16" steel ring.
2) Two 1-1/2"diameter x 5/16-18 thread eye bolt, 3 inches long. (or similar)
3) Six 5/6-18 square nuts (Hex nuts can be used also)
4) Two 5/16" threaded rod cut to 2-3/4" long.
5) One 3/8" threaded rod cut to 3-1/4" long
6) Two 3/8-16 square nuts ( Hex nuts can be used)
7) Loctite thread locker for all eye bolt nuts. ( Optional- double nut eye bolts to lock for rotation concerns)
PRINTED PARTS NEEDED:
Print two of the antique pulley frames in matte PETG.
Print one antique handle in matte PETG.
Print one antique pulley spacer in matte PETG, this holds the two pulley frames spaced at the correct distance for the pulley, also provides an attachment point for the upper eye bolt.
Print two antique pulley washers in matte PETG. These are installed on each side of the pulley to provide clearance between the pulley and frames.
Print one antique pulley. (If printed in wood PLA, stain to desired color after printing).
Print one antique pulley hook. Matte black PETG is recommended for strength.
ASSEMBLY INSTRUCTIONS:
Using the Vintage Pulley Exploded View PDF file.
Push the two 5/16: threaded rods thru the two holes on the end of one of the frames. slide the antique pulley spacer onto the two threaded rods so that the spacer contacts the flat smooth side of the pulley frame. The curved side of the spacer should face inward. Slide the second antique pulley frame onto the threaded rods in opposite rotation. so that the smooth flat side face inward. Install the flat nuts ( or hex nuts) onto all four ends of the threaded rods. Leave slightly loose for final alignment later.
Cut the 2" x 5/16" steel ring with a hacksaw. Spread the ring open where it was cut wide enough until the antique pulley hook will pass through. Also hook one of the eye bolts onto the opened ring. Carefully close the ring up to prevent the hook and eye bolt from falling off. The smaller the gap in the ring the better. Be careful not to make the ring oval by squeezing it too much. Spray paint the eye bolts, all nuts and ring flat black for that old iron look.
With the paint cured and dry, now is the time to install the eye bolt in this end of the pulley assembly. Push the treaded end of the remaining eye bolt into the hole that is located at the center of the antique pulley spacer. Apply a liberal amount of Loctite to the threads of the eye bolt and attach the nut so that the threaded end is flush with the face of the nut. If the nut is screwed onto the eye bolt too far the threaded rod part of the eye bolt will contact the pulley or rope if used
Now slide the Antique Pulley Handle into the slots located on the inboard sides of the two antique pulley frames. Position the pulley assembly on its side for the next step. Push the 3/8-16 threaded rod into the single hole just far enough to start into the handle in the frame slot. Place one of the antique pulley washers onto the side of the antique pulley and position under the where the treaded rods will pass through the handle. Push the threaded rods through the handle and washer until the end of the rod is flush with the opposite side of the antique pulley. Now push the second antique pulley washers into position so that the threaded rod will pass through the washer and then through the opposite side of the handle and frame. Attach the 3/8-16 flat nuts (Or hex nuts) and tighten all nuts snug. Remember that this is plastic and will break if overtightened. Use Loctite on nuts to prevent loosening over time.
The eyebolt with the ring and hook is installed into the end of the antique pulley handle. Push the treaded end of the eye bolt into the hole and attach the 5/16-18 nut. Apply Loctite or double nut as this part will turn in use and could come apart.

/https://fbi.cults3d.com/uploaders/15208610/illustration-file/f92d6110-08e1-4d75-afc0-8e264bf5b711/Antique-Pulley-Hanging-Photo.jpg)


