Skip to content

MyRCCar Mr. Crawley Gearbox / Transmission, SCX10 style

Advertising
Advertising
?
Creation quality: 5.0/5 (1 vote)
Evaluation of members on the printability, utility, level of detail, etc.

  • 1.8k views
  • 7 likes
  • 5 downloads
  • 1 collection

License
3D design format
ZIP Folder details Close
  • MRCC_MrCrawley_Gearbox.zip
    • MRCC_MrCrawley_Gearbox_MotorPlateCover.stl
    • MRCC_MrCrawley_Gearbox_OutGear_Axle_Long.stl
    • MRCC_MrCrawley_Gearbox_OutGear_noHoles.stl
    • MRCC_MrCrawley_Gearbox_OutGear_O-ring.stl
    • MRCC_MrCrawley_Gearbox_OutGear_Ring.stl
    • Alt Output Gear/MRCC_MrCrawley_Gearbox_OutGear_Axle_Short.stl
    • Alt Output Gear/MRCC_MrCrawley_Gearbox_OutGear_withHoles.stl
    • MRCC_MrCrawley_Gearbox_Crown.stl
    • MRCC_MrCrawley_Gearbox_Crown_withHoles.stl
    • MRCC_MrCrawley_Gearbox_CrownAxle.stl
    • MRCC_MrCrawley_Gearbox_CrownAxleThicker.stl
    • MRCC_MrCrawley_Gearbox_IdleGear.stl
    • MRCC_MrCrawley_Gearbox_IdleGear_Axle.stl
    • MRCC_MrCrawley_Gearbox_MainPart1.stl
    • MRCC_MrCrawley_Gearbox_MainPart2.stl
    • MRCC_MrCrawley_Gearbox_MotorPinion32p15T.stl
    • MRCC_MrCrawley_Gearbox_MotorPinion32p15T_ShortHub.stl
    • MRCC_MrCrawley_Gearbox_MotorPlate.stl

Learn more about the formats

Publication date 2023-07-19 at 11:36
Design number 1333129

3D printer file info

3D model description

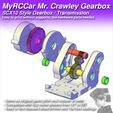
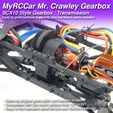
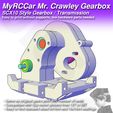
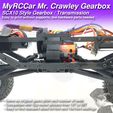
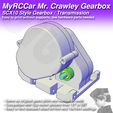
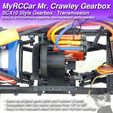
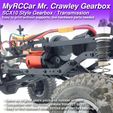
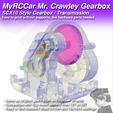
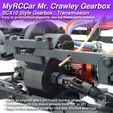
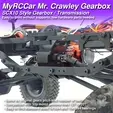
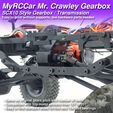
This is a 3D printable (most of it) gearbox for your MrCrawley RC Crawler Chassis, and probably / maybe it will also work in your SCX10 chassis. The pitch and number of teeth for each gear is the same one than in the original gearbox, but there is no compatibility between them, in terms of replacing the gears or the case with the original ones.

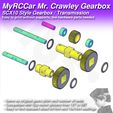
The only "difficult" part is that you will need a 5x47mm metal axle and you will have to "metal-smith" it a little so it is finally useful. That means making some plain surfaces in the extremes of the shaft, so you can fix there the Universal Shafts extremes with their grub. The depth of those planes should be around 13mm on each side.

There is also another version of the output gear in which you fix the metal axle to the gear and its printed axle in the centre of the metal axle, through the gear with some M3 grub screws. That means the teeth of the gear won't be perfect, but you will get a more similar to original gearbox output gear. The length of the 5mm diameter metal part in this case would be 35mm.

The skidplate of MrCrawley is ready for the M2.5 screws that original gearbox uses, so if you want to use this printed version instead, you will need to increase to 3mm the wide of the holes in the skidplate to really be able to use the M3 screws to fix the gearbox to the skidplate.

About the gears, you will find a 32p 56T crown, 48p 20T gear sharing axle with the crown, 48p 28T idle gear and 48p 52T output gear... This should achieve similar reduction to the original gearbox. You should be able to use 32p motor pinions from 12T to 20T; I included the 15T one for you to try.

I have tested it with slow-mo but also full throttling my 2600kv sensored motor, which doesn't result in a great speed, but the gears seem to resist the acceleration. The sound and accuracy of my printed gears could be improved a little, but I consider they are working fine, even printed in PLA as they are.

List of screws and sourced parts needed

SH means Socket Head Screw
BH means Button Head Screw
CS means Counter-Sunk Screw
GS means grub screw

  • CS 4x M3x12mm to attach Gearbox to SkidPlate
  • SH or BH 4x M3x30mm to join Part1 and Part2 with MotorPlate
  • SH or BH 2x M3x8mm to hold Motor in MotorPlate
  • SH or BH 2x M3x20mm to join Gearbox Cover and MotorPlate
  • BH 1x M3x12mm to join Crown to Crown Axle
  • GS 3x M3x6 to fix Output Gear Axle to Metal Shaft and for Motor Pinion
  • 2x Bearings 5x10x4, for Idle Gear
  • 5x Bearings 10x15x4, for Output Gear and Crown Axles

3D printing settings

You will need to print the gears the best you can. That means not using fast speed and accelerations to have the most accurate shape for the gears. I printed them with 0.2mm layer height and I think I had to adjust the wall perimeter thickness to perfectly fit inside the teeth of the smaller gears.

The same way, it is very important where the start/end points of each wall perimeters are. Try to have them in the inner part of the teeth, not in the tip, if you are looking for the best gear performance.

Advertising


Issue with this design? Report a problem.

Would you like to support Cults?

You like Cults and you want to help us continue the adventure independently? Please note that we are a small team of 3 people, therefore it is very simple to support us to maintain the activity and create future developments. Here are 4 solutions accessible to all:

  • ADVERTISING: Disable your banner blocker (AdBlock, …) and click on our banner ads.

  • AFFILIATION: Make your purchases online by clicking on our affiliate links here Amazon.

  • DONATE: If you want, you can make a donation via Ko-Fi πŸ’œ.

  • WORD OF MOUTH: Invite your friends to come, discover the platform and the magnificent 3D files shared by the community!


Sharing and downloading on Cults3D guarantees that designs remain in makers community hands! And not in the hands of the 3D printing or software giants who own the competing platforms and exploit the designs for their own commercial interests.

Cults3D is an independent, self-financed site that is not accountable to any investor or brand. Almost all of the site's revenues are paid back to the platform's makers. The content published on the site serves only the interests of its authors and not those of 3D printer brands who also wish to control the 3D modeling market.
100% secure payment by credit card, PayPal, Apple Pay, Google Pay, etc.
View all payment options.