Skip to content

MyRCCar Mr. Crawley Portal Axles

Advertising
Advertising
?
Creation quality: 5.0/5 (1 vote)
Evaluation of members on the printability, utility, level of detail, etc.

  • 1.4k views
  • 4 likes
  • 3 downloads
  • 1 collection

License
3D design format
ZIP Folder details Close
  • MRCC_MrCrawley_PortalAxles.zip
    • MRCC_MrCrawley_PortalAxle_Front_SteeringHub_Ackermann_RIGHT.stl
    • MRCC_MrCrawley_PortalAxle_Front_SteeringHub_Clearance_RIGHT.stl
    • MRCC_MrCrawley_PortalAxle_Gear1_5mmBushing.stl
    • MRCC_MrCrawley_PortalAxle_Gear1_12T_102015hole.stl
    • MRCC_MrCrawley_PortalAxle_Gear2_13T.stl
    • MRCC_MrCrawley_PortalAxle_HubCover.stl
    • MRCC_MrCrawley_PortalAxle_Rear_Hub_LEFT.stl
    • Hex Collection/MTC_Portals_Hex10mm.stl
    • Hex Collection/MTC_Portals_Hex5mm.stl
    • Hex Collection/MTC_Portals_Hex6mm.stl
    • Hex Collection/MTC_Portals_Hex7mm.stl
    • Hex Collection/MTC_Portals_Hex8mm.stl
    • Hex Collection/MTC_Portals_Hex9mm.stl
    • MRCC_MrCrawley_PortalAxle_Front_HubCarrier_RIGHT.stl

Learn more about the formats

Publication date 2023-07-21 at 13:07
Design number 1336903

3D printer file info

3D model description

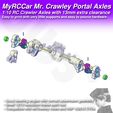
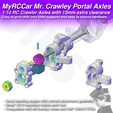
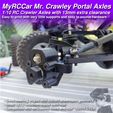
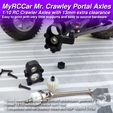
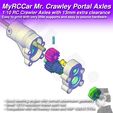
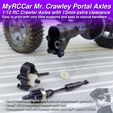
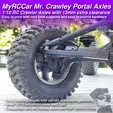
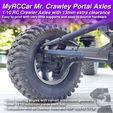
If you are looking for some extra height and clearance for your MrCrawley axles and chassis this Portal Axles will rise them around 13mm. This is the maximum I could reach while having reliable gears and being able to fit the hub inside a typical 52mm rim.

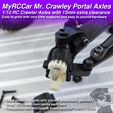
As you can see in the photos, inside of each hub there are 2 gears with a small 12/13 reduction. The "gear1" will fit around your CVDs, ideally HSP 102015 CVDs or compatible (adjustable length ones). You can probably use HSP 122015 too, if some adaptor is needed finally you can ask me to make it.

Remember this publication only includes the parts you will need to replace the standard ones in your Mr Crawley Basic Chassis, so the axles themselves are not included in the publication.

The only "complicated" thing to build this Portal Axles is that you will need 2x9mm round pins to fix each "Gear1" to the CVDs. I simply shortened 1mm my standard 2x10 pins I use for Wheel Hex normally. If you are worried about the pin getting out from the gear, use a Loctite drop to fix it in place, but ensure you don't let too much glue between the teeth to have the best meshing between gear1 and gear2.

The M5 grub screws can be also a little "picky", so if you want, maybe you can screw and cut M5 normal screws into the back of "Gear2" parts. You will need like 5mm inside the gear and other 4mm outside the gear to sit into the 5x10x4 lower bearing.

A set of different "heights" wheel Hex parts is included, from 5mm to 10mm, so you can better control your total axle width and clearance with steering hub.

For the steering axle, there are two different Steering Hubs with different arms... One of them will allow correct Ackermann geometry but will need probably higher Hex to not touch the rim, while the other has "neutral" Ackermann geometry and would allow to use shorter Hex having a shorter total axle width.

All these parts have been dimensioned a little strictly, so if you break some of them frequently, don't hesitate to tell me to see if I can improve or reinforce it in some way. They are not designed for jumps or big hits... The good thing is you can always re-print the broken part in a few minutes :)

If you consider some caster would be a great improvement for the front axle let me know how much degrees you would like and maybe I can fast mod the hub carriers to achieve that caster.

List of screws and sourced parts needed

SH means Shoket Head Screw
BH means Button Head Screw
CS means Counter-Sunk Screw
GS means grub screw

  • CS 16x M3x12-16mm to close Steering Hubs and Rear Hubs with Hub Covers
  • GS 4x M5x8-10 for the inner of the output gears inside hubs
  • SH or BH 4x M4x16mm to fix Wheels to the output gears
  • 4x 2x9mm metal pins for fixing input gears to CVDs
  • 8x 10x15x4 bearings
  • 8x 5x10x4 bearings

3D printing settings

  • You will need to add supports to the steering hubs and to the "gear2" first layers... you should be able to print the rest of the parts without supports.
  • I recommend printing the gears with special care, maybe lower speeds and accels, 0.1mm layer heights and pay special attention to the perimeters start/end points to ensure they are in the inner of the teeth, not the tip.
Advertising


Issue with this design? Report a problem.

Would you like to support Cults?

You like Cults and you want to help us continue the adventure independently? Please note that we are a small team of 3 people, therefore it is very simple to support us to maintain the activity and create future developments. Here are 4 solutions accessible to all:

  • ADVERTISING: Disable your banner blocker (AdBlock, …) and click on our banner ads.

  • AFFILIATION: Make your purchases online by clicking on our affiliate links here Amazon.

  • DONATE: If you want, you can make a donation via Ko-Fi πŸ’œ.

  • WORD OF MOUTH: Invite your friends to come, discover the platform and the magnificent 3D files shared by the community!


Sharing and downloading on Cults3D guarantees that designs remain in makers community hands! And not in the hands of the 3D printing or software giants who own the competing platforms and exploit the designs for their own commercial interests.

Cults3D is an independent, self-financed site that is not accountable to any investor or brand. Almost all of the site's revenues are paid back to the platform's makers. The content published on the site serves only the interests of its authors and not those of 3D printer brands who also wish to control the 3D modeling market.
100% secure payment by credit card, PayPal, Apple Pay, Google Pay, etc.
View all payment options.