Skip to content

A Better Nickel Calibration Test

Advertising
Advertising
?
Creation quality: 0.0/5 (0 votes)
Evaluation of members on the printability, utility, level of detail, etc.

  • 244 views
  • 1 download
  • 1 make

License
3D design format
Folder details Close
  • XYZ_Nickel_Calibration_2.skp
  • XYZ_nickel_Calibration_2.stl
  • XYZ_nickel_Calibration_2_export.gcode
  • XYZ_nickel_Calibration_2_export.txt

Learn more about the formats

Publication date 2023-09-03 at 23:45
?
Published to Thingiverse on: 2011-09-05 at 23:13
Design number 1428157

3D printer file info

3D model description

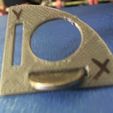
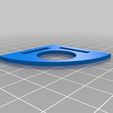
The last nickel calibration test I designed gave no real feedback on how to fix the problem. This one should allow for measurements and corrections.

This one is exactly 21.21 mm wide in both the x and y. The slots are the same lengths (21.21mm) but a little wide (3mm)to disregard the width of the slot until the x and y are perfect.

Please like and upload photos of your made thing! I love to see this still working for everyone so many years later!

Check out my interwebs!
https://www.youtube.com/geodroidjohn
Twitter- @mrjohnecker

Buy some 3D Printers-
Gearbest- https://www.gearbest.com/3d-printers-3d-printer-kits-c_11399/?lkid=13099383

3D printing settings

Disclaimer!
"This is based on my limited knowledge of using, building a 3D printer (Prusa Mendel) and all the things I've learned up to this point (I started in March of 2011).

It has been pointed out to me that this may not be the end-all-be-all of calibration tests.

This test assumes that you have a working knowledge of calibrating your firmware steps per mm and are comfortable doing so. It also assumes that your extruder has been precisely calibrated.

Please use at your own discretion. It works for me."

Step 1- Print using zero extra shells, no scaling, or widen.

Step 2- Attempt to place a nickel in the circle once the print is done. If it does not sit perfectly in the circle with no extra space on the sides then move to step 3.

Step 3- Mark the two slots as needed to remember which is X and Y.

Step 4- Remove piece from bed.

Step 5- Measure the insides of each slot. Also, attempt to slide the nickel through. If the coin can not pass you will be increasing the steps per mm for that axis. Vice versa if coin easily passes through with space to spare.

Step 6- You should have two numbers from measuring the slots. I had 23 on x and 22 on Y.

Step 7- Divide your number by the width of the nickel (21.21mm) For me it was 21.21/23x= 0.9221739130434783 and 21.21/22y=0.9640909090909091

Step 8- Multiply this long number by your current steps per mm in the firmware. Mine was 42.42. So, 0.9221739130434783x*42.42=39.11861739130435

This number will become your NEW steps per mm for that axis. Repeat this step for Y.

Step 9- Upload this to your board and print again. Repeat until the coin barely fits through the slot and fits snugly in to the hole.

Step 10- To calibrate Z, simply use digital calipers to measure the height of the test piece and use the same method to change the steps per mm.

Advertising


Issue with this design? Report a problem.

Would you like to support Cults?

You like Cults and you want to help us continue the adventure independently? Please note that we are a small team of 3 people, therefore it is very simple to support us to maintain the activity and create future developments. Here are 4 solutions accessible to all:

  • ADVERTISING: Disable your banner blocker (AdBlock, …) and click on our banner ads.

  • AFFILIATION: Make your purchases online by clicking on our affiliate links here Amazon.

  • DONATE: If you want, you can make a donation via Ko-Fi πŸ’œ.

  • WORD OF MOUTH: Invite your friends to come, discover the platform and the magnificent 3D files shared by the community!


Sharing and downloading on Cults3D guarantees that designs remain in makers community hands! And not in the hands of the 3D printing or software giants who own the competing platforms and exploit the designs for their own commercial interests.

Cults3D is an independent, self-financed site that is not accountable to any investor or brand. Almost all of the site's revenues are paid back to the platform's makers. The content published on the site serves only the interests of its authors and not those of 3D printer brands who also wish to control the 3D modeling market.

100% secure payment by credit card, PayPal, Apple Pay, Google Pay, etc.
View all payment options.