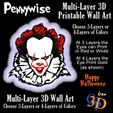
Clowns are creepy. They're just creepy! And that's just the normal ones. Pennywise the Clown from Stephen King's IT is downright terrifying! That's what we love most about him :-)
This Pennywise STL is a wall plaque that's sure to scare the pants off any young trick or treaters that come knocking on your door this Halloween. It's a multi-layer print, meaning you'll need to change filament colors throughout the print to get all that spooky goodness out of it. Or you can always paint the raised edges the appropriate colors.
PENNYWISE WALL ART - 3 STL FILES IN ONE
We've been 3D printing for a while now, so I know just how tricky it can be to print in layers with multiple colors. Printing in 3 layers (3 colors) tends to get the best results, depending on your printer and degree of patience. If it's fine-tuned enough, you can stretch it to 4 layers for even more detail.
With that in mind, we've supplied three separate STL files for this scary clown face. Two of them are 3-layer prints, and the last is a 4-layer print. See their descriptions below and view the images above for reference to see which one you want to print (or just print them all, why not?! LOL)
3 LAYERS W/ RED EYES
The first is a 3-layer print that finishes Pennywise's eyes in red. It's a nice touch for that extra creepy look. You'll want to start the print in Black for the first 1mm. Then switch to White for the next 0.5mm, and finish off in Red for the last 0.5mm.
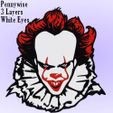
3 LAYERS W/ WHITE EYES
This version is just like the last one, but the eyes print in white during the second layer of color. Again, you'll start the print in Black for the first 1mm, switch to White for the next 0.5mm, and finish off in Red for the last 0.5mm.
4 LAYERS W/ GOLD EYES
This last version is my favorite. You can give Pennywise any color eyes you wish, but if you have it, I feel like Gold Silk PLA works best. Not only is it super creepy and menacing, but Pennywise's eyes really are gold in the movie.
For this 4-layer edition, you'll start the same way. Print Black for the first 1mm, White for the next 0.5mm, Red for another 0.5mm, then Gold for the last 0.5mm.
CHANGING COLORS MID-PRINT
There are two ways to go about this, depending on what your printer is capable of. You can either set up a 'Pause at Height' in Cura or, if your printer doesn't take well to the Pause extension, tell your printer to BEEP! at the precise moment the filament needs to be changed. That second one works on any printer with a built-in speaker.
Use the following links for a quick tutorial on both options.
- How to set up Pause at Height Filament Change in Cura
- How to Make Your 3D Printer BEEP for Color Changes
TIP: Be sure to Preview the print in your slicer to make sure the layer changes are occurring at the right time. Adjust them if needed. Make sure each color gets at least 3 layers worth of printing (no more than 0.16 layer height).
DIMENSIONS
We built this for printers with a bed size of 256x256. You can easily scale it down for a smaller printer (or up for bigger!), but only go as small as you need to preserve as much detail as possible. If you scale it down, do not lower the Z Scale. It needs all that depth for strength and vivid coloring.
At 100% scale, the Pennywise Halloween wall decor measures:
X = 22.6cm / 8.9in
Y = 23.9cm / 9.4in
Z = 0.2cm / 0.08in
If you like this spooky horror fanart, be sure to Follow GetPrinted3D on Cults3D and check back soon. This is just the latest in an ongoing series of GP3D Classic Horror Movie Wallart
IMPORTANT: Unless otherwise noted, ALL GetPrinted3D designs are Copyright protected. When you purchase a file, you do NOT have the right to sell the file or printed model. Files may not be redistributed under any circumstances. The models are for personal and private use, and may not be sold commercially without the explicit written consent of GetPrinted3D.
You can obtain a Commercial Resell License to print and legally sell our designs here:
- Patreon.com/GetPrinted3D

/https://fbi.cults3d.com/uploaders/26463760/illustration-file/eed64bb4-3fa2-4667-8ffa-b5d1fa4cbd07/Pennywise-Multi-Layer-IMG.jpg)
