Skip to content

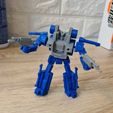
Fortress Maximus Gasket+Grommet = Cog

Advertising
Advertising
?
Creation quality: 5.0/5 (1 vote)
Evaluation of members on the printability, utility, level of detail, etc.

  • 1.3k views
  • 7 likes
  • 7 downloads

License
3D design format
ZIP Folder details Close
  • Cog G1 STL Version 2 G1.zip
    • Cog G1 ArmsLower Blue.stl
    • Cog G1 ArmsUpper Blue.stl
    • Cog G1 Body+Head Grey.stl
    • Cog G1 Feet+Leg Blue.stl
    • Cog G1 Guns Grey.stl
    • Cog G1 Leg Guns Blue.stl
    • Cog G1 Waist+tighs Blue.stl
    • Cog G1 Wheels Blue.stl
  • Cog STL Version 1 Legendsscale.zip
    • Cog ArmsLower Blue.stl
    • Cog ArmsUpper Blue.stl
    • Cog Body+Head Grey.stl
    • Cog Feet+Leg Blue.stl
    • Cog Guns Grey.stl
    • Cog Leg Guns Blue.stl
    • Cog Waist+tighs Blue.stl
    • Cog Wheels Blue.stl

Learn more about the formats

Publication date 2023-09-08 at 18:01
Design number 1437939

3D printer file info

3D model description

I am a beginner and this is my sixth and my second transformable 3D model design.

Fortress Maximus's Cog in legends scale based on G1 but with better articulations and (parts) transformable like the G1. I have a KO Fortress Maximus (18cm) and this scales great with it. Now i can arrange a dual fight with Scorponok and my first design Fasttrack :)

I made 2 versions.
Version 1 is 10-11cm with pegs 3mm
Version 2 is G1 height 14.5cm with pegs 5mm

Its articulated
Head: Rotation only for transformation
Arms: shoulder and elbow
Body: hip rotation
Legs: Thighs joint + rotation, Knee rotation, Ankels articulated
The guns on the arms and legs can swivle.

Some extra information for assemble, PLEASE READ!.
-Joints are made with filament 1.75mm
-Pegs are 3mm for legendscale version 1
-pegs are 5mm for g1 version 2
-All joints are tight fit. Mostly no adjustment. But you do need a cutter/sandpaper/stick to adjust if needed.
-I printed pre-drill holes in the model where filament is needed. Drill this with: 1.7mm or 1.8mm drill for tight joint
For the pegs 3mm u could adjust with a drill 3mm.
-I made 2 peg holes in inside of the leg for transformation in alt mode. Put a piece filament on 1 side. it wil hold the two legs together in altmode.

Tools:
Drill 1.7-1.8-2.0-3.0mm (recommended 1.0-1.5mm to pre drill to actual needed size)
Cutter
Sand paper/stick for tolerance adjustment
Filament 1.75mm
Lighter (to make rivets with filament for wheels)

If any question? please ask.
Please comment or let me know how you like it.

3D printing settings

Slicer: Cura
Filament: PETG / PLA/ PLA+ 1.75mm
Printer: Easythreed 100x100x100
Height 0.15mm
Print orientation: accordingly my best, please try otherwise

Advertising


Issue with this design? Report a problem.

Would you like to support Cults?

You like Cults and you want to help us continue the adventure independently? Please note that we are a small team of 3 people, therefore it is very simple to support us to maintain the activity and create future developments. Here are 4 solutions accessible to all:

  • ADVERTISING: Disable your banner blocker (AdBlock, …) and click on our banner ads.

  • AFFILIATION: Make your purchases online by clicking on our affiliate links here Amazon.

  • DONATE: If you want, you can make a donation via Ko-Fi πŸ’œ.

  • WORD OF MOUTH: Invite your friends to come, discover the platform and the magnificent 3D files shared by the community!


Sharing and downloading on Cults3D guarantees that designs remain in makers community hands! And not in the hands of the 3D printing or software giants who own the competing platforms and exploit the designs for their own commercial interests.

Cults3D is an independent, self-financed site that is not accountable to any investor or brand. Almost all of the site's revenues are paid back to the platform's makers. The content published on the site serves only the interests of its authors and not those of 3D printer brands who also wish to control the 3D modeling market.

100% secure payment by credit card, PayPal, Apple Pay, Google Pay, etc.
View all payment options.