Skip to content

Improved Binder Clip Spring Scale

Advertising
Advertising
?
Creation quality: 5.0/5 (1 vote)
Evaluation of members on the printability, utility, level of detail, etc.

  • 1.5k views
  • 9 likes
  • 3 collections

License
3D design format
ZIP Folder details Close
  • Improved_Binder_Clip_Scale.zip
    • EndLink2.STL
    • GaugeRod2.STL
    • Improved ClipScale Guide.pdf
    • MiddleLink2.STL

Learn more about the formats

Publication date 2023-09-11 at 06:36
Design number 1442757

3D printer file info

3D model description

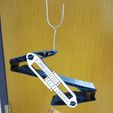
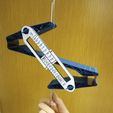
My last design for a binder clip spring scale left a lot to be desired. The improved design is more suitable for home use than outdoor/shop use, and the improvements focus on a few areas:
ā€¢ The minimum measurable weight is lower. By putting the clips in parallel instead of series, the mass being measured has more mechanical advantage to bend the clips. Instead of a minimum weight of 6 lb., this scale can measure a weight as low as 25 oz (1.6 lb.).
ā€¢ This design change also gives more displacement for the same weight, improving sensitivity. Tick marks can be placed every 2.5 oz instead of every pound. As before though, the units are customizable.
ā€¢ The gauge mechanism has been simplified, which will also allow two scalesā€”for instance, metric and SAE.
ā€¢ This new design uses five printed parts instead of ten.
ā€¢ The links have been more aggressively skeletonized, bringing the total filament demand from 181 g for the previous design down to 110 g.
ā€¢ No additional hardware is needed besides the two binder clips and some paper and glue. The previous design needed four bearings, two bolts/nuts, and a few pieces of wire.
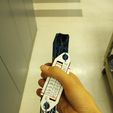
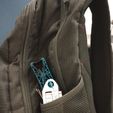
ā€¢ The design is more compact in one direction, allowing the handles to fold against the central link. It easily fits into a pocket.

Most importantly, this design takes advantage of vase mode to speed up the prints and reduce seams. Vase mode relies on the part having one (and only one) contourā€¦but that contour can be fairly long and complicated. So, by strategic placement of thin cuts, I tricked the slicer into treating the entire part as perimeter. Ben Eadieā€™s video provided the initial idea of adding cuts to ā€˜forceā€™ the model perimeter to protrude into what would have been infill volume. I just took that a step further and cut through 2-line-thick truss members to join all of them into a single perimeter. The cuts are thin enough to allow the melted plastic to still join itselfā€”but my slicer doesnā€™t know that. Using this technique, I made all three pieces of this design to be printed in vase mode.

3D printing settings

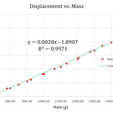
Overall dimensions are about the same as the last version, 8.5ā€ x 2ā€ x 2ā€. Maximum measurable weight is 55 oz (for the clips I used). The only materials needed are 110g of filament, a bit of paper and glue, and two 2ā€ binder clips. I got the clips I used here (Itā€™s not an affiliate link. Just the most economical source of binder clips I could find when I bought them). I calibrated with around 20 weights, but you donā€™t really need that many.

Full instructions are in the guide document. There's also an assembly video.
https://youtu.be/ekHDj3zxUVY

Advertising


Issue with this design? Report a problem.

Would you like to support Cults?

You like Cults and you want to help us continue the adventure independently? Please note that we are a small team of 3 people, therefore it is very simple to support us to maintain the activity and create future developments. Here are 4 solutions accessible to all:

  • ADVERTISING: Disable your banner blocker (AdBlock, ā€¦) and click on our banner ads.

  • AFFILIATION: Make your purchases online by clicking on our affiliate links here Amazon.

  • DONATE: If you want, you can make a donation via Ko-Fi šŸ’œ.

  • WORD OF MOUTH: Invite your friends to come, discover the platform and the magnificent 3D files shared by the community!


Sharing and downloading on Cults3D guarantees that designs remain in makers community hands! And not in the hands of the 3D printing or software giants who own the competing platforms and exploit the designs for their own commercial interests.

Cults3D is an independent, self-financed site that is not accountable to any investor or brand. Almost all of the site's revenues are paid back to the platform's makers. The content published on the site serves only the interests of its authors and not those of 3D printer brands who also wish to control the 3D modeling market.

100% secure payment by credit card, PayPal, Apple Pay, Google Pay, etc.
View all payment options.